
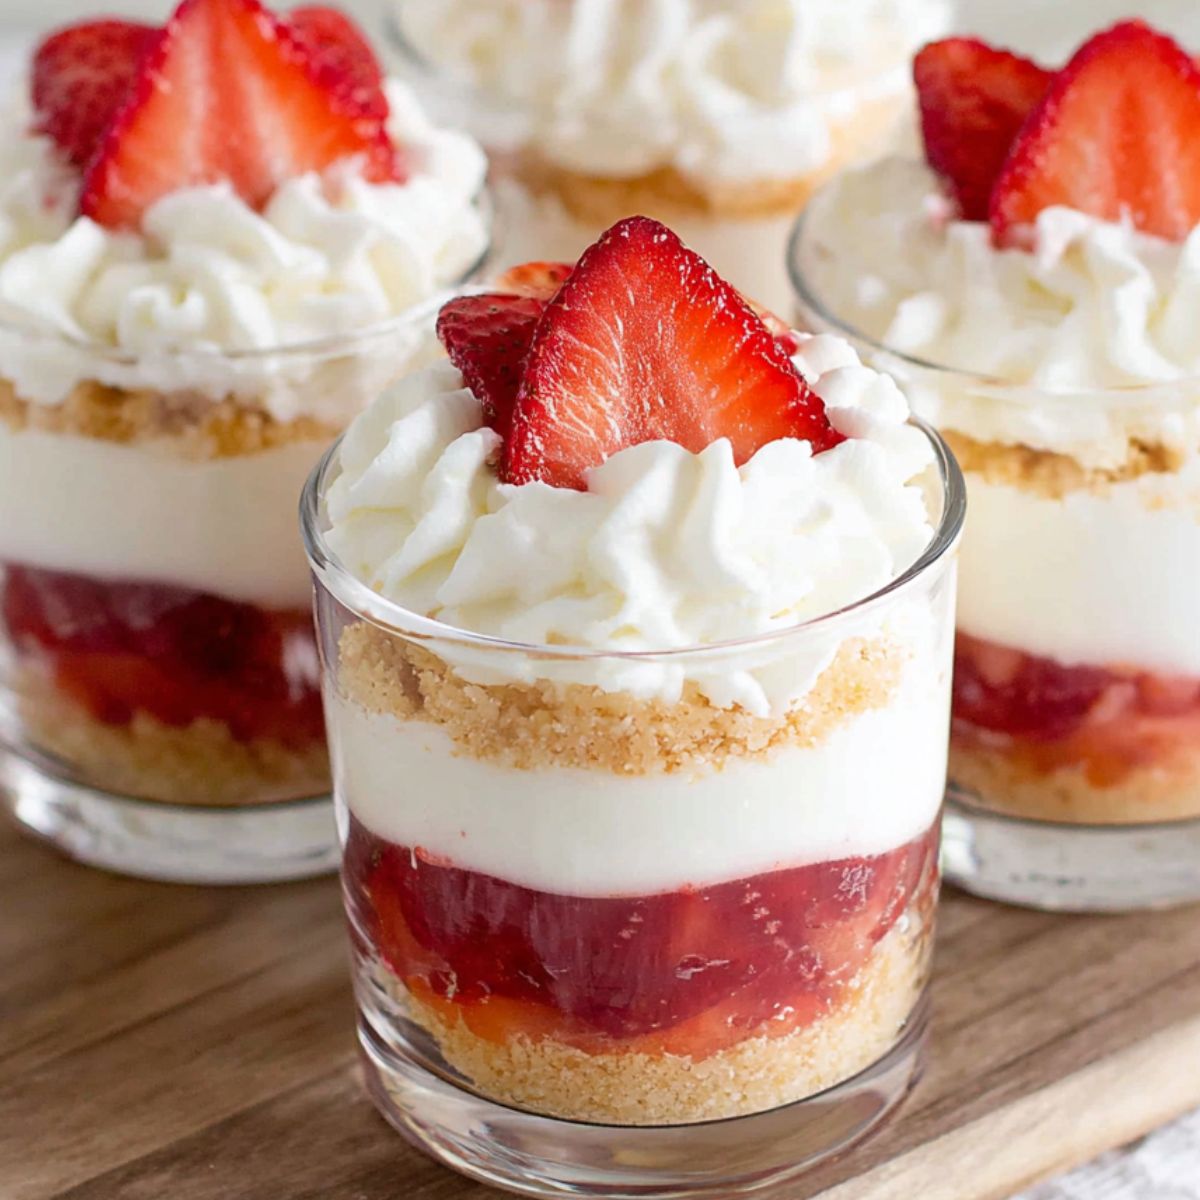
Looking for a dessert that’s impressive yet effortless? These strawberry cheesecake cups are the answer. This no-bake treat layers a buttery graham cracker crust, silky cream cheese filling, and juicy strawberries into elegant single servings; no oven required.
They’re easy to make, even for beginners, and can be prepped ahead for parties or last-minute cravings. With just a few layers and minutes of work, you’ll have a stunning dessert everyone will love.
Why These Strawberry Cheesecake Cups Are a Game-Changer
Imagine a dessert that needs no baking, uses simple ingredients, and looks like it came from a pastry shop. That’s exactly what these strawberry cheesecake cups deliver. Unlike traditional cheesecake, there’s no oven, no fuss; just quick assembly and chill time. Perfect for warm days (or when you simply can’t be bothered to bake).
Their versatility is the real secret. They work just as well at a backyard BBQ as they do at a bridal shower. Clear cups show off the gorgeous layers, and individual servings make them easy to serve. Loved by both kids and adults, they bring restaurant-level flavor with home-kitchen ease.
Jump to:
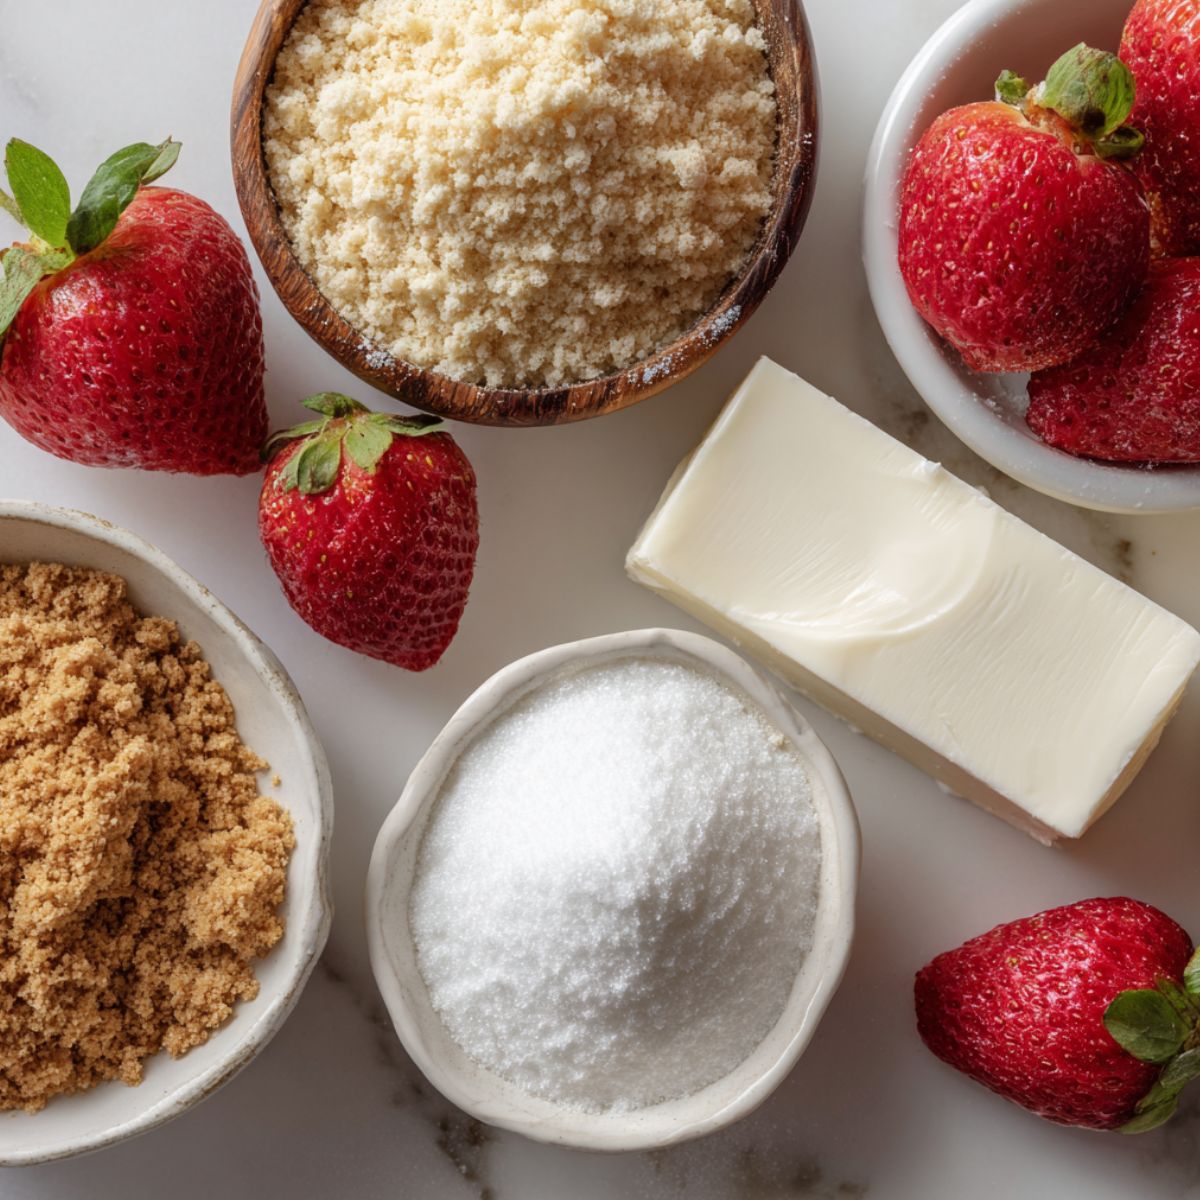
Ingredients
For the Graham Cracker Crust:
- Graham cracker crumbs
- Granulated sugar
- Melted butter
For the Cream Cheese Filling:
- Cream cheese, softened
- Powdered sugar
- Vanilla extract
- Heavy whipping cream, cold
For the Strawberry Layer:
- Fresh strawberries, diced
- Sugar (optional)
- Lemon juice
For Topping:
- Whipped cream
- Whole or sliced strawberries
- Graham cracker crumbs (optional)
See recipe card for quantities.
Instructions
Step 1: Creating the Perfect Graham Cracker Base
- Mix the graham cracker crumbs, sugar, and melted butter in a medium bowl until the mixture resembles wet sand.
- Grab your clear dessert cups or mason jars and add 2-3 tablespoons of the crumb mixture to each one.
- Press down firmly with the back of a spoon or a small glass to create a compact, even layer.
- Pop the cups in the fridge while you prepare the filling; this helps the crust set up nicely.
Pro tip: Make sure your butter is melted but not hot, or it might make the crust too soft. Room temperature butter works perfectly.
Step 2: Whipping Up the Creamy Filling
- Beat the softened cream cheese in a large bowl with an electric mixer until it's completely smooth and fluffy (about 2 minutes).
- Add the powdered sugar and vanilla extract, then beat for another minute until well combined.
- In a separate bowl, whip the cold heavy cream until stiff peaks form; this usually takes 3-4 minutes on high speed.
- Gently fold the whipped cream into the cream cheese mixture using a spatula, being careful not to deflate all those beautiful air bubbles.
Pro tip: Make sure your cream cheese is truly soft before beating; cold cream cheese will create lumps that are impossible to smooth out later.
Step 3: Assembling Your Dessert Cups
- Remove your cups from the fridge and spoon a generous layer of the cream cheese filling over the graham cracker crust (about ¼ cup per cup).
- Add a layer of diced strawberries on top of the filling (about 2-3 tablespoons).
- Add another layer of cream cheese filling, smoothing the top with the back of your spoon.
- Finish with a final layer of strawberries, arranging them prettily on top.
Pro tip: For Instagram-worthy presentation, use a piping bag with a star tip to add the cream cheese layers; it creates those professional-looking swirls.
Step 4: The Chill Time
- Cover each cup with plastic wrap or a lid if your containers have them.
- Refrigerate for at least 2 hours, though overnight is even better; this allows all the flavors to meld together.
- Just before serving, add a dollop of whipped cream and garnish with a fresh strawberry slice.
- If desired, sprinkle a few graham cracker crumbs on top for extra crunch and visual appeal.
Expert Cooking Tips
Cream Cheese
- Bring to room temp before mixing to avoid lumps.
- Microwave briefly to soften if needed.
- Beat cream cheese alone first for a smooth base.
Whipped Cream
- Use cold cream and chilled tools.
- Stop whipping at stiff peaks—no butter surprises!
Strawberries
- Dice evenly for clean layers.
- Toss with sugar and lemon juice to boost flavor.
- Pat dry to keep the filling firm.
- Save the best berries for garnish.
Assembly
- Use clear cups for pretty layers.
- Portion with a cookie scoop for consistency.
- Leave space for topping.
- Wipe cup edges for a clean, pro finish.
Recipe Variations & Substitutions
One of the best things about this recipe is how easily you can customize it to match your taste preferences or dietary needs.
Flavor Variations:
- Chocolate Strawberry Cheesecake Cups: Add ¼ cup cocoa powder to your cream cheese mixture and use chocolate graham crackers for the crust. The chocolate-strawberry combo is absolutely divine.
- Mixed Berry Cheesecake Cups: Swap strawberries for a mix of blueberries, raspberries, and blackberries. Each bite becomes a berry explosion.
- Lemon Strawberry Cheesecake Cups: Add 2 tablespoons of fresh lemon juice and 1 teaspoon of lemon zest to your filling for a bright, citrusy twist.
Dietary Modifications:
- Low-Sugar Version: Replace powdered sugar with your favorite sugar substitute like Swerve or monk fruit sweetener
- Dairy-Free Option: Use dairy-free cream cheese and coconut whipping cream; the texture stays surprisingly close to the original
- Gluten-Free: Substitute gluten-free graham crackers or use crushed gluten-free cookies for the crust
- Lighter Version: Use reduced-fat cream cheese and replace half the whipping cream with Greek yogurt; you'll cut calories without sacrificing too much creaminess
Crust Alternatives:
- Oreo cookie crumbs for a cookies-and-cream vibe
- Crushed vanilla wafers for a subtler, sweeter base
- Gingersnap crumbs for a spicy kick
- Crushed pretzels for a sweet-salty combination
Equipment Recommendations
Having the right tools makes assembling these no-bake strawberry cheesecake cups so much easier and faster.
- Clear dessert cups or small mason jars (8-10 oz size); clear containers show off those gorgeous layers and make your desserts look professionally made
- Electric hand mixer or stand mixer; essential for getting that smooth, lump-free cream cheese filling
- Rubber spatula; perfect for folding whipped cream into the filling without deflating it
- Medium mixing bowls (at least 2); one for the crust and one for the filling
- Measuring cups and spoons; accuracy matters in getting the right texture
- Food processor (optional); makes crushing graham crackers incredibly quick and uniform
- Piping bag with star tip (optional); elevates your presentation from homemade to bakery-level
Budget-Friendly Alternatives:
- Use disposable plastic cups if you don't have fancy dessert glasses
- A fork and some elbow grease can crush graham crackers if you don't have a food processor
- A whisk and strong arms can replace an electric mixer, though it'll take longer
Storage & Meal Prep Tips
Refrigerator
- Store covered in the fridge for up to 3 days.
- Filling stays creamy; crust may soften slightly.
- Add strawberries and whipped cream just before serving.
- Use airtight containers or wrap well to prevent odors.
Freezer
- Freeze for up to 1 month (without topping).
- Wrap tightly and place in a freezer-safe container.
- Thaw overnight in the fridge.
- Add whipped cream and strawberries after thawing.
Meal Prep
- Prepare crust and filling up to 2 days ahead.
- Store crust at room temp; filling in the fridge.
- Stir filling before assembling.
- Assemble the morning of your event for best freshness.
The Secret to Cloud-Like Creaminess
Want to know what separates average strawberry cheesecake cups from absolutely unforgettable ones? It all comes down to the folding technique. When you combine your whipped cream with the cream cheese mixture, use a gentle folding motion instead of stirring or beating. Start by adding about one-third of the whipped cream to lighten the mixture, then fold in the rest. This preserves those tiny air bubbles that give your filling that signature mousse-like texture.
Here's another secret: let your strawberry cheesecake cups sit in the fridge overnight if possible. This resting time allows the graham cracker crust to soften just slightly, creating a more cohesive bite, while the filling firms up to the perfect consistency. The flavors also meld together beautifully, and somehow the strawberries taste even more vibrant. Sure, you can serve these strawberry cheesecake cups after two hours, but patience really does pay off with this dessert.
FAQ
What is the strawberry cheesecake drink at Sonic?
Sonic's version is a milkshake with ice cream, cheesecake pieces, and strawberry topping. Our strawberry cheesecake cups are a layered no-bake dessert with fresh strawberries and real cream cheese.
What are the ingredients in Jello strawberry cheesecake Cups?
Jello's cups contain cheesecake pudding, strawberry topping, and graham crumbs. Our strawberry cheesecake cups use real cream cheese, fresh strawberries, and actual graham crackers for authentic flavor.
Is it better to bake or not bake a cheesecake?
Both work well! No-bake strawberry cheesecake cups are lighter, easier, and need no oven. They're perfect for quick prep and individual servings.
What's the secret to a creamy no bake filling?
Use room-temperature cream cheese and fold in whipped heavy cream gently. This keeps your strawberry cheesecake cups filling light, airy, and perfectly stable.
Your New Favorite Go-To Dessert
These strawberry cheesecake cups prove that impressive desserts don't need to be complicated. With just a few simple ingredients and no oven required, you've got a stunning sweet treat that works for any occasion. The combination of that buttery graham cracker crust, silky cream cheese filling, and fresh strawberries creates the perfect balance of textures and flavors that keeps everyone coming back for seconds.
The beauty of strawberry cheesecake cups is their versatility; make them for a fancy dinner party, a casual weekend treat, or even pack them for a picnic dessert. Once you master this basic recipe, you'll find yourself making strawberry cheesecake cups over and over again, experimenting with different berries, crusts, and toppings. If you loved these, try our No-Bake Oreo Cheesecake Cups for a cookies-and-cream twist, or check out our Cheesecake Cupcakes Recipe for a baked version with similar flavors. Either way, you're in for a delicious treat that'll make you look like a dessert genius!
Sweet, simple, and seriously delicious; that's how we do cheesecake! 🍓 - Viola
Related
Looking for other recipes like this? Try these:


Pairing
These are my favorite dishes to serve with this Strawberry Cheesecake Cups Recipe:

No-Bake Strawberry Cheesecake Cups
Equipment
- 1 Electric mixer or hand mixer
- Mixing bowls
- 1 Rubber spatula
- Measuring Cups & Spoons
- 1 Clear dessert cups or mason jars
- 1 Spoon or cookie scoop
- 1 Piping bag (optional)
Ingredients
Graham Cracker Crust
- 1 ½ cups Graham cracker crumbs About 10–12 crackers
- 3 tablespoon Granulated sugar
- 5 tablespoon Butter, melted Unsalted
Cream Cheese Filling
- 16 oz Cream cheese, softened 2 packages
- ¾ cup Powdered sugar
- 1 teaspoon Vanilla extract
- 1 cup Heavy whipping cream Cold
Strawberry Layer
- 2 cups Strawberries, diced Fresh and ripe
- 2 tablespoon Granulated sugar Optional
- 1 teaspoon Lemon juice Prevents browning
Topping
- Whipped cream For garnish
- Strawberries, sliced For garnish
- Graham cracker crumbs Optional crunch
Instructions
- Mix crust ingredients, press into cups
- Beat cream cheese, sugar, vanilla
- Whip cream, fold into filling
- Layer crust, filling, strawberries
- Chill for 2 hours
- Add whipped cream and garnish
Leave a Reply