
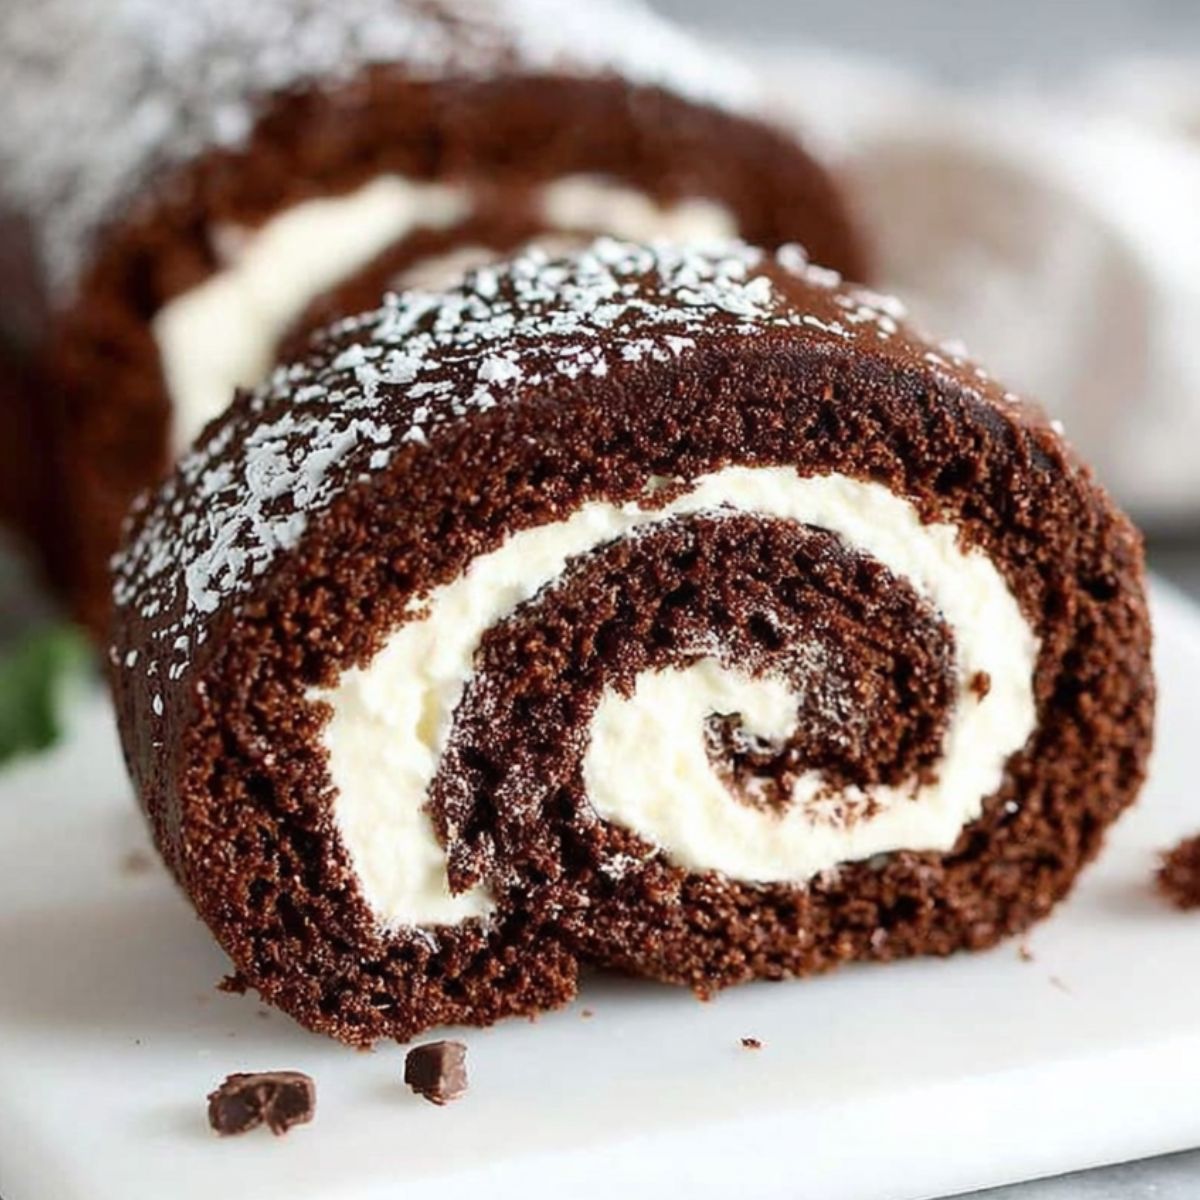
If you've been craving a show-stopping dessert that looks impressive but won't keep you in the kitchen all day, this chocolate swiss roll cake is exactly what you need. This classic dessert roll combines a tender cocoa sponge with a luscious whipped cream filling, creating the perfect balance of light and indulgent. Whether you're planning a birthday party or just want to treat yourself, this chocolate swiss roll cake delivers every single time.
What makes this chocolate swiss roll cake so special is how simple it actually is to make once you know the tricks. The sponge bakes in just 12 minutes, and rolling it while warm prevents cracks. Once you nail this chocolate swiss roll cake recipe, you'll be making it on repeat for every gathering.
Why This Chocolate Swiss Roll Cake Wins Every Time
This chocolate swiss roll cake recipe stands out because it focuses on getting that perfect light and airy texture that makes each bite melt in your mouth. Unlike dense chocolate cakes that sit heavy in your stomach, the cocoa sponge base stays fluffy and tender. The secret is in how we whip the eggs and fold in the cocoa powder; these techniques create air pockets that give you that signature soft texture.
The beauty of this chocolate swiss roll cake is its versatility too. You can fill it with classic whipped cream, rich chocolate ganache, or even a tangy cream cheese frosting. It pairs wonderfully with fresh berries, a dusting of confectioners' sugar, or a drizzle of chocolate sauce. This dessert roll works perfectly for holidays, birthdays, or casual weekend baking. Once you master the basic chocolate swiss roll cake technique, you'll find yourself experimenting with different fillings and flavors throughout the year.
Jump to:
Ingredients
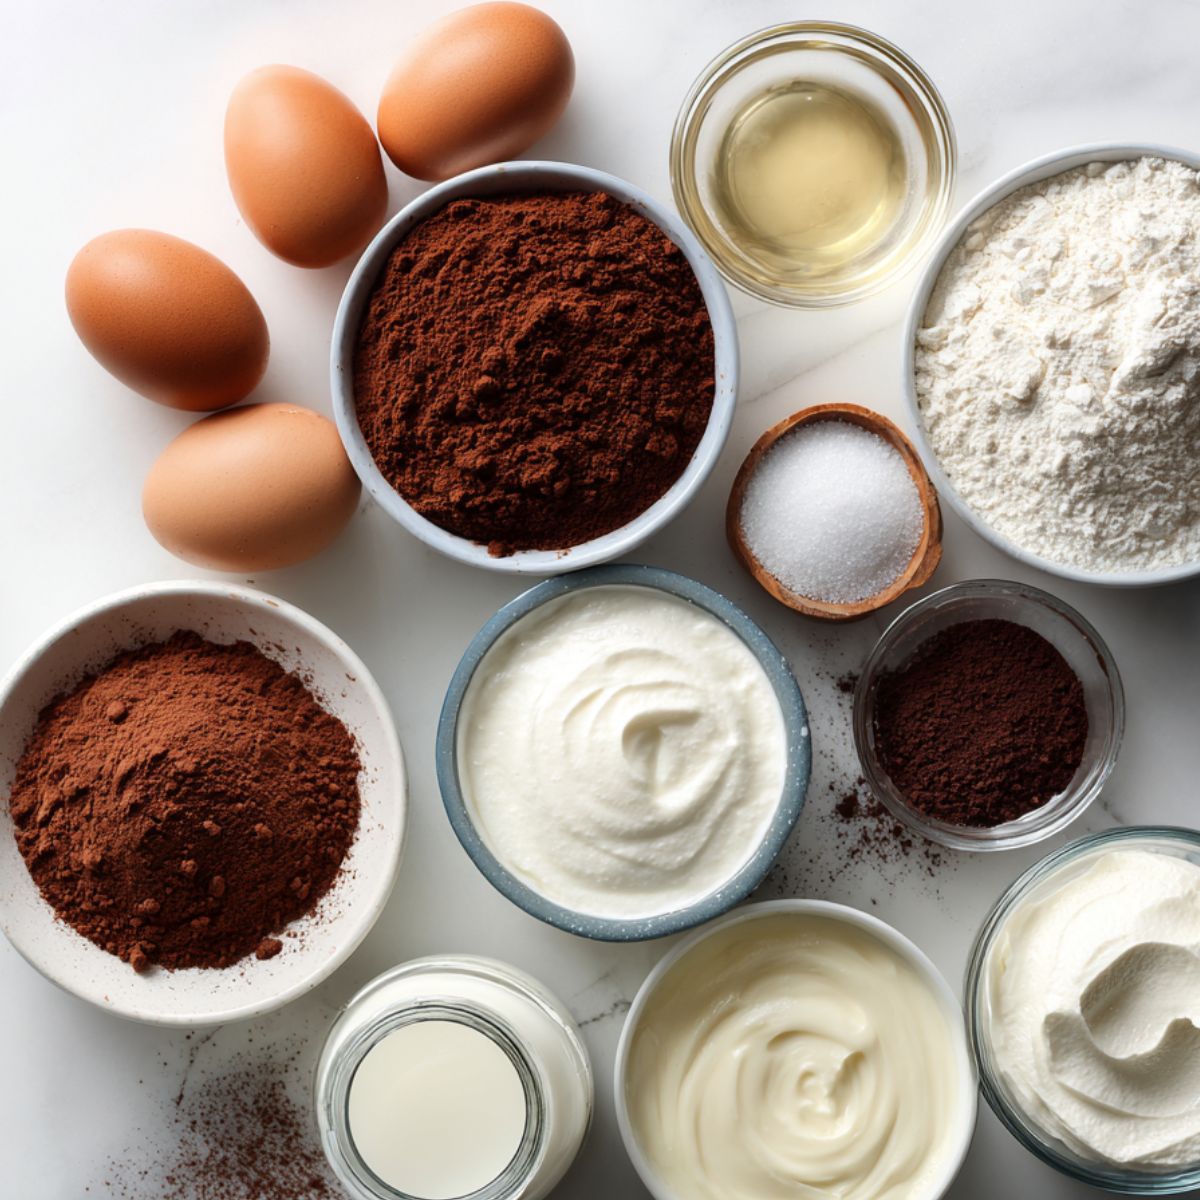
For the Cocoa Sponge Cake
- Eggs
- Granulated sugar
- Unsweetened cocoa powder
- All-purpose flour
- Baking powder
- Salt
- Vanilla extract
- Whole milk
For the Whipped Cream Filling
- Heavy whipping cream
- Powdered sugar
- Vanilla extract
Substitutions
- Coconut cream (dairy-free option)
- Gluten-free baking blend (gluten-free option)
- Mascarpone mixed with whipped cream (lighter filling option)
See recipe card for quantities.
Instructions
Step 1: Prepare Your Cake Roll Pan
- Preheat your oven to 350°F (175°C).
- Line a 10x15 inch jelly roll pan with parchment paper, making sure it goes up the sides.
- Lightly grease the parchment paper with butter or cooking spray.
- Set aside while you prepare the batter.
Pro Tip: The parchment paper must extend beyond the pan edges so you can easily lift out the baked sponge later.
Step 2: Make the Chocolate Sponge Batter
- In a large mixing bowl, beat the eggs with an electric mixer on high speed for about 3 minutes until they're thick and pale yellow.
- Gradually add the granulated sugar while continuing to beat for another 2 minutes until the mixture is fluffy.
- Sift together the cocoa powder, flour, baking powder, and salt in a separate bowl.
- Gently fold the dry ingredients into the egg mixture in three additions, being careful not to deflate the batter.
- Mix in the vanilla extract and milk until just combined.
- Pour the batter into your prepared pan and spread it evenly to all corners.
Expert Advice: Don't overmix when folding in the flour; stop as soon as you don't see any more dry streaks to keep that airy texture.
Step 3: Bake and Roll
- Bake for 10-12 minutes until the cake springs back when lightly touched.
- While it bakes, lay out a clean kitchen towel and dust it generously with confectioners' sugar.
- As soon as the cake comes out of the oven, immediately flip it onto the prepared towel.
- Carefully peel off the parchment paper from the bottom.
- Starting from the short end, roll the cake up with the towel inside while it's still warm.
- Let it cool completely in this rolled position for at least 1 hour.
Critical Step: Rolling while warm trains the chocolate swiss roll cake to hold its shape without cracking later.
Step 4: Prepare Filling and Assemble
- In a chilled bowl, beat the heavy cream, powdered sugar, and vanilla extract until stiff peaks form (about 3-4 minutes).
- Carefully unroll the cooled cake (it's okay if it wants to curl a bit).
- Spread the whipped cream filling evenly over the entire surface, leaving a 1-inch border around the edges.
- Roll the cake back up (this time without the towel), using the edge of the towel to help guide it.
- Place seam-side down on a serving platter.
- Refrigerate for at least 2 hours before serving to let everything set.
Expert Cooking Tips
Getting the Perfect Texture
The key to a flawless chocolate swiss roll cake is temperature control. Your eggs should be at room temperature before beating; this helps them whip to maximum volume. When folding in dry ingredients, use gentle sweeping motions from the bottom up to preserve air bubbles.
Quick Tips:
- Test your oven temperature with a thermometer; even 25 degrees off can cause cracking
- Don't open the oven door while baking
- Use a light hand when spreading the filling to avoid tearing the sponge
- If your batter seems thick, add an extra tablespoon of milk
Avoiding Common Problems
Cracks in your chocolate swiss roll cake usually happen because the cake dried out or cooled too much before rolling. Always roll it while still warm from the oven. Don't overbake; check at 10 minutes and only continue if the center looks wet.
Making It Look Professional
For that bakery finish, dust your chocolate swiss roll cake with cocoa powder right before serving. Use a sharp serrated knife and wipe the blade between cuts. Add whipped cream rosettes or fresh berries for color.
Recipe Variations & Substitutions
This chocolate swiss roll cake is incredibly adaptable to different tastes and dietary needs. Here are some delicious ways to make it your own.
Different Filling Options
While whipped cream is classic, you can switch things up with chocolate ganache for an ultra-rich dessert roll. Simply heat 1 cup of heavy cream until it simmers, pour it over 8 oz of chopped chocolate, and stir until smooth. Let it cool until spreadable. Cream cheese frosting also works beautifully; beat 8 oz softened cream cheese with ½ cup butter and 2 cups powdered sugar. For a fruity twist, spread a thin layer of raspberry or strawberry jam before adding the whipped cream.
Popular Variations:
- Coffee Chocolate Roll: Add 2 tablespoons instant espresso powder to the batter for a mocha flavor
- Mint Chocolate: Mix ½ teaspoon peppermint extract into your whipped cream filling
- Peanut Butter Swirl: Warm ½ cup peanut butter and swirl it into the cream filling
- Triple Chocolate: Add mini chocolate chips to the whipped cream and dust with cocoa powder
Dietary Modifications
For a gluten-free chocolate swiss roll cake, replace the all-purpose flour with an equal amount of gluten-free flour blend; make sure it contains xanthan gum. If you're making it dairy-free, use full-fat coconut cream that's been chilled overnight, then whip just the solid part with powdered sugar. For a lower-sugar version, you can reduce the sugar in the sponge to ½ cup and use a sugar substitute in the filling, though the texture may be slightly different.
Equipment Recommendations
Having the right tools makes creating this chocolate swiss roll cake so much easier and ensures better results every time.
Essential Equipment:
- 10x15 inch Jelly Roll Pan ; This specific size gives you the perfect cake dimensions for rolling
- Parchment Paper or Baking Paper ; Prevents sticking and makes removal foolproof
- Electric Mixer ; Hand or stand mixer works; you need power to whip eggs properly
- Clean Kitchen Towel ; Used for rolling the warm cake; choose one without heavy texture
- Rubber Spatula ; Perfect for gently folding ingredients without deflating the batter
- Fine-Mesh Sieve ; Sifts cocoa powder and flour to prevent lumps in your chocolate swiss roll cake
- Serrated Knife ; Creates clean slices without squishing the roll
Budget-friendly alternatives include using a large baking sheet if you don't have a jelly roll pan, though you may need to trim the edges. A hand whisk can work instead of an electric mixer, but expect to spend 10-15 minutes whipping by hand.
Storage & Meal Prep Tips
Refrigerator Storage
Store your finished chocolate swiss roll cake wrapped tightly in plastic wrap in the refrigerator for up to 4 days. Before serving, let it sit at room temperature for about 15 minutes to soften slightly. If you've dusted it with powdered sugar, add that garnish right before serving since it will dissolve in the fridge.
Storage Tips:
- Wrap individual slices separately for easy grab-and-go desserts
- Use an airtight container to prevent absorbing refrigerator odors
- Keep away from strong-smelling foods
Freezing Instructions
You can freeze a chocolate swiss roll cake for up to 2 months. Wrap the entire roll tightly in plastic wrap, then again in aluminum foil. The unfilled sponge freezes best. To use, thaw overnight in the refrigerator, then add fresh whipped cream filling. For meal prep, bake the sponge ahead and freeze it rolled in the towel for maximum freshness.
The Rolling Secret You Need to Know
Here's the game-changing tip that separates okay swiss rolls from absolutely perfect ones: the towel roll temperature matters more than you think. Your chocolate swiss roll cake needs to be rolled within 2 minutes of coming out of the oven. The steam and warmth make the sponge pliable, almost like a warm tortilla. If you wait too long, even 5 extra minutes, the surface begins to dry and set, making cracks inevitable.
Another secret is the sugar-dusted towel trick. That layer of confectioners' sugar prevents the warm cake from sticking to the towel while it cools. Use about ¼ cup and spread it evenly; this creates a non-stick surface that releases perfectly when you unroll. These two techniques together are what give bakery-quality results in your home kitchen, making your chocolate swiss roll cake look and taste professional every single time.
FAQ
What filling goes in a Swiss roll?
A chocolate swiss roll cake typically uses whipped cream, buttercream, or chocolate ganache. Whipped cream is most popular because it's light and complements the cocoa sponge perfectly.
What is the difference between Swiss roll and sponge cake?
A chocolate swiss roll cake is made from sponge cake but baked thin in a jelly roll pan and designed to be flexible enough to roll without cracking, unlike regular layered sponge cakes.
What's the secret to a perfectly rolled Swiss roll?
The secret to a perfect chocolate swiss roll cake is rolling it while still warm from the oven, which trains it to hold its curved shape without cracking.
What are common mistakes when making Swiss roll?
Common mistakes with chocolate swiss roll cake include overbaking (causing cracks), not rolling while warm, overmixing the batter, and spreading filling too thick.
Time to Roll Up Something Amazing
Now that you've mastered this chocolate swiss roll cake recipe, it's time to put your skills to the test in the kitchen. This elegant dessert roll proves that impressive doesn't have to mean complicated, and your chocolate swiss roll cake will have everyone asking for seconds.
Try our Vanilla Swiss Roll Cake Recipe for a classic twist, or experiment with our Cinnamon Roll Cake Mix Recipe for an easy breakfast version. Share your chocolate swiss roll cake results in the comments below; we'd love to see how it turned out!
Baking should always feel like a warm hug, not a stressful race!✨; Viola
Related
Looking for other recipes like this? Try these:


Pairing
These are my favorite dishes to serve with this Chocolate Swiss Roll Cake Recipe:


Cocoa Swiss Roll Cake with Whipped Cream Filling
Equipment
- 1 Jelly roll pan
- 1 Parchment paper
- 1 Electric mixer or stand mixer
- Mixing bowls
- 1 Fine-mesh sieve (for flour)
- 1 Offset spatula
- 1 Clean kitchen towel (for rolling)
- 1 Whisk
Ingredients
For the Cocoa Sponge Cake
- 4 large eggs room temperature
- ¾ cup granulated sugar
- ¼ cup unsweetened cocoa powder Dutch-process preferred
- ¾ cup all-purpose flour
- 1 teaspoon baking powder
- ¼ teaspoon salt
- 1 teaspoon vanilla extract
- 3 tablespoons whole milk
For the Whipped Cream Filling
- 2 cups heavy whipping cream cold
- ¼ cup powdered sugar
- 1 teaspoon vanilla extract
Substitutions
- Coconut cream for a dairy-free version
- 1:1 gluten-free flour blend instead of all-purpose flour
- Mascarpone mixed with whipped cream for a lighter filling
Instructions
- Preheat oven to 350°F (175°C) and line a jelly roll pan with parchment paper.
- Beat eggs and sugar until thick and pale.
- Sift cocoa, flour, baking powder, and salt; fold into egg mixture.
- Add vanilla and milk; spread batter evenly into the pan.
- Bake 10–12 minutes until springy.
- Flip onto a sugar-dusted towel; peel parchment and roll while warm.
- Whip cream, sugar, and vanilla to stiff peaks.
- Unroll cooled cake, spread cream evenly, and re-roll.
- Chill at least 2 hours before slicing.


Leave a Reply