
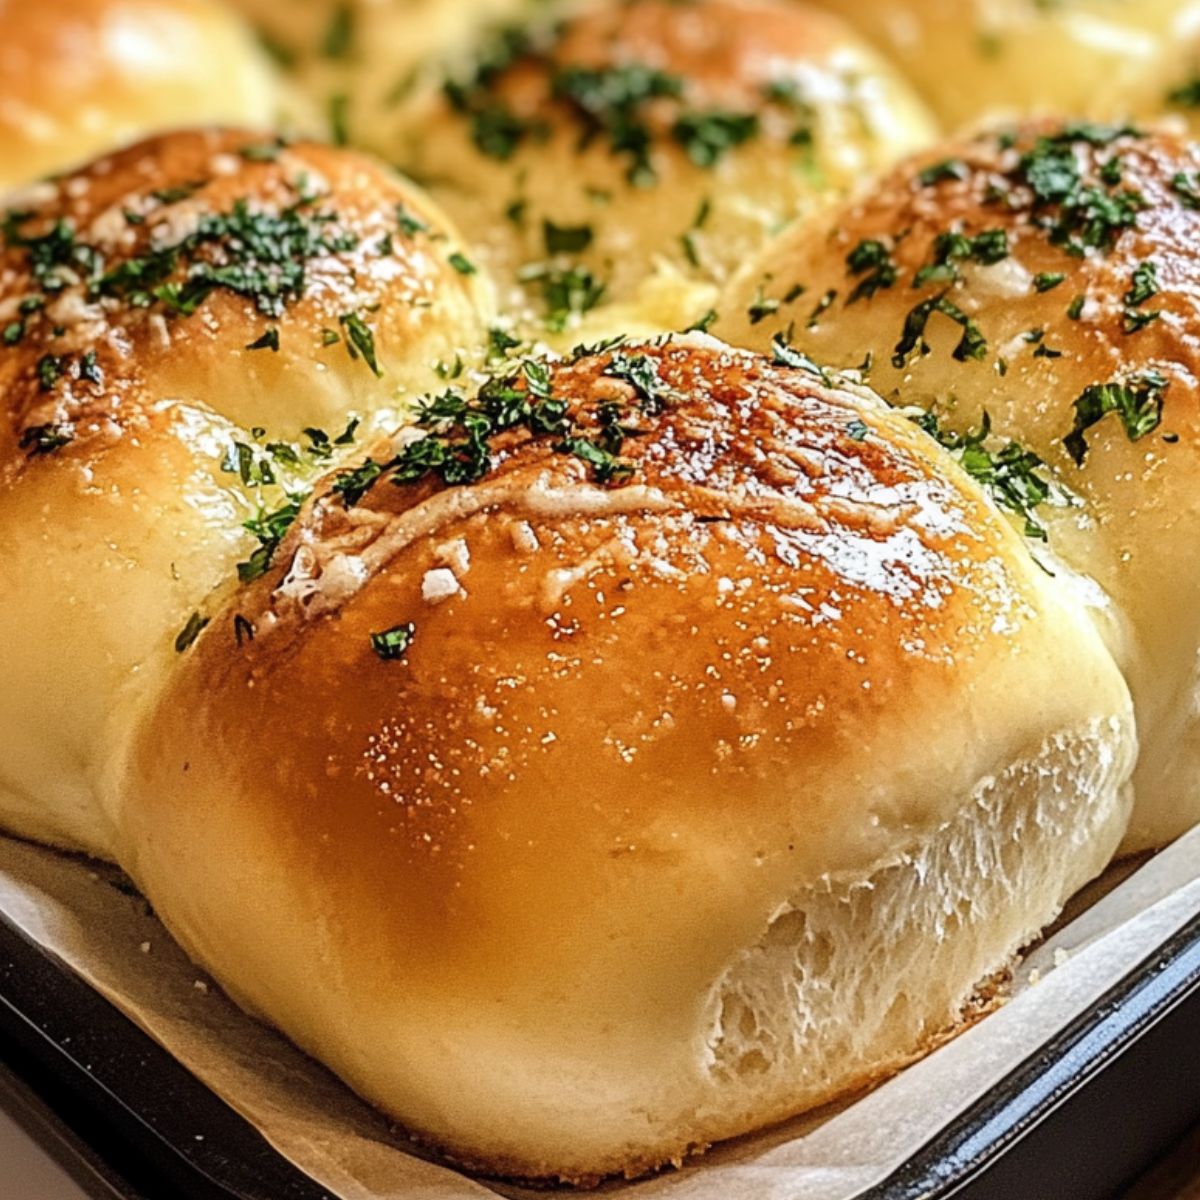
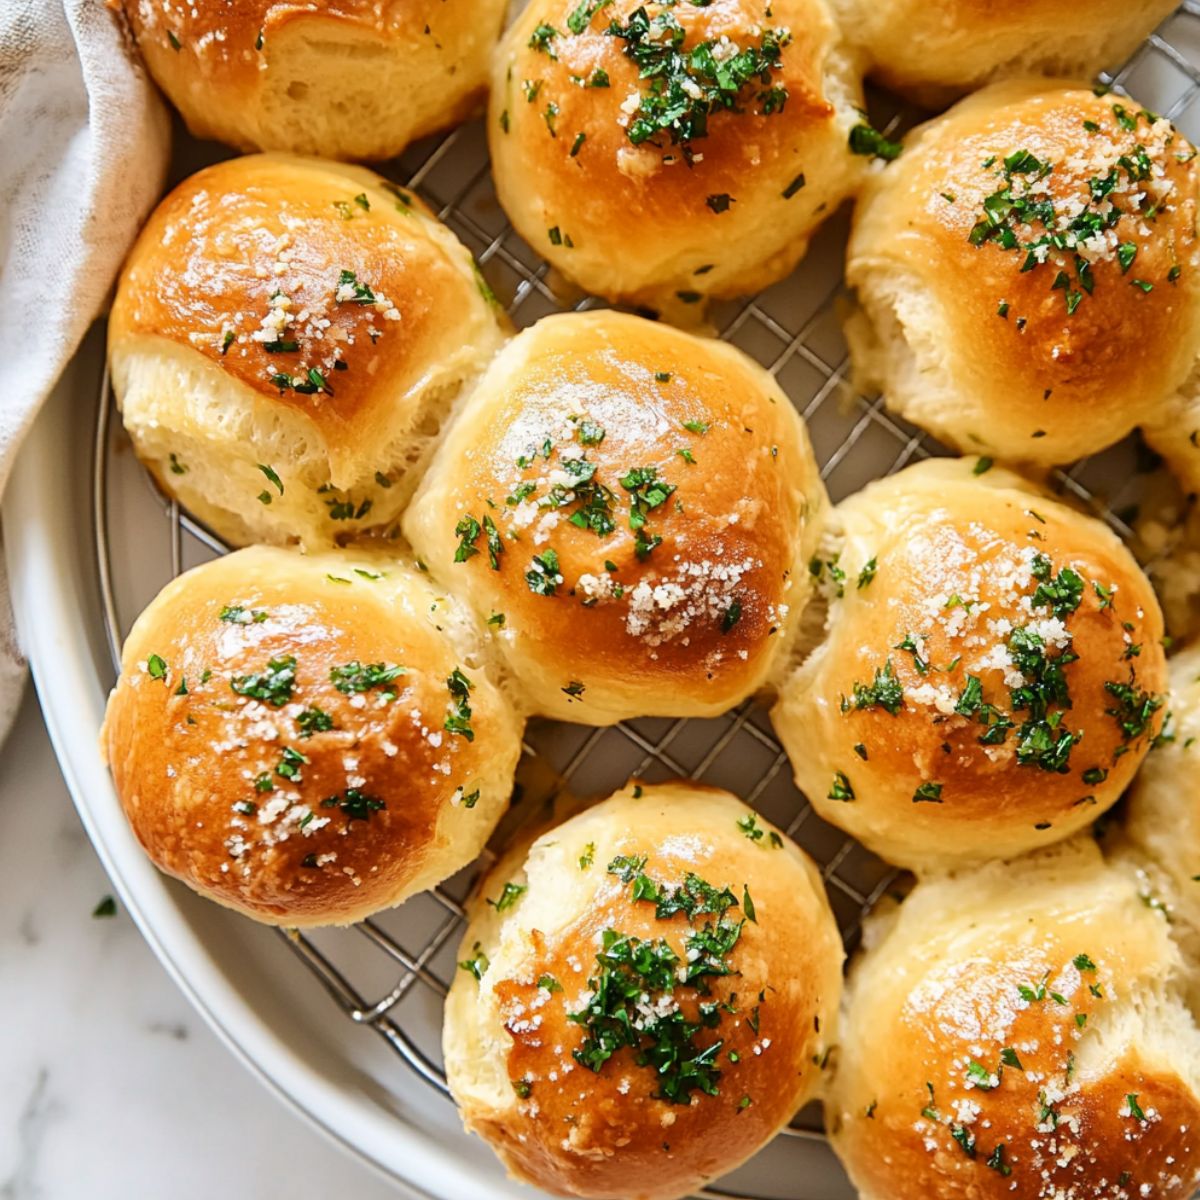
Have you ever noticed how some smells can instantly make a house feel like a home? That’s exactly what happens when a batch of Garlic Butter Bread Rolls hits the oven; the buttery garlic aroma is enough to make anyone wander into the kitchen with curiosity (and a growling stomach). These rolls aren't just another side dish; they’re the kind that make people pause mid-bite and say, “Where did you get this recipe?”
What makes these Garlic Butter Bread Rolls so irresistible isn’t just the rich, savory flavor that pairs beautifully with pasta, soups, or even a big holiday roast; it’s the fact that you can whip them up without needing a culinary degree or high-end tools. This recipe is proof that with a few everyday ingredients and simple steps, anyone, even first-time bakers, can bring bakery-quality bread to the dinner table.
They’re soft, golden, and brushed in that dreamy garlic butter finish that guarantees they’ll vanish faster than you can say “seconds.” And trust me, once you make these Garlic Butter Bread Rolls, they won’t just be a hit—they’ll become your signature. So roll up your sleeves (figuratively or literally; dough can be sticky) and get ready to bake the kind of bread that brings people together and makes every dinner feel just a little more special.
Why These Garlic Butter Bread Rolls Deserve the Spotlight
Let’s be honest; most garlic bread roll recipes fall into two camps—either they take forever to make, or they’re so quick they barely deliver on flavor. That’s where Garlic Butter Bread Rolls like these truly shine. This recipe strikes the sweet spot; it’s fast enough for a busy weeknight, yet still delivers that deep, buttery garlic flavor that tastes like it took all day to perfect.
These Garlic Butter Bread Rolls aren’t just a clever kitchen shortcut—they’re steeped in comfort food heritage. From the rustic charm of Italian garlic bread served alongside saucy pastas, to the beloved garlic-laced loaves passed around Eastern European holiday tables, this classic combo has stood the test of time. These rolls take inspiration from that legacy but make it wonderfully achievable for the modern home cook.
One of the best things about these Garlic Butter Bread Rolls? They’re surprisingly versatile. Pillowy soft with a golden crust and fragrant garlic finish, they elevate nearly any meal you serve them with. Try them with:
- Spaghetti and meatballs
- Hearty soups and stews
- Holiday roasts or glazed hams
- Grilled meats and vegetables
- Or just warm from the oven with an extra swipe of butter (trust me on this one)
Once you bake a batch, you’ll see why these Garlic Butter Bread Rolls are more than just a side—they’re the kind of bread that guests remember and request by name.
Jump to:
Ingredients
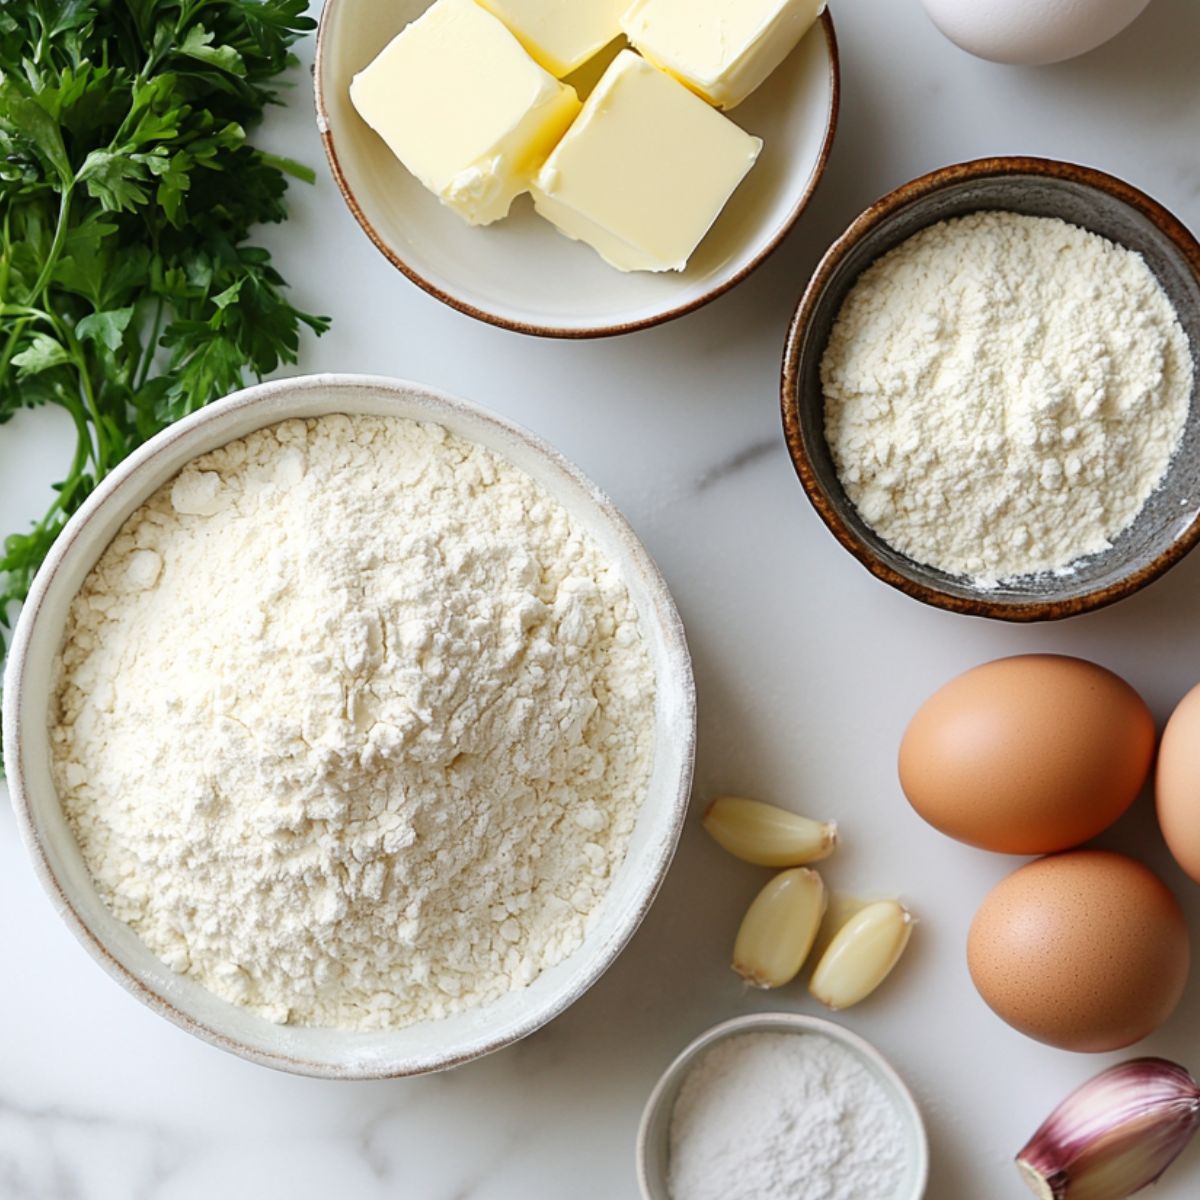
For the Bread Dough:
- All-purpose flour (bread flour works too for extra chewiness)
- Instant yeast
- Granulated sugar (helps with browning and feeds the yeast)
- Salt
- Butter, melted
- Warm milk (around 110°F – not too hot or it will kill the yeast)
- Large egg, room temperature
For the Garlic Butter Topping:
- Butter, softened
- Fresh minced garlic (adjust to your taste preference)
- Fresh parsley, finely chopped
- Salt
- Black pepper
- Optional: Grated Parmesan cheese
See recipe card for quantities.
Substitutions and Modifications
These Garlic Butter Bread Rolls are flexible enough to fit different dietary needs and pantry situations—because real life doesn’t always come with the perfect ingredients on hand. Here’s how you can tweak the recipe without losing that soft, buttery magic:
- Dairy-Free Delight: No dairy? No problem. Swap in plant-based butter and your favorite non-dairy milk (like oat, almond, or soy). You’ll still get that rich, indulgent flavor in every bite.
- Whole Wheat Boost: Want a little more fiber or a nuttier flavor? Try replacing up to half of the all-purpose flour with whole wheat flour. The rolls will still be soft, just with a heartier bite.
- Gluten-Free Option: For those avoiding gluten, use a 1:1 gluten-free flour blend. The texture may vary slightly, but the Garlic Butter Bread Rolls will still be delicious and satisfying.
- Herb Switch-Up: Don’t have parsley? Or just in the mood for something different? Rosemary, thyme, or oregano all work beautifully as aromatic add-ins to the garlic butter topping.
- Yeast Swap: If you’ve got active dry yeast instead of instant, you can still make it work. Just let it proof in the warm milk for a few minutes before adding it to the dough, and plan on a slightly longer rise time.
Whether you’re working with dietary preferences or just what’s in the pantry, these Garlic Butter Bread Rolls are ready to roll with you.
Instructions
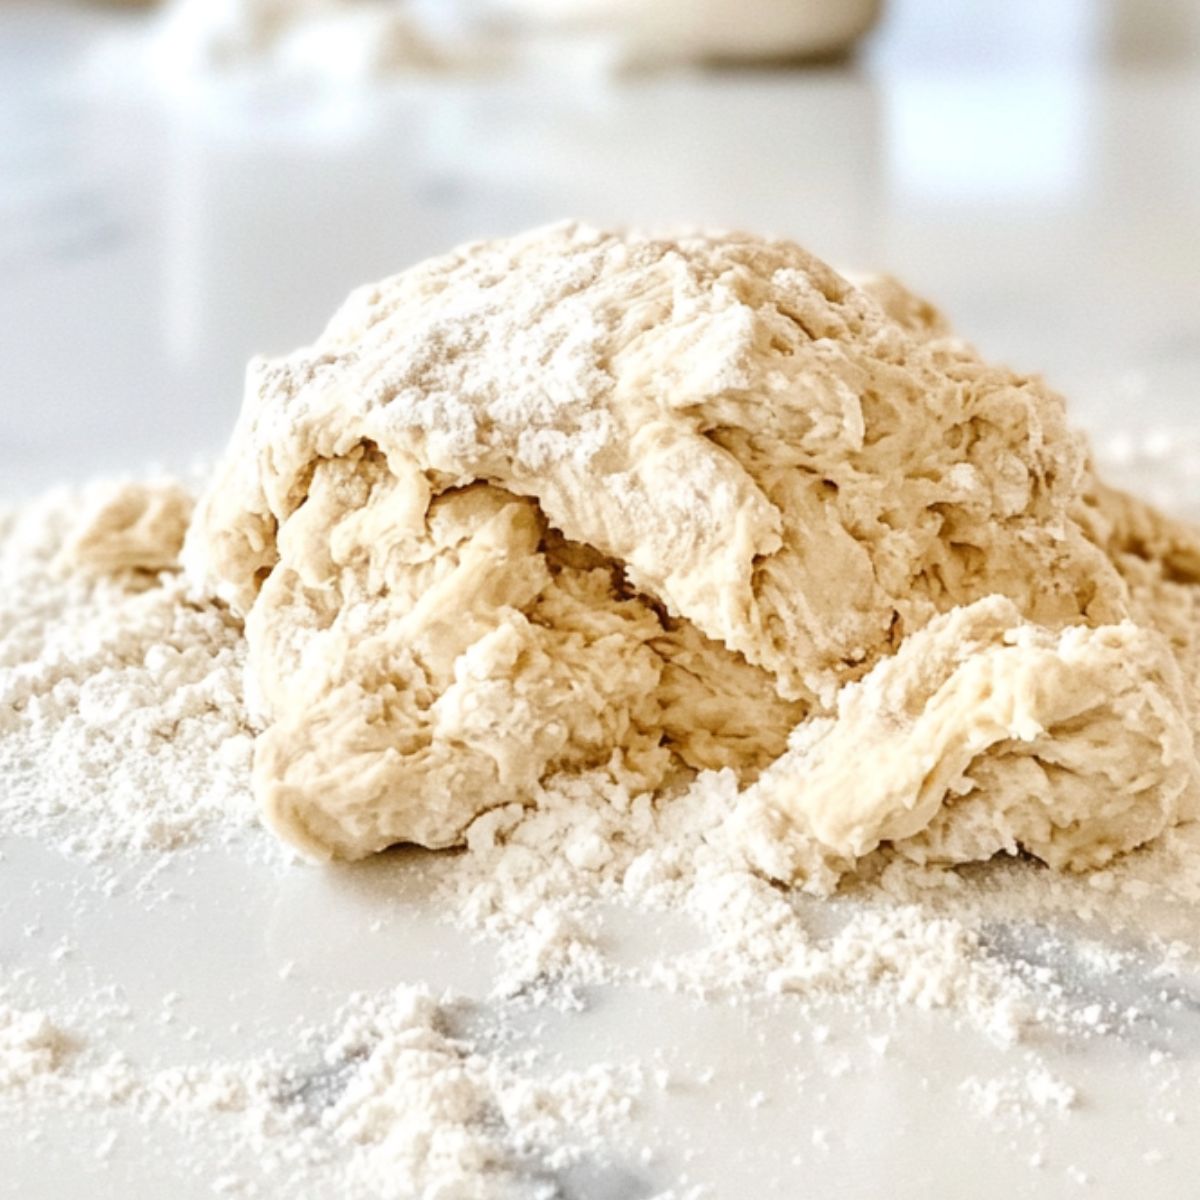
Mix and Knead the Dough
- In a large mixing bowl, combine 3 cups of flour (reserve the rest for later), sugar, salt, and instant yeast.
- Warm the milk to about 110°F, then add the melted butter and egg and whisk together.
- Pour the wet mixture into the dry ingredients and stir until a shaggy dough forms, adding remaining flour as needed.
- Turn the dough onto a lightly floured surface and knead for 5-7 minutes until smooth and elastic, or use a stand mixer with a dough hook for 4-5 minutes.
- The dough should be slightly sticky but manageable—too much flour will make dense rolls.
Pro tip: The dough is ready when you can stretch a small piece thin enough to see light through it (the "windowpane test").
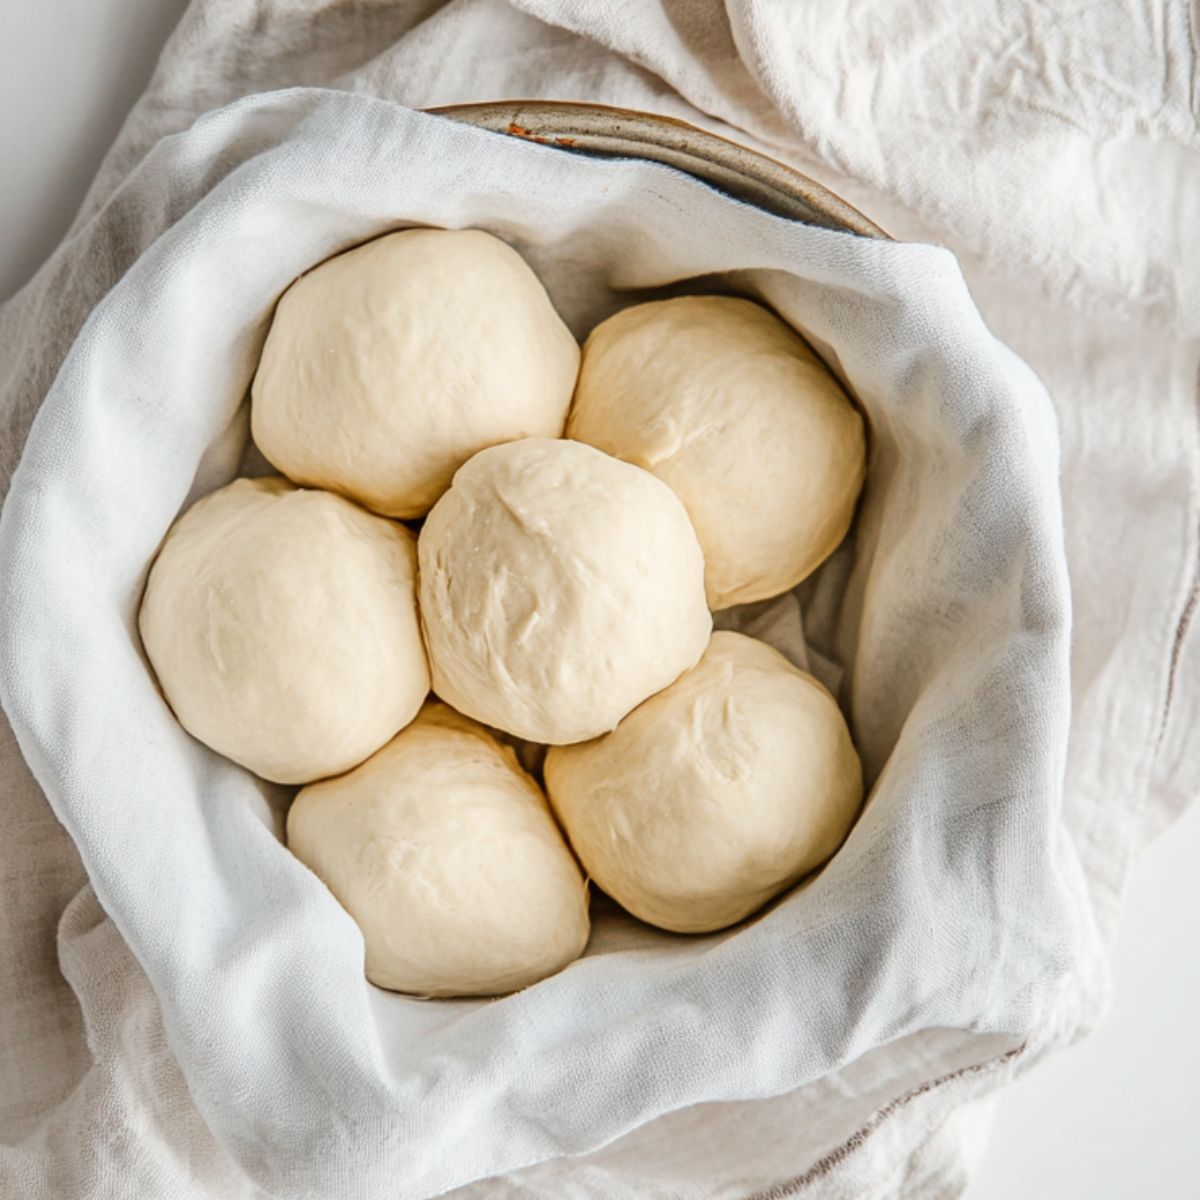
Let Dough Rise and Shape Rolls
- Place the dough in a lightly oiled bowl, cover with a clean towel, and let rise in a warm spot for 45-60 minutes, or until doubled in size.
- Gently punch down the risen dough to release air bubbles.
- Divide the dough into 12-15 equal portions and roll each into a smooth ball.
- Arrange the rolls in a greased 9×13-inch baking pan, spaced about 1 inch apart.
- Cover and let rise for another 30 minutes until puffy, while preheating your oven to 375°F.
Time-saving tip: For a quicker first rise, place the bowl in an oven that's been warmed to about 100°F and then turned off.
Prepare Garlic Butter and Bake
- While the rolls rise, mix softened butter, minced garlic, chopped parsley, salt, and pepper in a small bowl.
- Brush half of the garlic butter mixture over the tops of the risen rolls.
- Bake for 18-22 minutes, or until golden brown with an internal temperature of about 190°F.
- Immediately brush the hot rolls with the remaining garlic butter.
Flavor boost: For deeper garlic flavor, mix the butter and garlic an hour ahead of time to let the flavors meld.
Cool and Serve
- Let the rolls cool in the pan for about 5 minutes.
- Transfer to a wire rack if you want slightly crusty sides, or leave in the pan for softer rolls.
- Serve warm for the best flavor and texture experience.
- Store any leftovers in an airtight container once completely cooled.
Visual cue: Perfectly baked rolls should look golden on top and sound hollow when tapped on the bottom.
- Step 1: Mix and Knead the Dough
Mix the ingredients and knead until smooth and elastic.
- Step 2: Let Dough Rise and Shape Rolls
Let the dough rise, punch down, shape into balls, and let them puff up again.

- Step 3: Prepare Garlic Butter and Bake
Mix garlic butter and brush it on before baking until golden.
- Step 4: Cool and Serve
Let cool slightly and serve warm to enjoy the best flavor and texture.
Hints & Expert Cooking Tips
Want your Garlic Butter Bread Rolls to bake up bakery-worthy every single time? These pro-level tips will help you get that soft, golden perfection—without second-guessing your dough:
- Temperature is everything: Use a thermometer to check that your milk is between 105–115°F. Milk that’s too hot can wipe out your yeast; too cold and your dough won’t rise properly. Yeast is picky—but predictable.
- Don’t shortcut the kneading: Those few extra minutes of kneading pay off big time. It’s what develops the gluten and gives your rolls that pillowy, airy structure. Fluffy bread isn’t a fluke—it’s science (and elbow grease).
- DIY proofing station: Cold kitchen? No problem. Preheat your oven to its lowest temp for just 1–2 minutes, then turn it off. Place your covered dough inside, and voilà—a cozy environment for a perfect rise.
- No stand mixer? No worries: Sure, mixers save time, but hand-kneading works just as well. It’s rhythmic, satisfying, and oddly therapeutic. Plus, there’s something special about shaping Garlic Butter Bread Rolls with your own hands.
- The finger test for rising: Gently press the dough with a clean finger. If the indentation fills in slowly but doesn’t bounce all the way back, it’s ready for the next step. If it springs back too fast, give it more time.
With these tips in your apron pocket, your Garlic Butter Bread Rolls will turn out tender, buttery, and downright irresistible—every time.at could use this. This is also a great idea to link out to another blogger with a similar recipe that fits a different diet.
Recipe Variations & Dietary Modifications
One of the best things about Garlic Butter Bread Rolls? They’re a delicious blank canvas for creativity. Whether you’re after a cheesy twist, a garden-fresh herbal kick, or a make-ahead version for busy days, these variations have you covered:
- Cheesy Garlic Bread Rolls: Want to level up the indulgence? Mix shredded mozzarella and a bit of grated Parmesan directly into the dough before the first rise. For extra gooey goodness, sprinkle more cheese on top before baking. These cheesy Garlic Butter Bread Rolls will have everyone reaching for seconds.
- Herb-Loaded Variation: Fresh herbs can turn a simple roll into something that tastes straight from an artisan bakery. Add a tablespoon each of chopped rosemary, thyme, and basil into the dough to infuse every bite with bold, fragrant flavor.
- Pull-Apart Garlic Butter Rolls: For a fun, shareable twist, arrange your dough balls close together in a round cake pan. As they bake, they’ll touch and rise into a gorgeous pull-apart centerpiece—perfect for family dinners or entertaining guests.
- Whole Wheat Garlic Rolls: Swap out half the all-purpose flour for whole wheat to add a slightly nutty depth and boost the fiber content. You may need a splash more liquid, but the result is still every bit as soft and satisfying.
- Make-Ahead Option: Planning ahead? Shape your Garlic Butter Bread Rolls, cover them tightly, and refrigerate overnight. Let them rest at room temperature for about 30–45 minutes before baking, and you’ll have fresh, warm rolls with no stress the next day.
No matter which direction you take, these Garlic Butter Bread Rolls adapt beautifully—and taste like they came straight from a cozy, well-loved kitchen.
Equipment
- Mixing bowl: A large glass or metal bowl gives you plenty of space for the dough to rise.
- Baking pan: A 9×13-inch pan works perfectly for standard rolls. For pull-apart rolls, use a round cake pan.
- Kitchen thermometer: Helps ensure your milk is the right temperature and your rolls are fully baked.
- Pastry brush: Silicone brushes work best for applying the garlic butter without losing bristles in your food.
- Kitchen scale: Not required but helpful for dividing dough into equal portions.
Budget option: If you don't have a pastry brush, you can use a clean, folded paper towel or even the back of a spoon to apply the butter.Equipment Recommendations
Storage & Meal Prep Tips
Garlic Butter Bread Rolls are one of those rare recipes that are just as good the next day—if they last that long! Whether you're planning ahead for a dinner party or saving a few rolls for weekday meals, these tips will help you store and reheat them like a pro.
Fridge Storage
Once your Garlic Butter Bread Rolls have completely cooled, store them in an airtight container or resealable bag. They’ll stay fresh in the refrigerator for up to 3 days. To bring them back to life, simply warm in a 300°F oven for 5–7 minutes or microwave for 15–20 seconds until soft and fragrant.
Freezing Instructions
- Unbaked Rolls: Want fresh-baked rolls later without starting from scratch? Freeze the shaped dough balls on a baking sheet until firm, then transfer them to a freezer-safe bag. When you're ready to bake, thaw them overnight in the fridge, allow them to rise until puffy, and bake as usual.
- Baked Rolls: Already baked your Garlic Butter Bread Rolls? Wrap the cooled rolls tightly in foil and freeze for up to 3 months. When you're ready to enjoy, let them thaw at room temperature and then reheat in a 300°F oven for about 10 minutes to restore that just-baked texture.
Make-Ahead Garlic Butter
The garlic butter topping is just as flexible. Whip it up to 3 days in advance, store it in the fridge, and let it come to room temperature before using. It’s a quick, flavorful timesaver when you’re baking a fresh batch or just need a finishing touch for reheated rolls.
With these storage and prep tips, your Garlic Butter Bread Rolls can be just as perfect tomorrow—or even next month; as they are straight from the oven today.
The Little Secret That Makes a Big Difference
Every baker has a trick up their sleeve; something they quietly add while no one’s looking, a whisper of magic that turns a good recipe into an unforgettable one. For me, when it comes to Garlic Butter Bread Rolls, it's a tiny, unexpected pinch of dried dill.
Just ¼ teaspoon stirred into the garlic butter mixture, and suddenly, the flavor deepens in a way that’s hard to describe but impossible to forget. Guests won’t be able to put their finger on what makes your rolls taste better than all the others—but they’ll keep coming back for more.
Want that bakery-style shine too? Here's the second part of the secret: before brushing on the garlic butter, give each roll a quick glaze with an egg wash (1 beaten egg mixed with a tablespoon of water). It creates that golden, glossy finish that looks like it came straight from a professional kitchen.
Keep this little secret between us, but prepare to be asked for your recipe more times than you can count.
FAQ
How do you make garlic butter for rolls?
Making garlic butter is incredibly simple—and once you try homemade, you’ll never go back to store-bought. Just combine softened butter with freshly minced garlic, a pinch of salt, chopped fresh parsley (or herbs of your choice), and optional grated Parmesan for added richness. Blend it all until smooth, and you’ve got the perfect spread for your Garlic Butter Bread Rolls or any savory bread.
Is it better to butter rolls before or after baking?
Ideally—do both! Brushing your Garlic Butter Bread Rolls before baking (especially over an egg-washed surface) helps infuse flavor and adds color, while a second brush right after they come out of the oven gives them that glossy, melt-in-your-mouth finish. This two-step method guarantees maximum flavor and visual appeal.
What bread makes the best garlic bread?
While classic garlic bread is usually made with crusty loaves like French baguettes or Italian ciabatta, soft and fluffy rolls—like Garlic Butter Bread Rolls—offer a cozy twist. They soak up the garlic butter beautifully and are perfect as a side or appetizer for pasta, soups, or roasts.
How do you make buttered garlic bread?
To make buttered garlic bread, slice your bread of choice (baguette, roll, or loaf), spread it generously with garlic butter, and either toast it in the oven until golden or pan-fry it for extra crisp edges. For rolls, bake them first, then brush with warm garlic butter while hot to let the flavors soak in.
Your New Favorite Roll… and Then Some
So here’s the thing—Garlic Butter Bread Rolls aren’t just good. They’re the kind of comforting, buttery, golden little miracles that make people slow down at the table and savor every bite. With their soft, fluffy centers and that crave-worthy garlic finish, they’re proof that even simple, beginner-friendly recipes can steal the show at any dinner—from a casual weeknight to the biggest holiday spread.
And don’t be afraid to put your own spin on them. Toss in some herbs, a little extra cheese, or try a pull-apart version for sharing. Once you’ve baked a batch, you might just find yourself making them on repeat.
If you loved these rolls, you’ll probably go crazy for a few of our other kitchen favorites too, like the Garlic Parmesan Cheeseburger Bombs (cheesy, garlicky, and stuffed with flavor) or the super fun Breakfast Pancake Poppers (bite-sized brunch magic the whole family devours). They’re all about big flavor with simple steps, just how we like it.
So go ahead—bake up a batch of Garlic Butter Bread Rolls, let that amazing aroma fill your home, and don’t forget to share how you made them your own. I’ll be here cheering you on... probably with melted butter on my hands.
Related
Looking for other recipes like this? Try these:

Pairing
These are my favorite dishes to serve with this Garlic Butter Bread Rolls recipe:


Garlic Butter Bread Rolls Recipe
Equipment
- 1 Large mixing bowl
- 1 Whisk
- 1 Pastry Brush
- 1 9x13 inch baking pan
- Measuring Cups & Spoons
- 1 Wire cooling rack
- 1 Kitchen thermometer (optional)
Ingredients
Dough
- 3½ cups all-purpose flour bread flour works too for extra chewiness
- 2¼ teaspoon instant yeast 1 packet
- 2 tablespoon granulated sugar helps with browning and feeds the yeast
- 1 teaspoon salt
- ¼ cup butter melted
- 1 cup warm milk not too hot, around 110°F
- 1 egg room temperature
Garlic Butter Topping
- ½ cup butter softened
- 4–5 garlic cloves minced , fresh
- 2 tablespoon fresh parsley finely chopped
- ½ teaspoon salt
- ¼ teaspoon black pepper
- 2 tablespoon Parmesan cheese optional, for extra flavor

Leave a Reply