
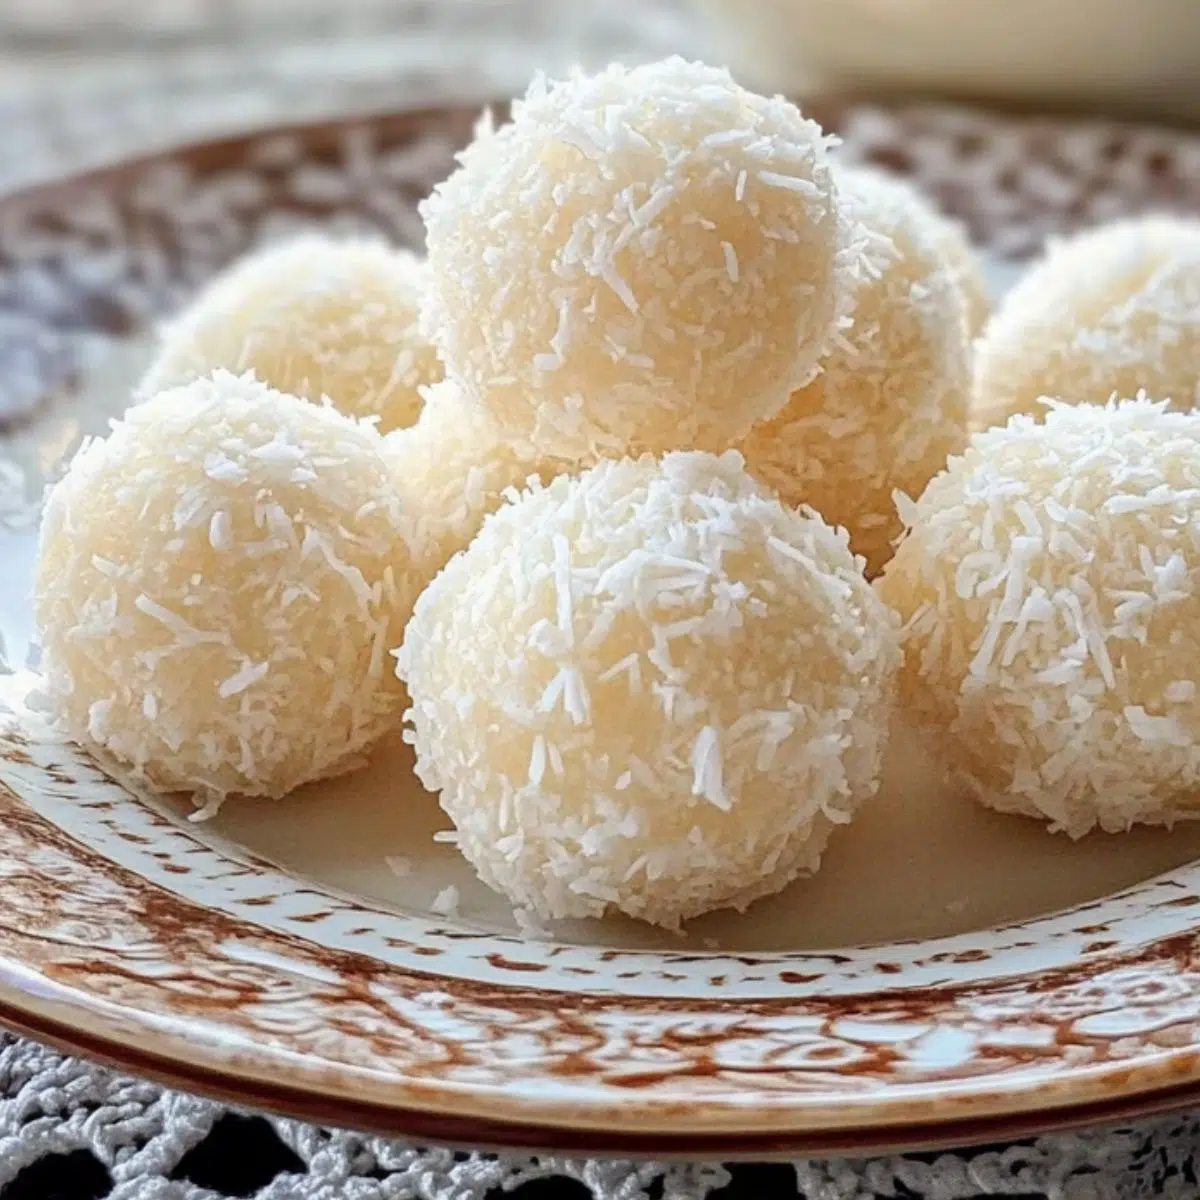
Have you ever craved a dessert that’s irresistibly creamy, perfectly sweet, and effortlessly easy to make? Let me introduce you to Condensed Milk Snowballs; the no-bake treat that tastes like a tiny piece of heaven. These soft, coconut-kissed cookie balls come together in minutes using simple pantry staples, yet they deliver a taste that feels like a homemade masterpiece. Whether you're prepping for a festive gathering or just need a sweet fix without turning on the oven, Condensed Milk Snowballs have you covered.
What sets these little snowballs apart isn't just their flavor (though that’s reason enough to make a batch); it’s the simplicity. You’ll only need about 15 minutes of prep and a short chill in the fridge to whip up something that looks elegant, feels indulgent, and surprises everyone with how easy it was. Made with sweetened condensed milk, crushed cookies, and a generous dusting of coconut, Condensed Milk Snowballs are as versatile as they are delicious.
They’re perfect for holiday cookie trays, cozy tea-time moments, or those last-minute dessert emergencies when guests drop by unannounced. Once you try them, Condensed Milk Snowballs are bound to become a go-to in your treat-making arsenal.
Why Condensed Milk Snowballs Stand Out
There’s a reason Condensed Milk Snowballs have become cherished in so many homes; they’re a testament to the magic that happens when simplicity meets indulgence. Unlike traditional cookies that can be a bit finicky—with timers, temperatures, and lots of cleanup—these no-bake wonders are delightfully easy to make and almost impossible to mess up. Originally born out of necessity when oven use was a luxury, Condensed Milk Snowballs quickly proved they had more than just practicality going for them; their sweet, creamy bite and soft coconut coating made them unforgettable.
These treats shine especially bright during the winter holidays. With their snow-dusted appearance and melt-in-your-mouth texture, Condensed Milk Snowballs look like they were made for Christmas cookie trays and cozy gatherings. But the truth is—they’re too good to save for just one season. Whether it’s the middle of July or the heart of December, they’re always a welcome treat.
And let’s not forget the experience of enjoying them. Pair Condensed Milk Snowballs with a steamy mug of coffee, your favorite tea, or even a rich hot chocolate; the contrast between the warm drink and the cool, creamy cookie is pure comfort. It’s a small, satisfying moment that feels a little luxurious—and who doesn’t need that now and then?
Jump to:
Ingredients
- Powdered sugar (for rolling)
- Sweetened condensed milk
- Crushed vanilla wafers, graham crackers, or digestive biscuits
- Shredded coconut (plus extra for coating)
- Vanilla extract
- Salt
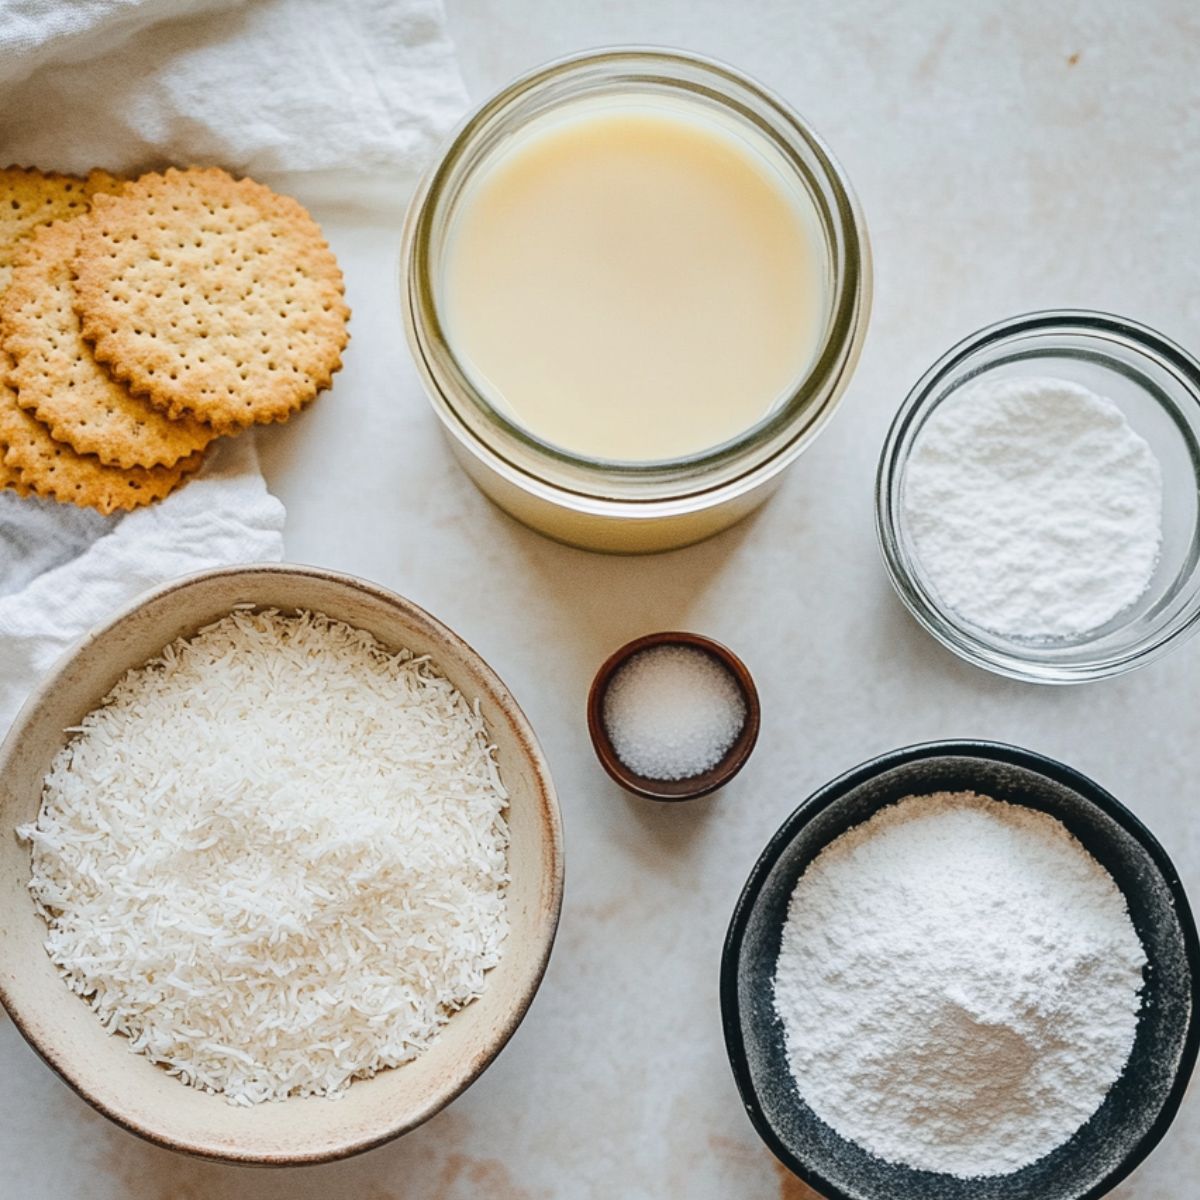
See recipe card for quantities.
Why Each Ingredient Matters
- Sweetened condensed milk
This is the heart of every Condensed Milk Snowball. It brings that unmistakable rich, creamy sweetness while acting as the glue that holds everything together. No other ingredient delivers the same luscious texture quite like it. - Crushed cookies or biscuits
Think of these as the foundation of your snowballs. Whether you go with vanilla wafers, graham crackers, or digestive biscuits, they provide structure and that soft, melt-away texture. Your choice here can subtly shape the flavor, so feel free to get creative. - Shredded coconut
This is where the magic happens. Coconut adds a lightly chewy texture and that tropical twist that sets Condensed Milk Snowballs apart. Plus, rolling them in extra flakes gives them that signature snowy look we all love. - Vanilla extract
A little goes a long way. Vanilla ties everything together, enhancing the sweetness and giving the snowballs a warm, inviting depth that feels like a cozy hug. - Salt
It may seem like a small player, but salt is essential. Just a pinch is enough to balance out the sweetness and make the flavors really shine. - Powdered sugar
The final flourish. This light coating not only makes them look like actual snowballs but also adds a soft, sweet touch that completes each bite beautifully.
Instructions
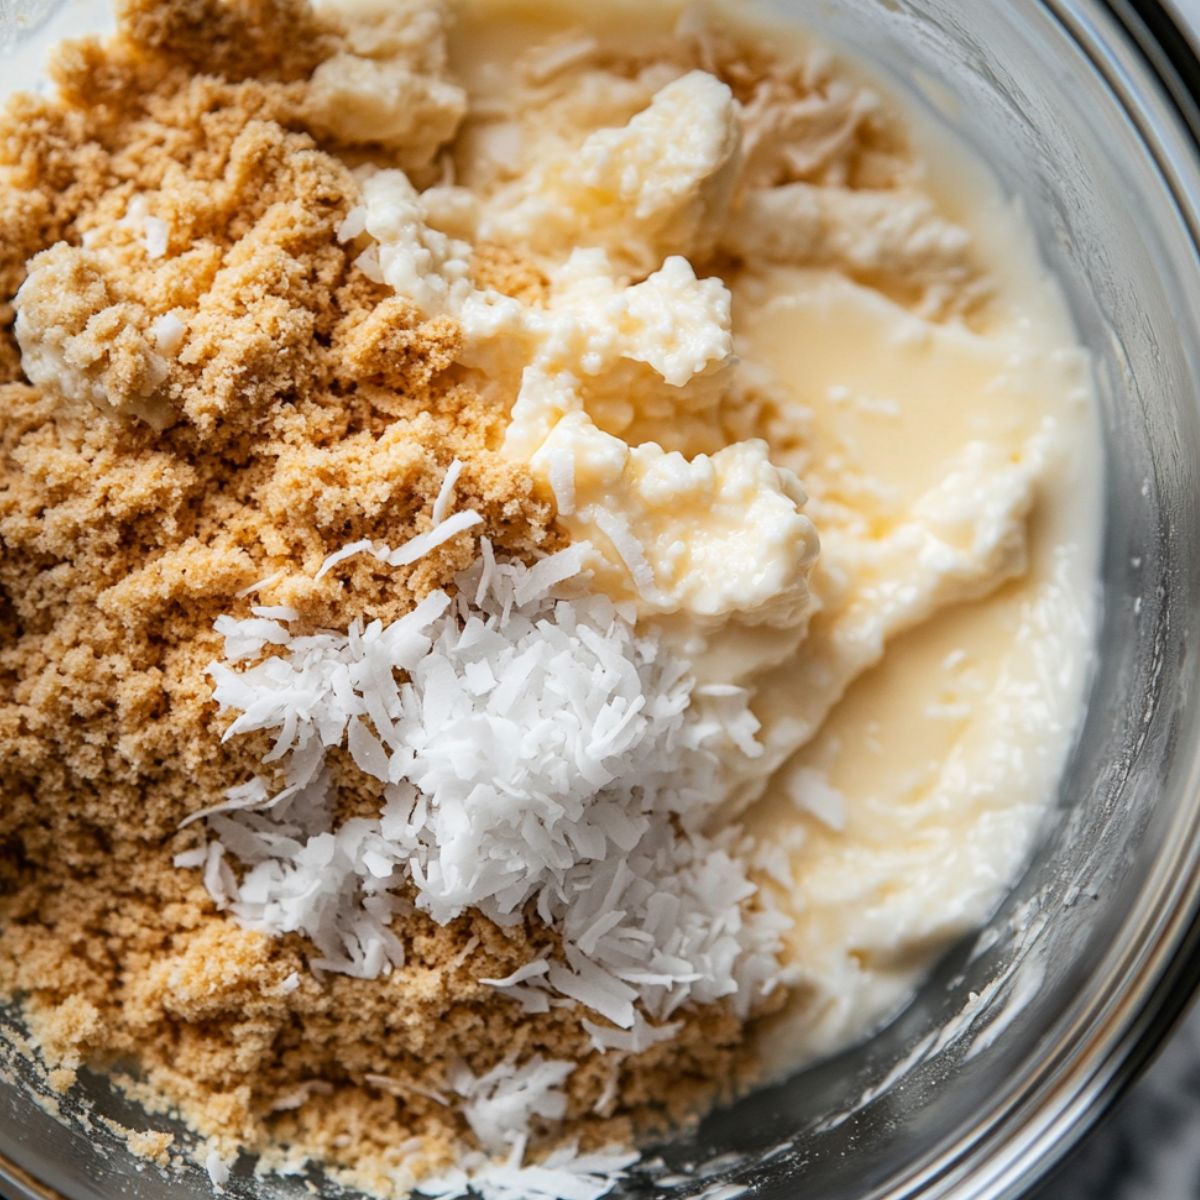
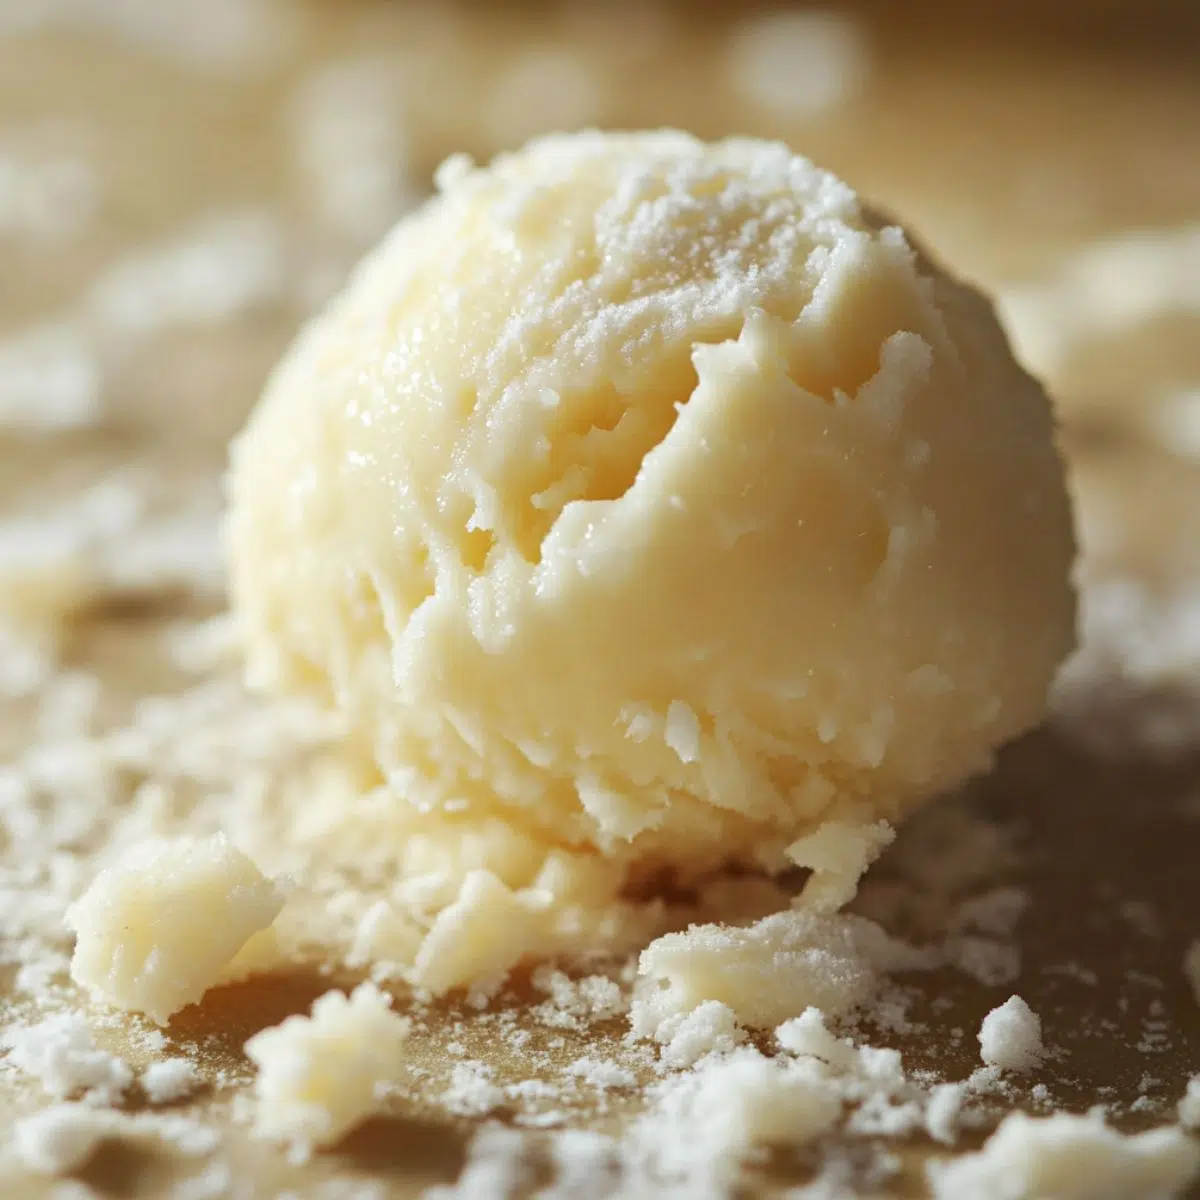
Prepare Your Base & Mix Ingredients
- Crush your cookies or biscuits into fine crumbs using a food processor or a plastic bag and rolling pin.
- In a large mixing bowl, combine the cookie crumbs, 1½ cups of shredded coconut, sweetened condensed milk, vanilla extract, and salt.
- Mix thoroughly until you have a sticky, thick mixture that can hold its shape when rolled.
Pro tip: If your mixture seems too wet, add more cookie crumbs. If it's too dry, add a bit more condensed milk.
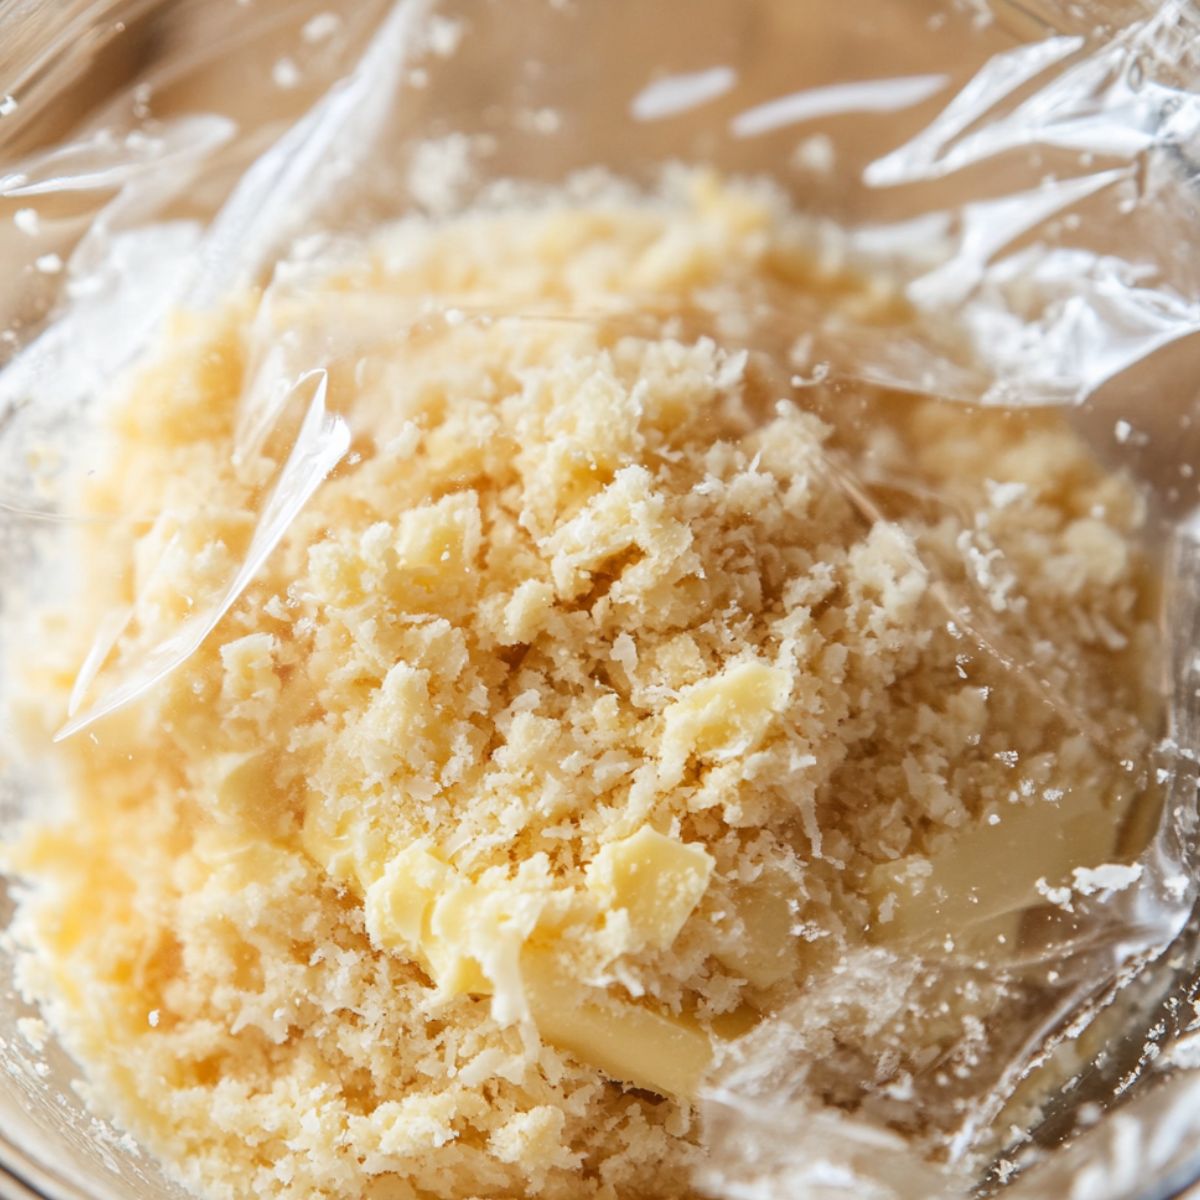
Chill The Mixture
- Cover the bowl with plastic wrap and refrigerate for at least 30 minutes to firm up the mixture and help the flavors combine.
- This chilling step is crucial for making the mixture easier to handle when forming balls.
Time-saving hack: If you're in a hurry, place the mixture in the freezer for 10-15 minutes instead.
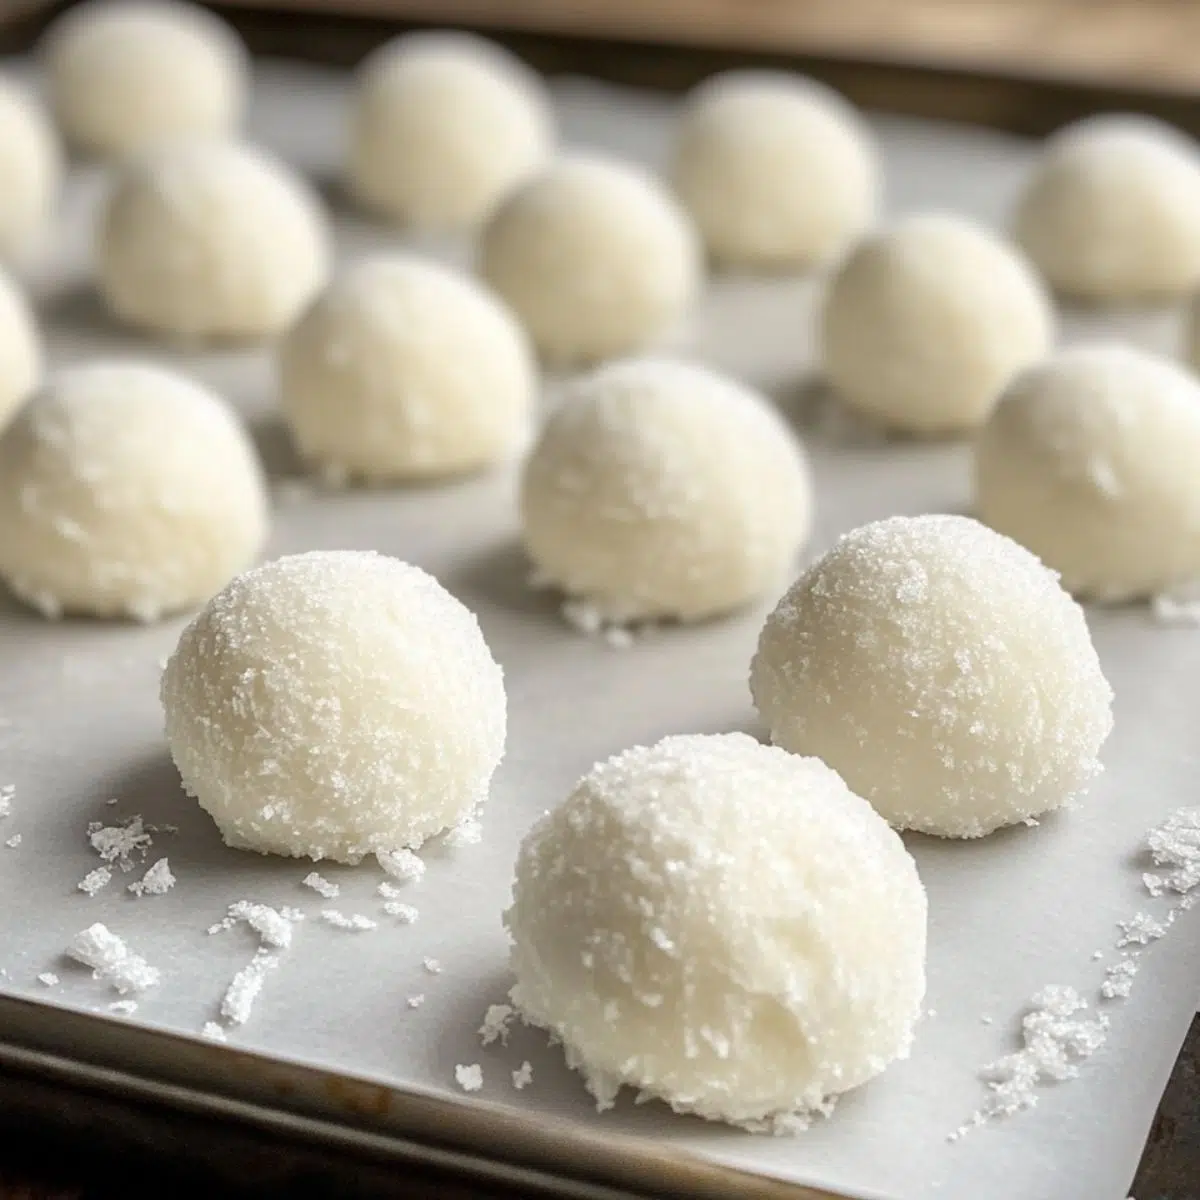
Form & Coat The Snowballs
- Prepare two shallow bowls—one with the remaining shredded coconut and another with powdered sugar.
- Using slightly wet hands and a tablespoon or cookie scoop, portion and roll the chilled mixture into 1-inch balls.
- Roll each ball first in shredded coconut, then in powdered sugar until completely coated.
- Place the finished snowballs on a parchment-lined tray.
Pro tip: Slightly wet your hands with cold water between rolling balls to prevent sticking.
Final Chill & Serve
- Refrigerate the finished condensed milk snowballs for at least 1 hour before serving.
- This final chilling helps them firm up completely and enhances their texture.
- Store in an airtight container in the refrigerator for up to a week.
- Step 1: Prepare Your Base & Mix Ingredients
Combine all ingredients into a sticky, thick mixture that holds its shape.
- Step 2: Chill the Mixture
Chill the mixture to make it easier to roll and enhance flavor.
- Step 3: Form & Coat The Snowballs
Roll balls and coat in shredded coconut and powdered sugar.
- Step 4: Final Chill & Serve
Chill the snowballs for an hour before serving for best texture.
Expert Cooking Tips
- Perfect texture every time
The goal with Condensed Milk Snowballs is a texture that’s soft and creamy on the inside but firm enough to hold its shape without getting sticky. If they feel too wet, add a bit more crushed cookie until they roll easily. - Better with time
Here’s a little secret; Condensed Milk Snowballs actually get better after a good rest in the fridge. Let them chill for at least a few hours, but if you can wait 24 hours, the flavors really come together and the texture sets just right. - The ultimate coating hack
For a flawless powdered sugar finish, skip the messy fingers. Pop a few snowballs into a container with a generous scoop of powdered sugar, seal the lid, and give it a gentle shake. It’s quick, tidy, and gives you that perfect snow-dusted look. - Don’t rush the chill
It might be tempting to skip the chilling step (especially if you're in a hurry to snack), but it's non-negotiable. Chilling firms up the snowballs and locks in their shape, so they’re as delightful to eat as they are to look at.
Substitutions & Variations
- Cookie base
Want to make your Condensed Milk Snowballs gluten-free? No problem. Just swap in your favorite gluten-free cookies or graham crackers. The texture and flavor hold up beautifully, and you won’t miss a beat (or the gluten). - Coconut
Not a coconut lover? You’re not alone. You can easily trade the shredded coconut for finely chopped nuts like almonds or walnuts. They’ll still give you a bit of texture and richness, but with a nuttier twist that’s just as delicious. - Flavor additions
Feeling creative? Try mixing in 2 tablespoons of cocoa powder for chocolate Condensed Milk Snowballs that are rich and fudgy. Prefer something brighter? Add 1 tablespoon of lemon zest for a refreshing citrus version that’s perfect for spring and summer.ic diet (eg. gluten free), they may have friends or family that they're cooking for that could use this. This is also a great idea to link out to another blogger with a similar recipe that fits a different diet.
Recipe Variations & Dietary Modifications
There’s so much room to get creative with Condensed Milk Snowballs. Whether you’re adding bold new flavors or making them more diet-friendly, these little gems are easy to adapt without losing their charm.
Classic Variations
- Chocolate Condensed Milk Snowballs
Love a chocolatey bite? Stir 3 tablespoons of cocoa powder into the mixture, then roll the finished snowballs in a blend of cocoa and powdered sugar for a rich, fudgy finish. - Lemon Coconut Snowballs
Brighten things up with 1 tablespoon of lemon zest and a splash of lemon juice. These citrus-kissed Condensed Milk Snowballs are perfect for spring gatherings or whenever you’re craving something fresh and zesty. - Nutty Snowballs
Add texture and a toasty flavor with ½ cup of finely chopped nuts like walnuts, pecans, or almonds. They add just the right crunch to balance the creamy base. - Spiced Snowballs
Looking for a warm, cozy twist? Mix in ½ teaspoon of cinnamon and a pinch of nutmeg. These spiced Condensed Milk Snowballs are holiday-ready and full of nostalgic flavor.
Dietary Adaptations
- Vegan Condensed Milk Snowballs
Making these vegan is a breeze; just use coconut condensed milk and be sure your cookie base is completely plant-based. Same great flavor, no animal products. - Gluten-Free
Use certified gluten-free cookies or graham crackers as your base, and you’re good to go. The texture stays just as lovely, and no one will know the difference. - Nut-Free
By default, Condensed Milk Snowballs are nut-free—just skip the nutty add-ins and double-check your cookie ingredients to be safe.
Craving more easy sweets? Don’t miss our [Homemade Cookie Butter Recipe] or [Easy No-Bake Cheesecake Bites]; both pair beautifully with a cozy afternoon and a hot cup of coffee.nt link)
Equipment
- Food processor: Makes quick work of crushing the cookies to a consistent texture.
- Cookie scoop: Helps create uniform-sized snowballs for even chilling and a professional look.
- Mixing bowls: A set of different sized bowls makes the assembly process much easier.
- Parchment paper: Prevents the snowballs from sticking to your tray during chilling.
If you don't have a food processor, a sturdy zip-top bag and a rolling pin work just fine for crushing the cookies.
Storage & Meal Prep Tips
These delightful Condensed Milk Snowballs are just as practical as they are tasty. Whether you're prepping for a party or saving a sweet stash for later, here’s how to keep them fresh and fabulous.
Refrigerator Storage
- Store your Condensed Milk Snowballs in an airtight container in the refrigerator to maintain their soft, creamy texture.
- Place a sheet of parchment paper between layers to prevent them from sticking together.
- They’ll stay fresh and delicious for up to one week—though let’s be honest, they rarely make it that long!
Freezing Instructions
- One of the best things about Condensed Milk Snowballs is how well they freeze.
- Freeze them first on a baking tray until solid, then transfer to a freezer-safe container or bag.
- When you're ready to enjoy, thaw them in the refrigerator for a few hours.
- For that just-made look, feel free to re-roll them in powdered sugar after thawing.
Make-Ahead Options
- These treats are ideal for advance prep. In fact, they improve in flavor after a day in the fridge as the ingredients meld together.
- You can even prepare the mixture up to two days ahead; just keep it refrigerated and roll into snowballs when you’re ready to serve.
The Overnight Magic: A Baker’s Little Secret
Let me tell you a little behind-the-scenes secret about my Condensed Milk Snowballs—one that I learned from an old-school pastry chef who swore by this method. After years of rushing straight from mixing to rolling, I finally tried her advice: let the mixture rest overnight in the fridge. That simple step? Game-changing. The condensed milk gently works its way through every crumb and flake, binding everything together with a creamy richness you just can't rush. By the next day, the mixture is firmer, easier to handle, and rolls into perfect little snowballs with zero fuss. And the taste? Deeper, smoother, and somehow even more indulgent. Trust me—this little pause is where the magic happens.
FAQ
Why do people put condensed milk in shaved ice?
Condensed milk is often added to shaved ice because it adds a rich, creamy sweetness that perfectly complements the light, icy texture. It transforms a refreshing treat into something more indulgent—almost like dessert and a sweet drink in one bite. It's especially popular in Asian-style shaved ice desserts like Korean bingsu or Filipino halo-halo.
Why is condensed milk not advisable (for some)?
While sweetened condensed milk is delicious, it's not always advisable for people watching their sugar intake or managing certain health conditions like diabetes. It’s high in sugar and calories, which can be a concern if consumed in large amounts. That said, in moderation and as part of a balanced diet, it can absolutely be enjoyed as a sweet treat—like in our Condensed Milk Snowballs!
What can I make out of sweetened condensed milk?
Sweetened condensed milk is incredibly versatile. You can use it to make no-bake desserts like fudge, truffles, pie fillings, caramel (aka dulce de leche), ice cream bases, and of course, Condensed Milk Snowballs. It also adds creamy depth to drinks like Thai iced tea or Vietnamese coffee.
How to make coconut snowballs with condensed milk?
It’s super easy! Simply mix sweetened condensed milk with crushed cookies or biscuits, shredded coconut, a splash of vanilla extract, and a pinch of salt. Chill the mixture, then roll into small balls and coat them in more coconut. That’s the basic idea behind Condensed Milk Snowballs, and you can even customize them with cocoa, citrus zest, or chopped nuts.
Sweet Simplicity, Big Flavor
If you ask me, there’s nothing quite like a dessert that looks like you spent hours making it... but actually comes together in minutes. These Condensed Milk Snowballs are exactly that; effortlessly charming, melt-in-your-mouth sweet, and oh-so-easy to whip up. Whether you’re prepping for a holiday cookie exchange, surprising friends at afternoon tea, or just craving something cozy and satisfying, these little snowballs are always a hit.
And here’s the best part—you don’t have to stop at just one kind of treat. If you loved this recipe, I think you’ll fall head over heels for my Italian Rice Balls with Meat (perfectly crispy with a savory surprise inside) or the dreamy Strawberry Cheesecake Balls, which are as indulgent as they sound. Together, they make a trio of crowd-pleasing bites you’ll want to keep on repeat.
So go ahead, roll up your sleeves and give these snowballs a try. Don’t forget to play with the variations to find your signature twist. And if you make them, I’d love to see how they turn out, drop a comment below and tag your creations with #CondensedMilkSnowballs so we can swoon over them together!
Related
Looking for other recipes like this? Try these:


Pairing
These are my favorite dishes to serve with this Condensed Milk Snowballs recipe:


Condensed Milk Snowballs Recipe
Equipment
- 1 Food processor or rolling pin + zip-top bag
- Mixing bowls
- 1 Spatula
- Measuring Cups & Spoons
- 1 Parchment paper
- 1 Cookie scoop (optional)
Ingredients
- 2 cans Sweetened condensed milk Full-fat preferred
- 3 cups Crushed cookies Vanilla wafers, graham crackers, or digestives
- 2 cups Shredded coconut Plus extra for rolling
- 1 teaspoon Vanilla extract Pure vanilla if possible
- ¼ teaspoon Salt Balances sweetness
- 2 cups Powdered sugar For coating
Instructions
- In a bowl, mix cookie crumbs, shredded coconut, sweetened condensed milk, vanilla, and salt until sticky and combined.
- Cover and refrigerate for at least 30 minutes, or until firm enough to roll.
- Scoop and roll into 1-inch balls. Coat each in shredded coconut, then powdered sugar.
- Chill the finished snowballs for 1 hour before serving for the perfect texture.

Leave a Reply