
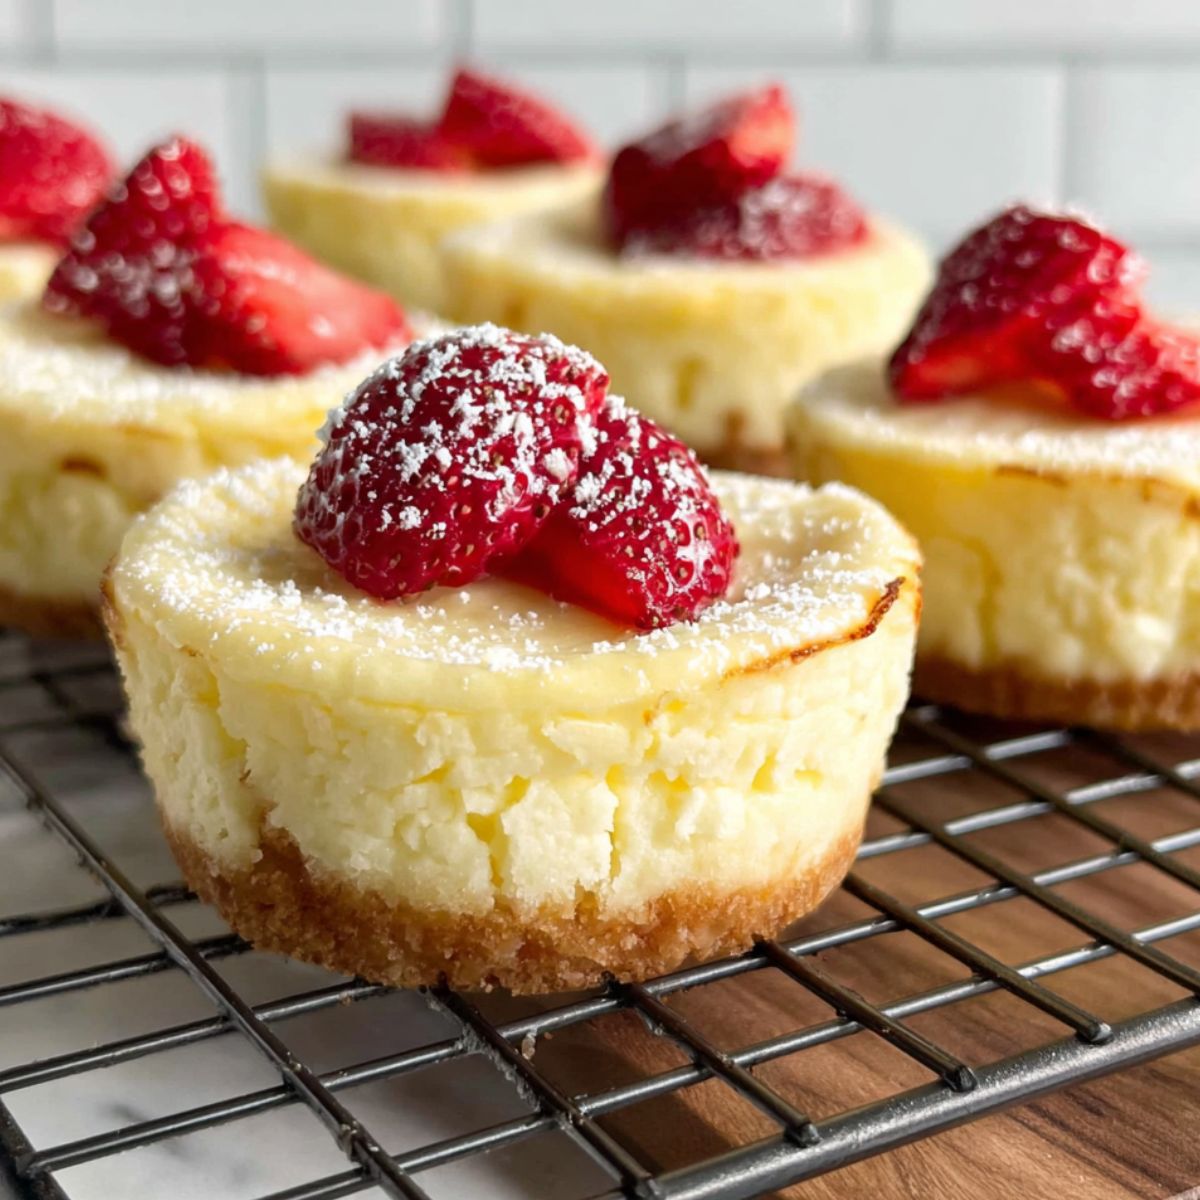
Looking for the perfect dessert that's both elegant and easy? These cheesecake cupcakes are about to become your new favorite treat! I've been making these little beauties for years, and they never fail to impress at parties, potlucks, or just when you're craving something special at home. What makes cheesecake cupcakes so amazing is that they combine all the creamy, rich flavor of traditional cheesecake with the convenience of individual portions; no slicing, no mess, just grab and enjoy.
These cheesecake cupcakes are ready in about 45 minutes from start to finish, and they're surprisingly simple to make. Whether you're a baking newbie or a seasoned pro, this cheesecake cupcake recipe will give you perfect results every time. The combination of a buttery graham cracker crust and smooth cream cheese filling creates that classic cheesecake texture we all love, but in a cute, portable form.
Why These Mini Desserts Are a Game-Changer
Cheesecake cupcakes have become incredibly popular because they solve one of the biggest challenges with traditional cheesecake; portion control and presentation. Instead of worrying about cutting perfect slices or dealing with a springform pan, you get 12 beautiful individual servings that look bakery-perfect. The personal-sized format also means faster cooking time and easier temperature control, which reduces the risk of cracks or uneven baking that often plague full-sized cheesecakes.
What really sets these cheesecake cupcakes apart is their versatility. You can dress them up with fresh strawberries for a fancy dinner party, top them with Oreo crumbles for a fun twist, or keep them simple with just a dusting of powdered sugar for everyday enjoyment. They pair wonderfully with coffee for brunch, work as an elegant dessert after dinner, and even make thoughtful homemade gifts. The graham cracker base provides that essential crunch, while the cream cheese filling stays wonderfully creamy and smooth. Trust me, once you master this basic cheesecake cupcake recipe, you'll find yourself making them for every occasion.
Jump to:
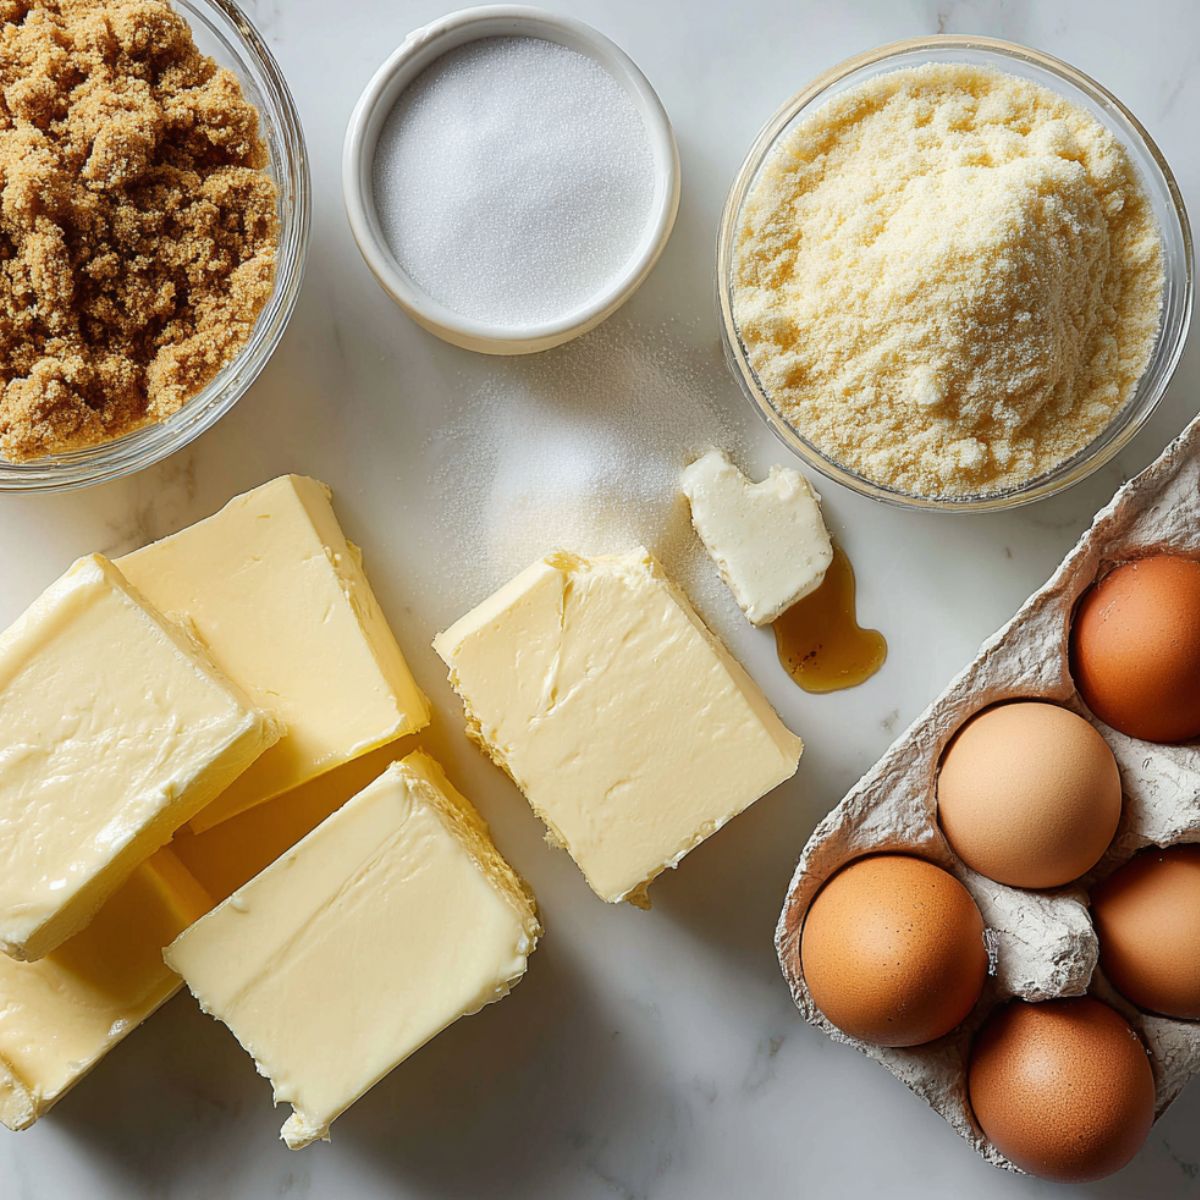
Ingredients
For the Crust
- Graham cracker crumbs
- Melted butter
- Sugar
For the Cheesecake Filling
- Cream cheese
- Sugar
- Eggs
- Vanilla extract
- Sour cream
Optional Toppings
- Fresh strawberries or mixed berries
- Chocolate sauce or chocolate chips
- Crushed Oreos
- Whipped cream
- Powdered sugar
See recipe card for quantities.
Instructions
Step 1: Prepare Your Pan and Crust
- Preheat your oven to 325°F and line a 12-cup muffin tin with cupcake liners.
- Mix graham cracker crumbs, melted butter, and sugar in a bowl until the mixture resembles wet sand.
- Press about 1 tablespoon of the mixture firmly into the bottom of each liner using the back of a spoon or a small glass.
- Bake the crusts for 5 minutes, then remove and let them cool while you prepare the filling.
Step 2: Make the Cream Cheese Filling
- Beat the softened cream cheese in a large bowl with an electric mixer on medium speed for 2-3 minutes until completely smooth and fluffy.
- Add sugar and beat for another minute until well combined and no lumps remain.
- Add eggs one at a time, beating on low speed after each addition just until incorporated; don't overmix at this stage.
- Mix in vanilla extract and sour cream until the batter is silky smooth.
Step 3: Fill and Bake
- Divide the cheesecake batter evenly among the 12 prepared crusts, filling each about ¾ full.
- Gently tap the pan on the counter a few times to release any air bubbles.
- Bake for 18-22 minutes until the centers are just set but still slightly jiggly.
- Turn off the oven, crack the door open, and let the cheesecake cupcakes cool inside for 10 minutes; this prevents sudden temperature changes that cause cracking.
Step 4: Cool and Chill
- Remove from the oven and let cool completely at room temperature for about 30 minutes.
- Transfer to the refrigerator and chill for at least 2 hours, or preferably overnight for the best texture.
- Once chilled, add your favorite toppings and serve cold.
Expert Cooking Tips
- Master the Temperature
Use room-temperature cream cheese and eggs. Cold ingredients cause lumps and uneven texture. Take them out about an hour before baking. - Mix Gently
Once the eggs go in, mix on low speed just until combined. Overmixing traps air and leads to cracks or deflation. Pop visible bubbles with a toothpick before baking. - Check for the Jiggle
Bake until edges are set and centers slightly jiggle; that’s your cue for creamy, not dry, cheesecake cupcakes. - Cool Slowly
Turn off the oven and let the cupcakes cool inside. Gradual cooling prevents cracks from sudden temperature changes. - Pack the Crust Firmly
Use the bottom of a glass or measuring cup to press the crust down tightly ; no one likes a crumbly base!
Recipe Variations & Substitutions
One of the best things about this cheesecake cupcake recipe is how easily you can customize it. Here are my favorite variations:
Strawberry Cheesecake Cupcakes Top each cooled cupcake with fresh strawberry slices and a drizzle of strawberry sauce. You can also swirl 2 tablespoons of strawberry preserves into the batter before baking for a marbled effect. This version is perfect for spring and summer gatherings.
Oreo Cheesecake Cupcakes Replace the graham cracker crust with crushed Oreos (about 15 cookies with filling). Press one Oreo into the bottom of each liner before adding the filling, then top with more crushed Oreos after baking. Kids absolutely love this chocolate twist.
No-Bake Version For a no-bake option, press the crust into the liners and chill without baking. Make the filling with an extra ¼ cup of heavy cream whipped to stiff peaks and folded into the cream cheese mixture. Chill for 4 hours until set.
Dietary Modifications:
- Keto-Friendly: Use almond flour instead of graham crackers for the crust, and swap regular sugar with erythritol or your preferred keto sweetener.
- Vegan: Replace cream cheese with vegan cream cheese, use flax eggs (2 tablespoons ground flaxseed mixed with 6 tablespoons water), and substitute vegan butter and sour cream.
- Low-Fat: Use reduced-fat cream cheese and replace sour cream with non-fat Greek yogurt. The texture will be slightly less creamy but still delicious.
Creative Flavor Additions: Add a tablespoon of lemon zest for lemon cheesecake cupcakes, or swirl in raspberry preserves for a fruity twist. Mix in mini chocolate chips, or add a layer of caramel sauce in the middle before baking.
Equipment Recommendations
Having the right tools makes creating perfect cheesecake cupcakes much easier:
- 12-Cup Muffin Tin: A standard-size tin works perfectly for these cheesecake cupcakes. Dark-colored pans may require reducing the baking time by a few minutes.
- Cupcake Liners: Use sturdy paper or foil liners; cheap thin ones can stick and tear. Foil liners are especially good as they help the cheesecake cupcakes hold their shape.
- Electric Mixer: A hand mixer or stand mixer ensures your cream cheese gets completely smooth. Beating by hand is possible but takes much longer and may leave lumps.
- Small Glass or Measuring Cup: Perfect for pressing the crust firmly into the bottom of each liner.
- Rubber Spatula: Essential for scraping down the bowl and ensuring everything is evenly mixed.
Budget-friendly alternative: If you don't have an electric mixer, let your cream cheese sit out until it's very soft, then use a sturdy whisk and some elbow grease.
Storage & Meal Prep Tips
Proper storage keeps your cheesecake cupcakes fresh and delicious for days.
- Refrigerator Storage Store cheesecake cupcakes in an airtight container in the refrigerator for up to 5 days. Keep them in their liners to maintain shape, and separate layers with parchment paper if stacking. They actually taste better after a day or two as the flavors develop and the texture becomes even creamier.
- Freezing Instructions These freeze beautifully for up to 2 months. Place cooled cheesecake cupcakes in a single layer on a baking sheet and freeze until solid (about 2 hours), then transfer to a freezer-safe container or bag. This prevents them from sticking together. Thaw in the refrigerator overnight before serving. Add fresh toppings after thawing for the best presentation.
- Make-Ahead Tips Bake your cheesecake cupcakes up to 3 days ahead and keep them refrigerated. Wait to add fresh fruit toppings until just before serving to prevent them from getting soggy. If you're using chocolate or caramel sauce, add it an hour before serving so it can set properly.
- Serving Temperature Cheesecake cupcakes taste best when served cold, straight from the fridge. Let them sit out for about 10 minutes before serving if you prefer a slightly softer texture.
The Secret to Bakery-Quality Results
Want to know what separates homemade cheesecake cupcakes from bakery-quality ones? Here's my secret: add a water bath. While these cupcakes turn out great without one, placing your muffin tin inside a larger baking pan filled with about an inch of hot water creates a humid environment that results in an incredibly creamy texture and virtually eliminates cracking. The gentle, even heat from the water bath cooks your cheesecake cupcakes more uniformly.
Another pro tip is to run a toothpick around the edge of each cupcake as soon as they come out of the oven. This releases any seal between the liner and the cheesecake, allowing them to contract naturally as they cool without pulling away from the sides. It's a small step that makes a big difference in appearance.
FAQ
What are common cheesecake cupcake mistakes?
Common mistakes include using cold cream cheese, overmixing after adding eggs, and overbaking. Your cheesecake cupcakes should jiggle slightly when done and cool gradually to prevent cracks.
What makes cheesecake cupcakes unique?
Cheesecake cupcakes deliver traditional cheesecake flavor in individual portions. They bake faster and allow fun customization with different toppings on each cheesecake cupcake.
Do cheesecake cupcakes need a water bath?
Not required, but a water bath creates creamier cheesecake cupcakes with fewer cracks. Place your muffin tin in a larger pan with an inch of hot water for best results.
Is cheesecake better baked or not baked?
Baked cheesecake cupcakes have denser, traditional texture. No-bake versions are lighter and quicker. I prefer baked cheesecake cupcakes for classic taste.
Sweet Endings
There you have it; the ultimate guide to making perfect cheesecake cupcakes at home! These little treats are so much easier than traditional cheesecake, yet they deliver all that creamy, dreamy flavor we crave. Whether you keep them classic with a simple topping or get creative with strawberries, chocolate, or Oreos, these cheesecake cupcakes will become your go-to dessert for any occasion.
I love serving these alongside other fun desserts. If you enjoyed this recipe, you'll definitely want to try my Hot Chocolate Cupcakes for a rich, chocolatey twist, or check out my No-Bake High Protein Cheesecake Fluff for a lighter option that's packed with protein. Both pair beautifully with these cheesecake cupcakes for a dessert spread that'll wow your guests.
Now grab your muffin tin and cream cheese, and let's get baking! Don't forget to let me know how your cheesecake cupcakes turn out. I'd love to hear which toppings you tried and how everyone loved them. Happy baking, friends!
Making every bite count, one cupcake at a time! ✨ ; Ashley
Related
Looking for other recipes like this? Try these:

Pairing
These are my favorite dishes to serve with this Cheesecake Cupcakes Recipe:

Cheesecake Cupcakes
Equipment
- 12-cup Muffin tin
- 1 Paper cupcake liners
- 1 Electric mixer or hand mixer
- Mixing bowls
- 1 Rubber spatula
- Measuring cups and spoons
- 1 Small glass or measuring cup (for pressing crust)
Ingredients
For the Crust
- 1 ½ cups Graham cracker crumbs Crushed finely
- ¼ cup Melted butter Unsalted preferred
- 2 tablespoons Sugar Granulated
For the Cheesecake Filling
- 16 oz Cream cheese Softened to room temperature
- ½ cup Sugar Granulated
- 2 large Eggs Room temperature
- 1 teaspoon Vanilla extract Pure vanilla
- ¼ cup Sour cream Adds creaminess
Optional Toppings
- Fresh strawberries or mixed berries For garnish
- Chocolate sauce or chocolate chips Optional drizzle
- Crushed Oreos For a chocolate version
- Whipped cream Light topping
- Powdered sugar Dust before serving
Instructions
- Preheat oven to 325°F and line muffin tin.
- Mix crumbs, butter, and sugar; press into liners.
- Bake crust 5 minutes; let cool.
- Beat cream cheese until smooth.
- Add sugar, eggs, vanilla, and sour cream; mix gently.
- Fill liners ¾ full; tap to remove air bubbles.
- Bake 18–22 min until edges set and centers jiggle slightly.
- Cool in oven 10 min, then chill 2 hours.
- Add toppings and serve cold.
Leave a Reply