
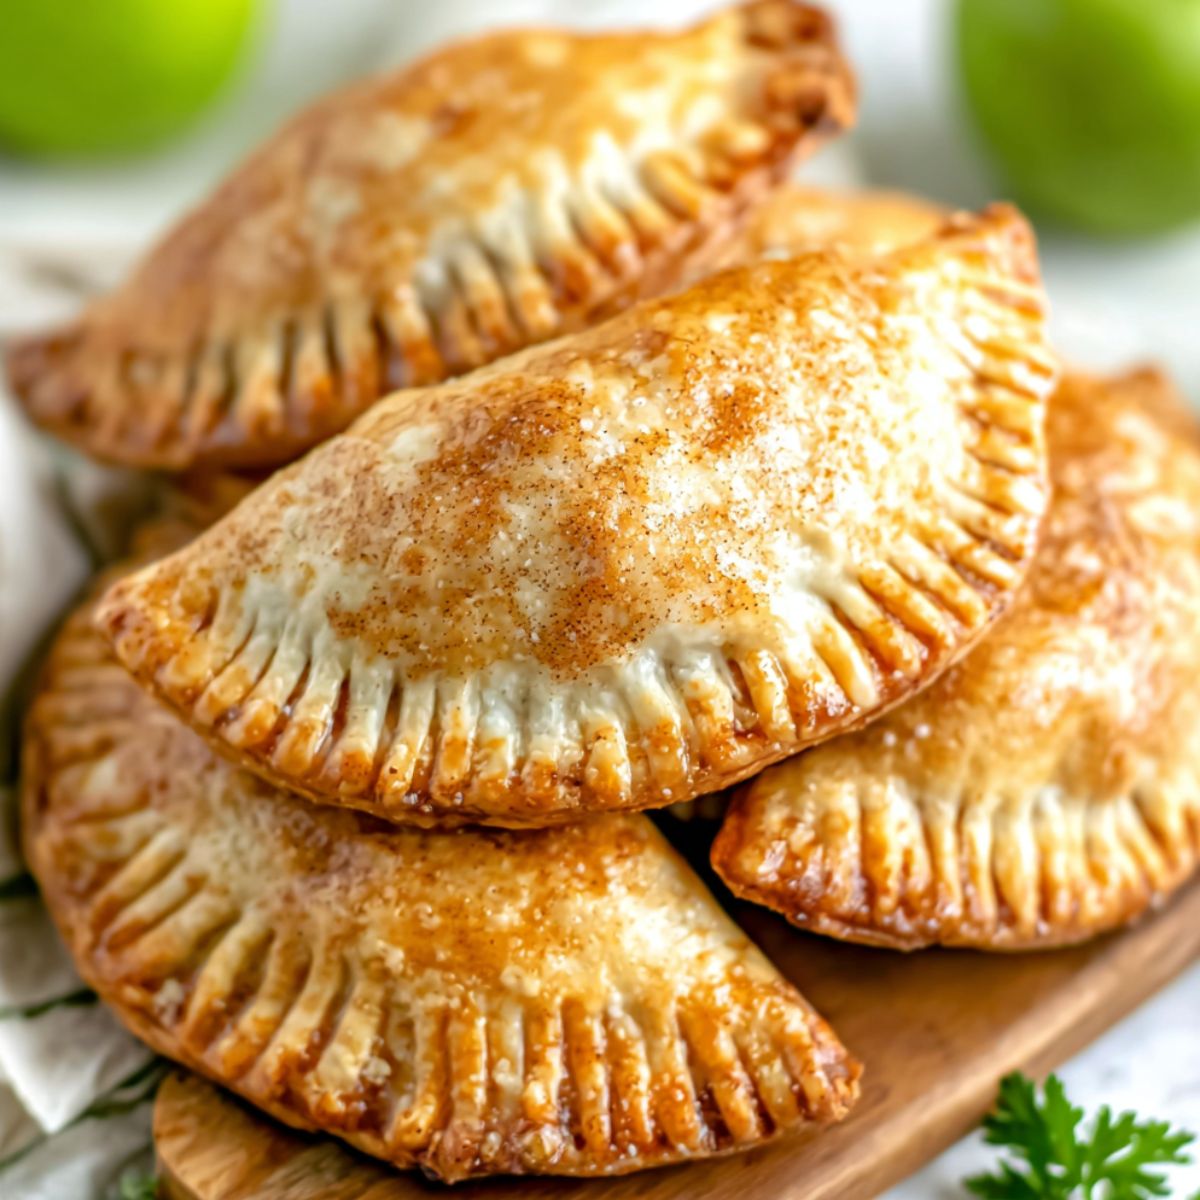
There's something magical about biting into a warm apple hand pies fresh from the oven. These adorable handheld desserts bring all the comfort of traditional apple pie in a portable, personal-sized package that's perfect for busy mornings, lunchboxes, or cozy fall gatherings. If you've been searching for a simple way to enjoy homemade apple hand pies without the fuss of a full-sized pie, you're in exactly the right place.
This apple hand pies recipe delivers that perfect balance of buttery, flaky crust wrapped around a warm, spiced apple filling. These little pockets of deliciousness come together in just 30 minutes and require no fancy equipment. Let's make some apple hand pies that'll have everyone asking for seconds!
Why These Apple Hand Pies Will Become Your Go-To Dessert
When fall arrives and apples are at their peak, there's no better way to celebrate than with fresh apple hand pies. Unlike traditional apple pie that requires careful slicing, these individual pies are grab-and-go friendly, making them ideal for potlucks, holiday gatherings, or treating yourself on a crisp afternoon. The flaky pie crust gets perfectly golden brown while sealing in that cinnamon-spiced apple filling.
What makes this hand apple pies recipe truly special is how customizable it is. You can adjust the sweetness, play with different spices, or try various apple varieties. They're also freezer-friendly, so you can prep a batch ahead and have homemade pastries ready whenever a craving hits.
Jump to:
Ingredients
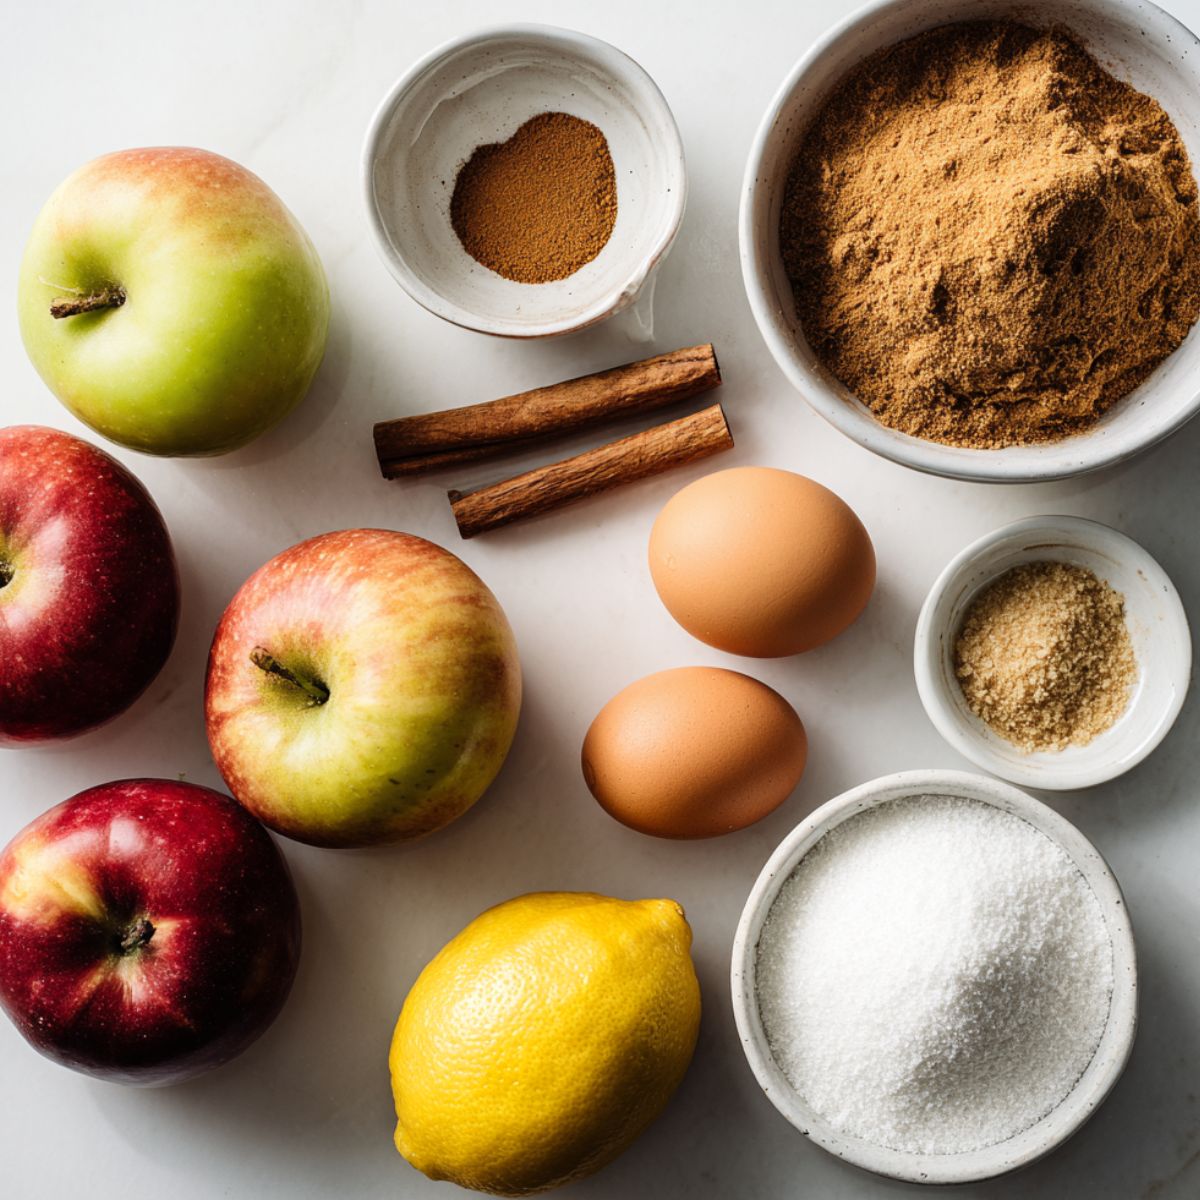
For the Apple Filling:
- Apples (Granny Smith or Honeycrisp)
- Granulated sugar
- Brown sugar
- Ground cinnamon
- Nutmeg
- Cornstarch
- Lemon juice
- Salt
For the Pastry:
- Pie crusts (pre-made or homemade)
- Egg (for egg wash)
- Coarse sugar (optional, for sprinkling)
Dietary Substitutions:
- Gluten-free pastry dough
- Coconut sugar
- Vegan butter or plant-based milk
See recipe card for quantities.
Instructions
Step 1: Prepare the Apple Pie Filling
- Combine your diced apples with both sugars, cinnamon, nutmeg, cornstarch, lemon juice, and salt in a medium bowl.
- Mix everything together until the apples are evenly coated with the spice mixture.
- Let the mixture sit for about 5 minutes while you prepare the dough; this allows the flavors to blend and the apples to release a bit of juice.
- If your apples seem very juicy, drain off excess liquid to prevent soggy apple hand pies.
Step 2: Cut and Shape the Dough
- Roll out your pie crusts on a lightly floured surface to smooth out any creases.
- Using a 4-inch round cutter (or a small bowl), cut out circles from the dough; you should get about 8-10 circles per crust.
- Gather the scraps, re-roll once, and cut additional circles; try not to overwork the dough to keep it tender.
- Place the circles on a parchment-lined baking sheet and keep them chilled while you work.
Step 3: Fill and Seal Your Hand Pies
- Place about 2 tablespoons of apple filling in the center of each dough circle, leaving a ½-inch border around the edges.
- Brush the edges with water or beaten egg to help them seal properly.
- Fold the dough over to create a half-moon shape, pressing the edges together firmly.
- Use a fork to crimp the edges, which not only seals them but creates that classic rustic dessert recipe look.
- Cut 2-3 small slits on top of each pie to allow steam to escape during baking.
Step 4: Bake to Golden Perfection
- Preheat your oven to 400°F and line a baking sheet with parchment paper.
- Arrange your assembled hand pies on the prepared sheet, spacing them about 2 inches apart.
- Brush the tops with beaten egg wash and sprinkle with coarse sugar for a beautiful, sparkly finish.
- Bake for 18-22 minutes until the crust is deep golden brown and you can see the filling bubbling slightly through the slits.
- Let the baked apple hand pies cool on the baking sheet for at least 10 minutes before serving; the filling will be extremely hot right out of the oven.
Expert Cooking Tips
Getting your apple hand pies just right comes down to a few key techniques that make all the difference.
Choose the Right Apples Granny Smith apples are the gold standard because they hold their shape during baking and provide a tart contrast to the sweet filling. For the best flavor, try mixing two varieties; half Granny Smith and half Honeycrisp creates amazing depth.
Keep Everything Cold Working with cold dough is crucial for achieving that flaky crust. If your kitchen is warm, pop the dough back in the fridge for 10 minutes between steps. Cold butter creates steam pockets as it bakes, resulting in beautiful, flaky layers.
Don't Overfill Two tablespoons per pie is the sweet spot; enough for great flavor without causing leaks or sealing problems.
Perfect Your Seal Press firmly around the edges with your fingers first, then crimp with a fork. Make sure there are no air bubbles trapped inside.
Vent Those Pies Two or three small cuts with a sharp knife release steam during baking and prevent your pies from bursting open.
Recipe Variations & Substitutions
This basic apple hand pies recipe is wonderfully versatile and can be adapted in countless ways to suit your taste preferences or dietary needs.
Caramel Apple Hand Pies Drizzle homemade or store-bought caramel sauce over the cooled pies for an indulgent twist. You can also add a tablespoon of caramel to the apple filling before sealing for pockets of gooey sweetness. This variation is especially popular for fall gatherings and holiday parties.
Apple Turnovers Style with Puff Pastry Swap the traditional pie crust for puff pastry to create a lighter, more delicate texture. The apple hand pies with puff pastry puff up beautifully and have an almost croissant-like quality. Follow the same assembly method but reduce baking time to 15-18 minutes at 400°F.
Fried Apple Hand Pies For a more indulgent treat, try frying instead of baking. Heat vegetable oil to 350°F and fry the assembled pies for 3-4 minutes per side until deep golden brown. Drain on paper towels and dust with cinnamon sugar while still warm. These taste like fair food at its finest.
Air Fryer Apple Hand Pies If you want all the flavor with less oil, the air fryer is your friend. Brush the pies lightly with melted butter or oil, place them in a single layer in your air fryer basket, and cook at 375°F for 12-15 minutes, flipping halfway through. They come out incredibly crispy with a fraction of the calories.
Dietary Modifications:
- Vegan: Use vegan pie crust and brush with plant-based milk instead of egg wash
- Gluten-Free: Substitute with your favorite gluten-free pie dough
- Sugar-Free: Replace granulated sugar with monk fruit sweetener or stevia
- Keto: Use almond flour-based pie crust and a sugar-free sweetener
Equipment Recommendations
Having the right tools makes preparing apple hand pies much easier and more enjoyable.
- Round Cookie Cutter (4-inch): Creates perfectly uniform circles for consistent baking; a small bowl or glass works as a budget-friendly alternative
- Rolling Pin: Essential for smoothing out pie crusts and ensuring even thickness throughout
- Pastry Brush: Makes applying egg wash quick and mess-free for that golden brown finish
- Fork: Perfect for crimping edges securely while adding decorative texture
- Sharp Paring Knife: Necessary for cutting vent slits and trimming excess dough
- Baking Sheets: Heavy-duty sheets prevent burning and ensure even heat distribution
- Parchment Paper: Prevents sticking and makes cleanup a breeze
- Large Mixing Bowl: Gives you plenty of room to toss the apples with spices without making a mess
Most home cooks already have these basics in their kitchen, making this an accessible recipe for bakers at any level.
Storage & Meal Prep Tips
One of the best things about apple hand pies is how well they store and reheat, making them perfect for meal prep.
Refrigerator Storage Store baked pies in an airtight container in the refrigerator for up to 5 days. Reheat in a 300°F oven for 8-10 minutes to restore crispiness.
Freezing Instructions Freeze unbaked pies on a baking sheet until solid, then transfer to freezer bags for up to 3 months. Bake directly from frozen, adding 5-7 extra minutes to the baking time. For baked pies, freeze completely cooled pies and reheat from frozen in a 350°F oven for 15-18 minutes.
Make-Ahead Tips Prepare the apple filling up to 2 days ahead and refrigerate. Cut dough circles can be refrigerated between parchment paper sheets for up to 24 hours before assembling your apple hand pies.
The Secret to Extra-Flaky Apple Hand Pies
Want to know the professional baker's trick for achieving that restaurant-quality flaky crust? It all comes down to temperature control and one simple extra step. Before you begin assembling your apple hand pies, place your cut dough circles in the freezer for 15 minutes. This super-chills the butter in the pastry, which creates more dramatic steam pockets when it hits the hot oven.
Additionally, brush your assembled pies with egg wash and then immediately sprinkle with a mixture of cinnamon sugar on top. This creates a slightly crunchy, sparkly coating that not only looks gorgeous but adds an extra layer of flavor and texture. The combination of cold dough hitting high heat plus that sugary topping transforms good apple hand pies into absolutely exceptional ones that rival anything you'd find at a high-end bakery.
FAQ
What apples are best for hand pies?
Granny Smith apples are the top choice for apple hand pies because they hold their shape and provide a tart flavor. Honeycrisp or Braeburn also work well.
What is the difference between a hand pie and a turnover?
Hand pies typically use regular pie crust while turnovers use puff pastry. Both make delicious apple hand pies; it comes down to texture preference.
What kind of dough is used for hand pies?
Traditional apple hand pies use standard pie dough for a sturdy, flaky crust. You can also use puff pastry or biscuit dough.
Can I use store-bought pie crust for hand pies?
Yes! Store-bought pie crust works perfectly for apple hand pies and saves time. Look for refrigerated pie crusts in the dairy section.
Enjoy Your Homemade Apple Hand Pies
These apple hand pies prove that impressive desserts don't have to be complicated. With their buttery, flaky crust and perfectly spiced apple filling, they deliver all the satisfaction of traditional apple pie in a convenient form. Whether you're packing them in lunchboxes or serving them at fall gatherings, these handheld desserts never disappoint.
Once you master this apple hand pies recipe, you can experiment with different fillings and toppings. If you loved these, try our Puff Pastry Apple Turnovers Recipe for a flakier version, or our Gluten Free Apple Cobbler Recipe for another crowd-pleasing apple dessert. Happy baking!
These little pockets of apple heaven never last long in my kitchen! 🍎
— Emily
Related
Looking for other recipes like this? Try these:


Pairing
These are my favorite dishes to serve with this Apple Hand Pies recipe:


Apple Hand Pies
Equipment
- 1 Rolling Pin
- 1 Round cutter (4-inch)
- 1 Pastry Brush
- 1 Fork
- 1 Paring knife
- 1 Baking sheet
- 1 Parchment paper
- 1 Mixing bowl
Ingredients
Apple Filling
- 4 medium apples (Granny Smith or Honeycrisp) peeled, cored, diced
- 3 tablespoon granulated sugar
- 1 tablespoon brown sugar
- 1 teaspoon ground cinnamon
- ¼ teaspoon nutmeg
- 1 tablespoon cornstarch
- 1 tablespoon lemon juice
- 1 pinch salt
Pastry
- 2 pre-made pie crusts or homemade
- 1 egg beaten, for egg wash
- 2 tablespoon coarse sugar optional, for topping
Instructions
- Combine apples, sugars, spices, cornstarch, lemon juice, and salt.
- Cut dough circles and chill.
- Fill, fold, and crimp hand pies.
- Brush with egg wash and sprinkle sugar.
- Bake at 400°F until golden brown.
- Cool 10 minutes before serving.


Leave a Reply