
Craving chocolate but trying to stay on track with your fitness goals? This Protein Brownie is the ultimate solution; rich, fudgy, and ready in just one minute. Unlike the usual sugar-loaded desserts, this treat packs a punch of high-quality protein, giving you that indulgent chocolate fix without the crash. Whether it's a post-workout snack or a late-night craving, this recipe fits your routine; and your macros; like a glove.
What makes this Protein Brownie a must-have? It’s fast, simple, and built with everyday ingredients you probably already have in your kitchen. I’ve made it during rushed mornings, gym days, and movie nights; it never disappoints. Try it once, and you’ll keep coming back to this smart, satisfying Protein Brownie that truly delivers on taste and nutrition.
Why This Protein Brownie Recipe Stands Out
Let’s be real; the fitness world is full of “healthy” desserts that sound amazing until you take that first dry, flavorless bite. This Protein Brownie recipe actually delivers. It was crafted during my own fitness journey; born from those all-too-familiar late-night chocolate cravings—when I needed something satisfying that wouldn’t sabotage my goals. I didn’t want another bland, protein-heavy snack; I wanted a Protein Brownie that felt like a treat and acted like fuel.
What sets this recipe apart is how effortlessly it fits your lifestyle. It’s versatile enough to go vegan, gluten-free, or dairy-free with a few easy swaps; and it plays well with everything from almond milk to a scoop of ice cream for a well-earned cheat moment. The texture? Spot on; chewy like a true brownie, not dry like a protein muffin or overly dense like energy bites. Every bite of this Protein Brownie is proof that healthy and delicious can absolutely go hand in hand.
Jump to:
Ingredients
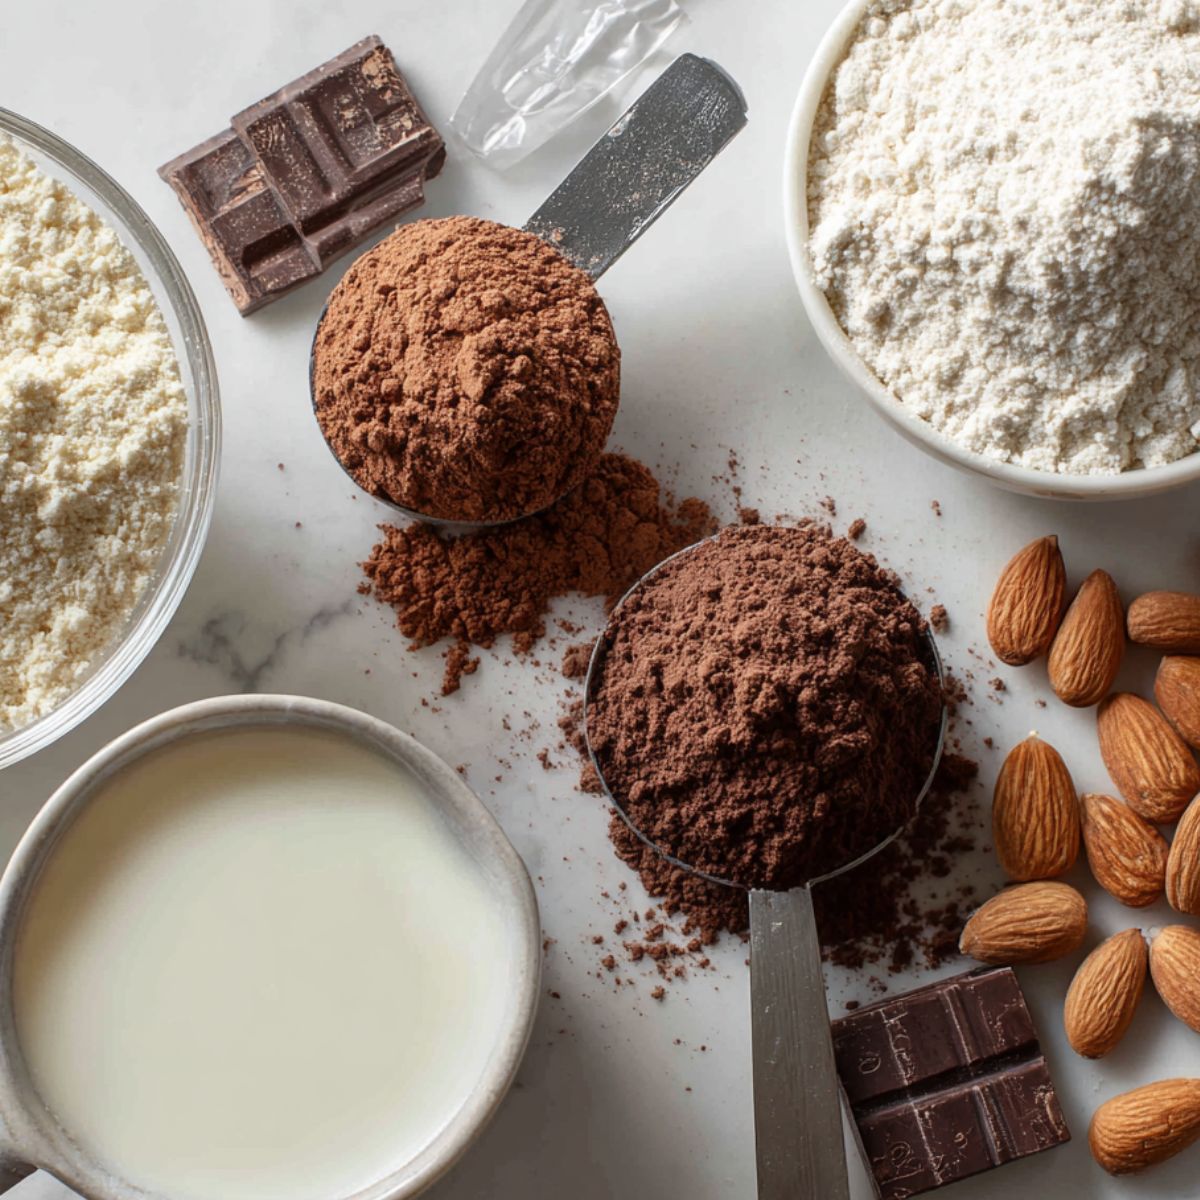
Core Ingredients:
- Chocolate whey protein powder
- Almond flour
- Unsweetened cocoa powder
- Sugar substitute (stevia, erythritol, or monk fruit)
- Unsweetened almond milk
- Sugar-free chocolate chips (optional)
Power-Up Additions:
- Vanilla extract
- Sea salt
- Almond butter
Note:
This Protein Brownie recipe is incredibly forgiving. If the batter feels too thick, add more liquid; if it’s too thin, mix in a bit more protein powder or almond flour. It’s flexible, easy to adjust, and perfect for any level of kitchen confidence.
See recipe card for quantities.
Instructions
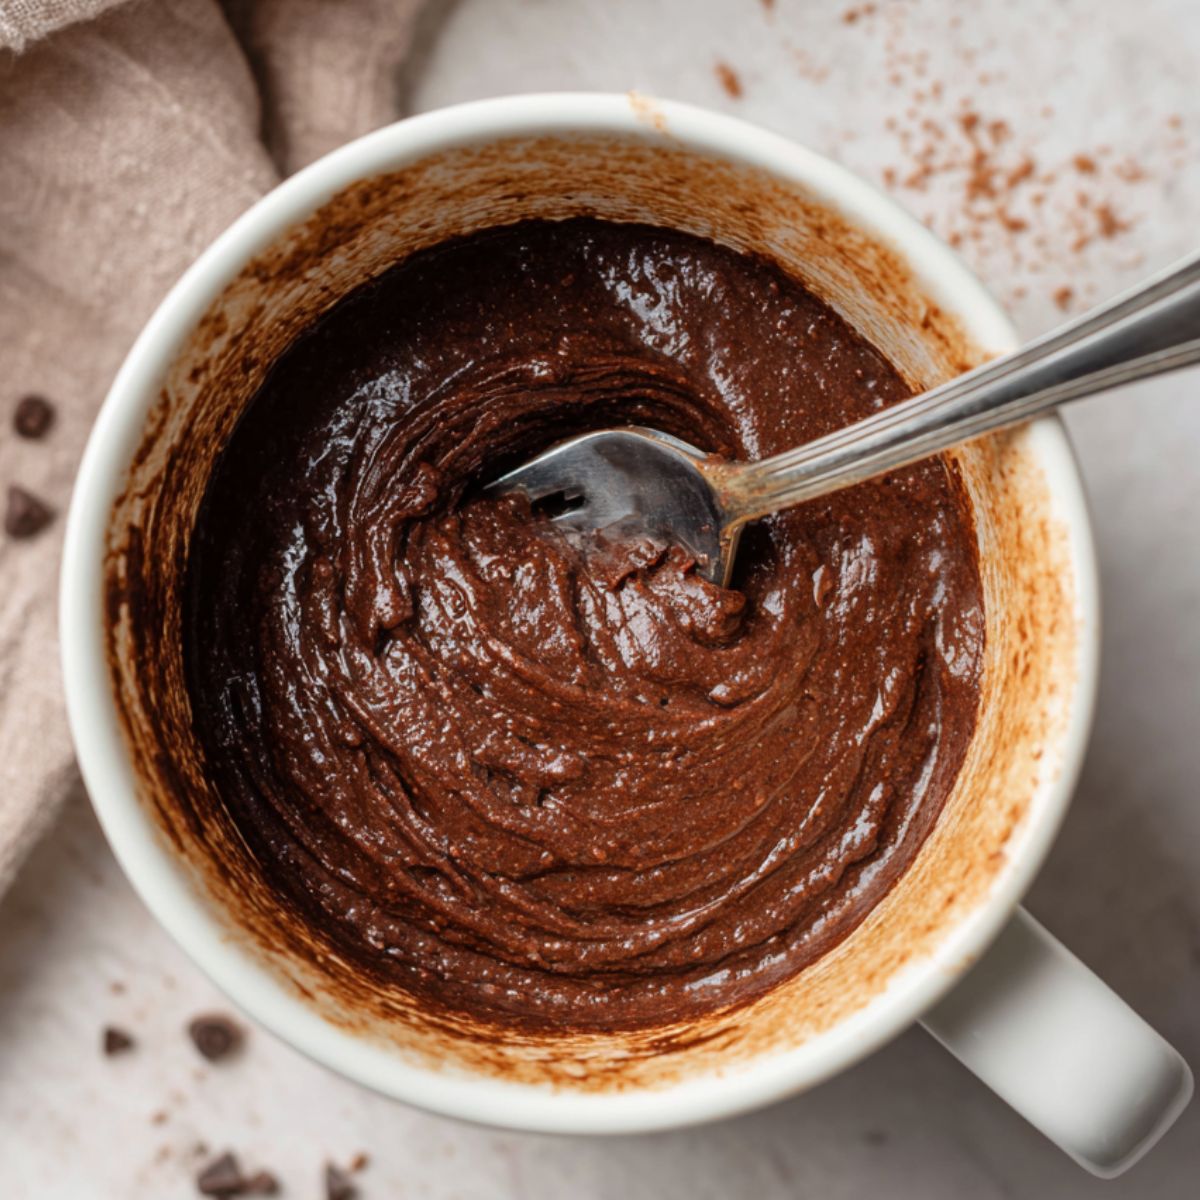
Mix Everything Together
- In a microwave-safe mug lightly sprayed with cooking spray, whisk together all dry ingredients (protein powder, almond flour, cocoa powder, and sweetener) until no lumps remain.
- Add almond milk and vanilla extract, mixing until you get a thick cake batter consistency. Fold in chocolate chips if using.
Microwave
Microwave on high for 45-60 seconds. Start with 45 seconds and check – the top should look set but slightly moist.
Microwave power varies, so watch carefully to avoid overcooking.
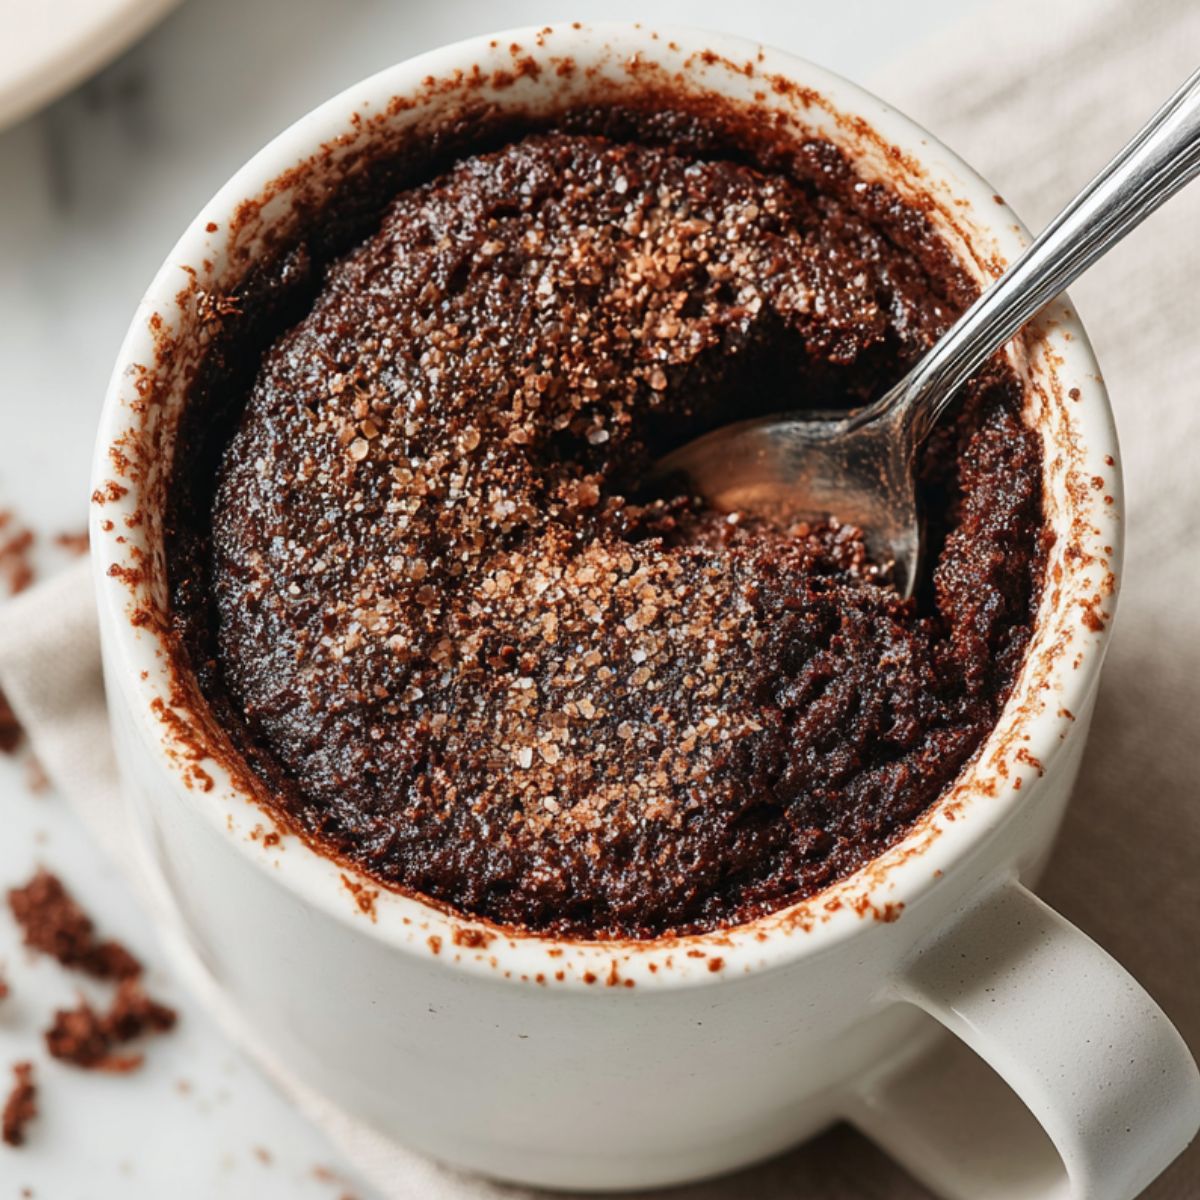
Cool and Enjoy
Let the brownie cool for 30-60 seconds before eating. This allows the texture to set properly and prevents burning your tongue on hot chocolate.
- Step 1: Mix Everything Together
Combine dry and wet ingredients into a thick brownie batter.
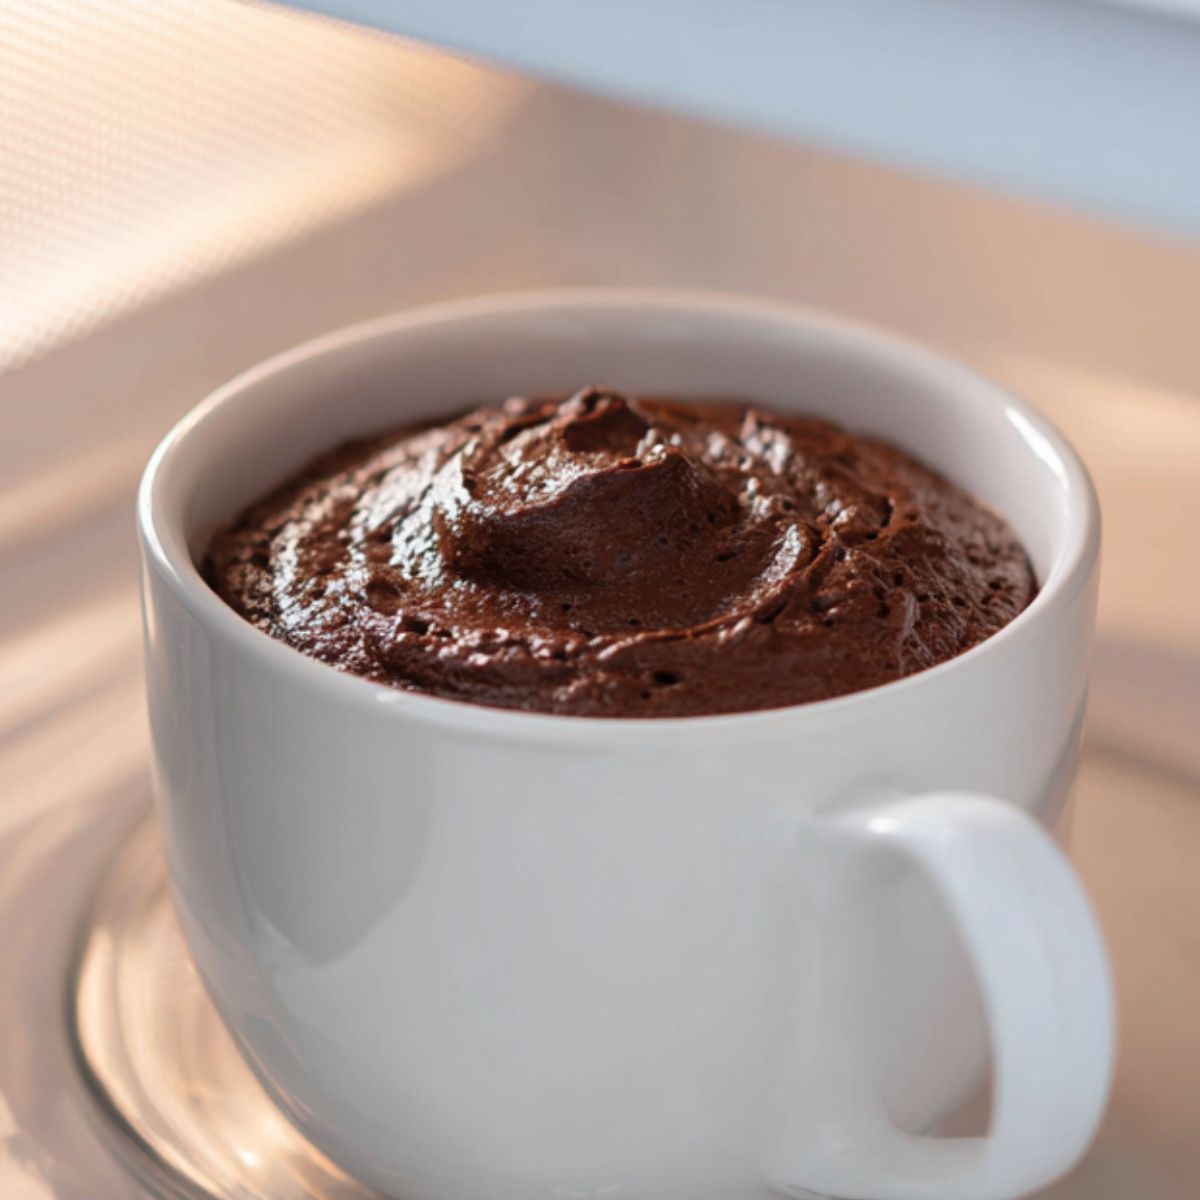
- Step 2: Microwave
Microwave the batter until the top is set but moist.

- Step 3: Cool and Serve
Let it cool slightly for the perfect fudgy texture.
Hints & Expert Cooking Tips for the Perfect Protein Brownie
- Bring It to Room Temp:
Cold ingredients; especially protein powder; can lead to a clumpy, uneven mix. Let everything sit out for a few minutes before combining; it makes a smoother, better-textured Protein Brownie every time. - Batter Check = Brownie Win:
Aim for a batter that lightly coats the back of a spoon but still drips easily. If it’s too thick, the brownie turns dense; too thin, and it leans more cake than chewy treat. - Microwave Like a Pro:
Got a powerful microwave? Use 50% power for about 90 seconds instead of full blast. This helps your Protein Brownie cook more evenly without tough, rubbery edges. - Prep Now, Enjoy Later:
Double your batter and store it in the fridge for up to 3 days. Just remember to stir in a splash of milk or water before microwaving; cold batter thickens up, and a little liquid brings it back to life.
Recipe Variations & Dietary Modifications
There’s no one-size-fits-all when it comes to a great Protein Brownie, and that’s the beauty of this recipe. Whether you’re plant-based, gluten-free, or keto-focused, these easy swaps let you customize without compromising taste or texture.
- Vegan Protein Brownie
Swap out whey for your favorite plant-based protein; pea, rice, or hemp all work well. Use almond, oat, or soy milk in place of dairy. The texture may shift slightly, but the rich, fudgy flavor still shines through. - Keto-Friendly Version
This Protein Brownie is already low in carbs, but for stricter keto plans, sweeten with erythritol or stevia only. For an extra dose of healthy fats, stir in a tablespoon of almond butter. - Gluten-Free Option
You’re in luck; this recipe is naturally gluten-free with almond flour. Just double-check that your protein powder is certified gluten-free to avoid sneaky additives. - High-Protein Boost
Need more muscle-building fuel? Add an extra half scoop of protein powder and a splash more liquid to keep the batter smooth. This can bring your Protein Brownie up to around 30g of protein per serving. - Flavor Variations
Switch up the taste with these fun twists:- Salted Caramel: Use sugar-free caramel extract and a pinch of sea salt
- Peanut Butter Protein Brownie: Add 1 tablespoon of natural peanut butter
- Mint Chocolate: Mix in ¼ teaspoon of peppermint extract
- Coffee Mocha: Stir in 1 teaspoon of instant coffee powder
Equipment
Essential Tools:
- Microwave-safe mug or bowl (6-8 oz capacity) – A wide, shallow container works better than a tall, narrow one
- Small whisk or fork – For mixing without lumps
- Measuring spoons – Precision matters in small-batch baking
- Rubber spatula – For folding in mix-ins gently
Budget-Friendly Alternatives: Don't have a whisk? A fork works just fine. No measuring spoons? Use these conversions: 1 tablespoon = 3 teaspoons, and a standard coffee mug is usually about 8 oz.
Pro Equipment Upgrade: A small kitchen scale makes this recipe even more consistent. Weighing your protein powder (about 25-30g per scoop) ensures the same results every time.
Storage & Meal Prep Tips
- Fresh Is Best
This Protein Brownie truly shines when enjoyed fresh and warm; the texture is spot-on right after microwaving, especially after a short cooling period that lets the fudginess settle in just right. - Fridge-Friendly
If you manage to save some (rare, but it happens), cover your leftover Protein Brownie and store it in the fridge for up to 2 days. When ready to indulge again, reheat for 15–20 seconds in the microwave to bring back that melty, just-baked feel. - Meal Prep Like a Pro
Want to stay ahead of those sudden chocolate cravings? Mix several batches of the dry ingredients and store them in small, airtight containers or jars in your pantry; they’ll stay good for up to a month. When the mood strikes, simply add the wet ingredients and microwave; your Protein Brownie is ready in no time. - Freezer Option
While freezing the finished product isn’t ideal, you can prep and freeze the dry mix in portion-sized bags for up to 3 months. Just thaw fully before adding liquids and cooking; it’s a great strategy for make-ahead snack planning.
The Tiny Secret That Changed My Protein Brownie Forever
When I first started testing this Protein Brownie recipe, it was good—but something felt... off. The flavor was there, the chocolate cravings were satisfied, but the texture didn’t quite hit that brownie sweet spot. Then one night, while multitasking (read: chasing laundry while my batter sat untouched), I stumbled on the secret: let the batter rest for just 2–3 minutes before cooking. Total game-changer. The protein powder hydrates, the almond flour softens, and suddenly you're eating a Protein Brownie that tastes bakery-worthy, not like a rushed health snack.
Oh; and don’t underestimate the power of a pinch of salt. That little sprinkle doesn’t just add flavor; it makes the chocolate sing. Together, these tiny tweaks took my Protein Brownie from passable to perfection. Try it once, and you'll never go back.
FAQ
Are protein brownies good for you?
Yes! When made with clean ingredients, they’re a tasty way to boost protein and curb cravings without the guilt.
Can you add protein powder to box brownie mix?
Yes, just swap a bit of flour with protein powder and adjust the liquid. It’s an easy upgrade.
How to make brownies high in protein?
To make a Protein Brownie high in protein, use whey or plant-based protein powder, almond flour, nut butter, and eggs or milk. These ingredients boost protein without sacrificing taste or texture.
Can I use protein powder instead of flour for brownies?
You can partially replace flour with protein powder in a Protein Brownie recipe, but not completely. A full swap may dry out the texture, so balance is key for that fudgy, brownie-like result.
Your 60-Second Chocolate Fix Awaits
Let’s be honest; who said healthy eating had to be boring? This 1-minute Protein Brownie proves you can crush cravings and your fitness goals; all in one fudgy, protein-packed bite. It’s fast, satisfying, and has officially earned its spot in my weekly rotation.
If you're anything like me and love quick, feel-good treats, you’ve got to try my Healthy Chocolate Fudge or the 3 Ingredient Brownie Bites Recipe next; they’re perfect for when you want dessert without the detour.
So go ahead, give this Protein Brownie a whirl tonight. Then tell me—what twist did you add? Drop your thoughts in the comments or tag your creation online; I love seeing what you come up with. And hey, don’t forget to rate the recipe; it helps our little healthy dessert-loving community grow!
✨ Ashley Morgan ✨
Homemade treats that fuel your goals & taste like the real thing.
Related
Looking for other recipes like this? Try these:


Pairing
These are my favorite dishes to serve with this 1 Minute Protein Brownie Recipe:


1-Minute Protein Brownie
Equipment
- 1 Microwave-safe mug
- 1 Fork or small whisk
- Measuring spoons
Ingredients
- 1 scoop Chocolate whey protein Or plant-based (pea, hemp, or rice)
- 2 tablespoon Almond flour Can use coconut or regular flour
- 1 tablespoon Unsweetened cocoa powder For rich chocolate flavor
- 1.5 tablespoon Sugar substitute Stevia, erythritol, or monk fruit
- 3 tablespoon Unsweetened almond milk Or oat, dairy milk, or water
- 1 tablespoon Sugar-free chocolate chips Optional, for texture
- 1 teaspoon Vanilla extract Optional, boosts flavor
- 1 pinch Sea salt Optional, enhances chocolate taste
- 1 tablespoon Almond butter Optional, for added richness
Instructions
- Mix all dry ingredients.
- Add wet ingredients and stir.
- Fold in chocolate chips.
- Let batter rest for 2–3 minutes.
- Microwave on high for 45–60 seconds.
- Let cool for 30–60 seconds before eating.
Notes
Nutrition information is automatically calculated, so should only be used as an approximation.


Leave a Reply