
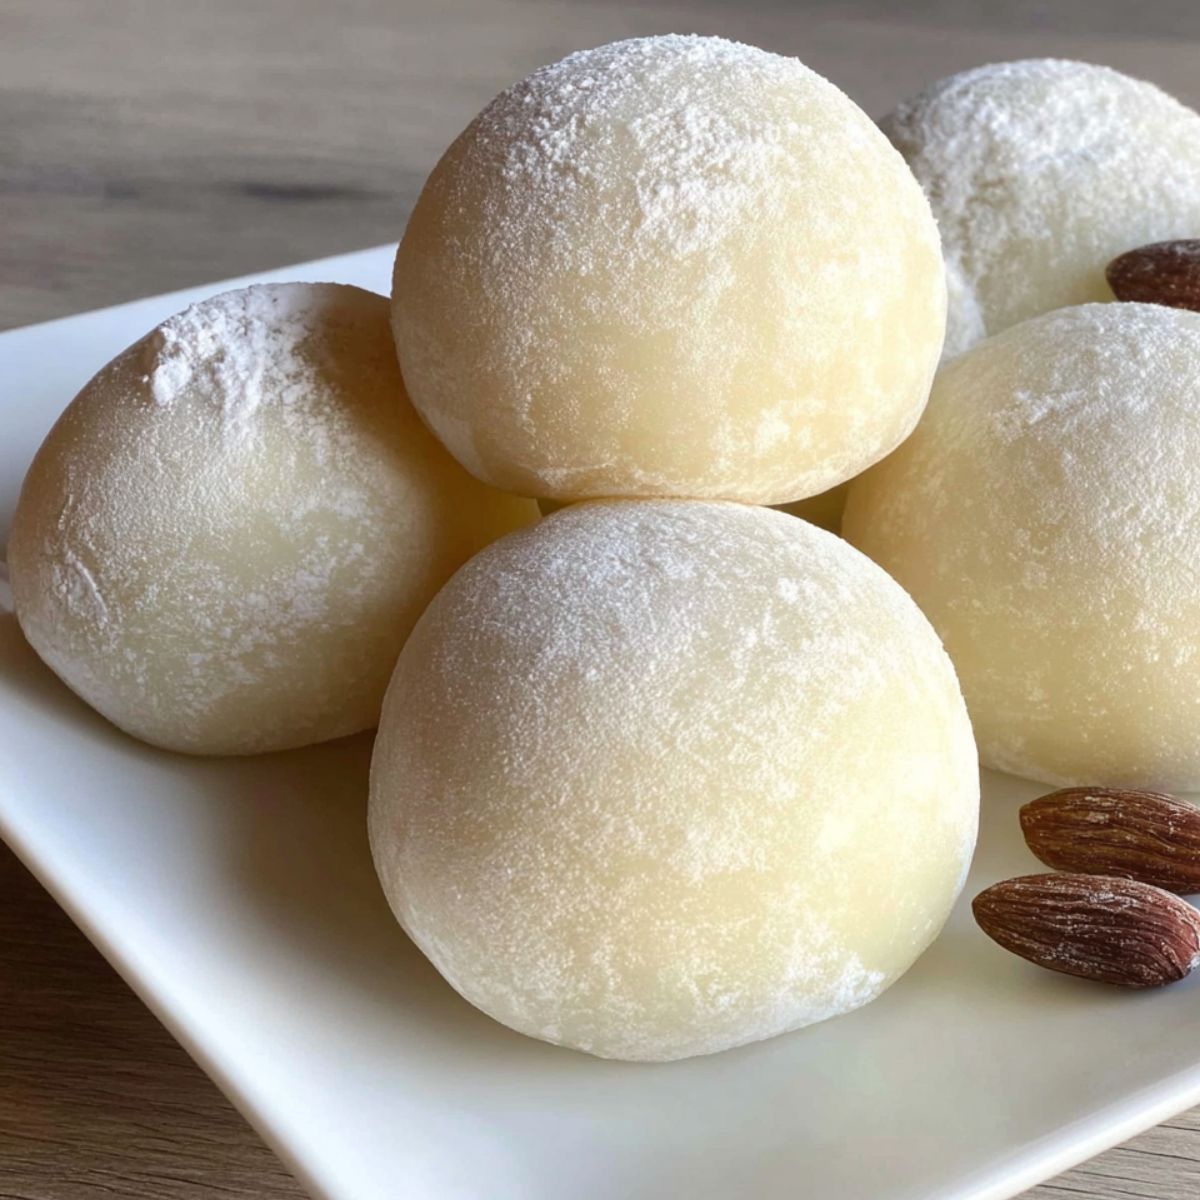
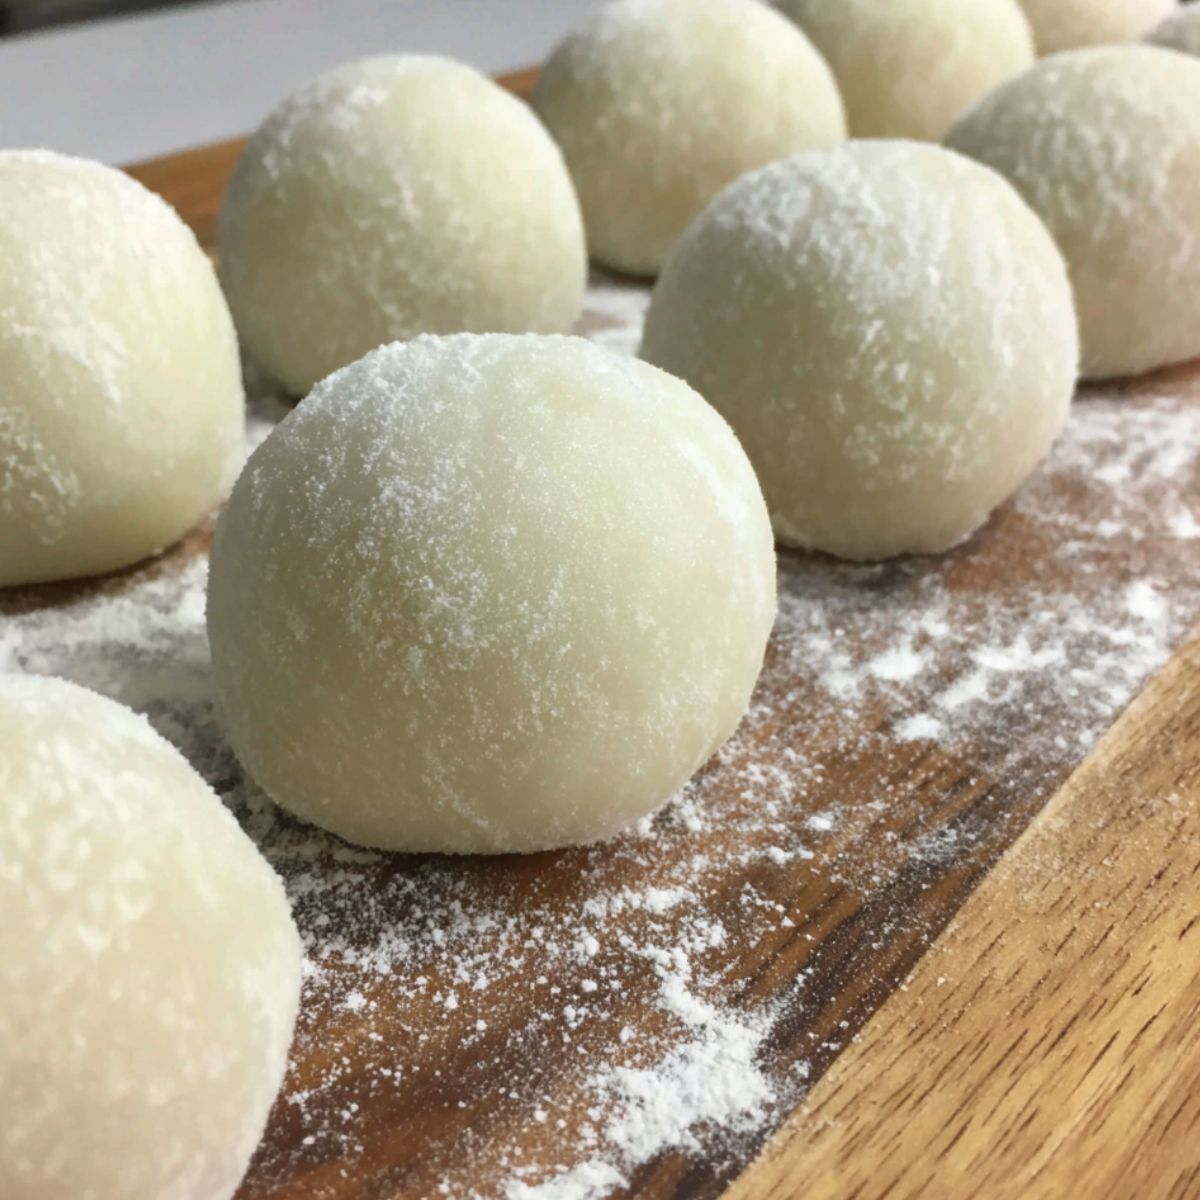
Craving a soft, chewy dessert that feels like pure comfort? Say hello to milk mochi; a silky, melt-in-your-mouth treat you can make in just 15 minutes. With only glutinous rice flour, milk, and sugar, this recipe delivers that perfect creamy sweetness without any fuss.
Unlike traditional mochi that can be complicated, this easy milk mochi recipe is all about simplicity and flavor; rich, milky, and irresistibly soft. Whether you’re new to Asian desserts or just want a quick sweet fix, this milk mochi is proof that homemade really can taste better than store-bought.
Why This Milk Mochi Recipe Stands Out
Milk mochi has taken the spotlight as a lighter, more delicate alternative to rich, heavy desserts; it offers that perfect balance of chewiness and creaminess we all love. Inspired by traditional Japanese mochi-making, milk mochi has evolved over time, giving rise to delicious variations enjoyed across many cultures.
What makes this milk mochi recipe truly shine is its beautiful simplicity; no steaming, no special tools, no complicated techniques. Just three basic pantry ingredients come together to create a dessert that tastes like it came straight from your favorite restaurant. The creamy milk flavor is wonderfully versatile; it pairs perfectly with fresh fruit, works as a dreamy base for mochi ice cream, or delights on its own as a sweet, satisfying rice cake.
Best of all, this milk mochi recipe is the ideal blank canvas if you want to get creative; try matcha, coconut milk, or even chocolate variations to suit any taste.
Jump to:
Ingredients
- Glutinous rice flour; This is what gives mochi its signature chewy texture. Regular flour won’t work as a substitute.
- Whole milk; Adds creaminess and helps bind the dough.
- Granulated sugar; Brings the right amount of sweetness and helps create a smooth, soft texture.
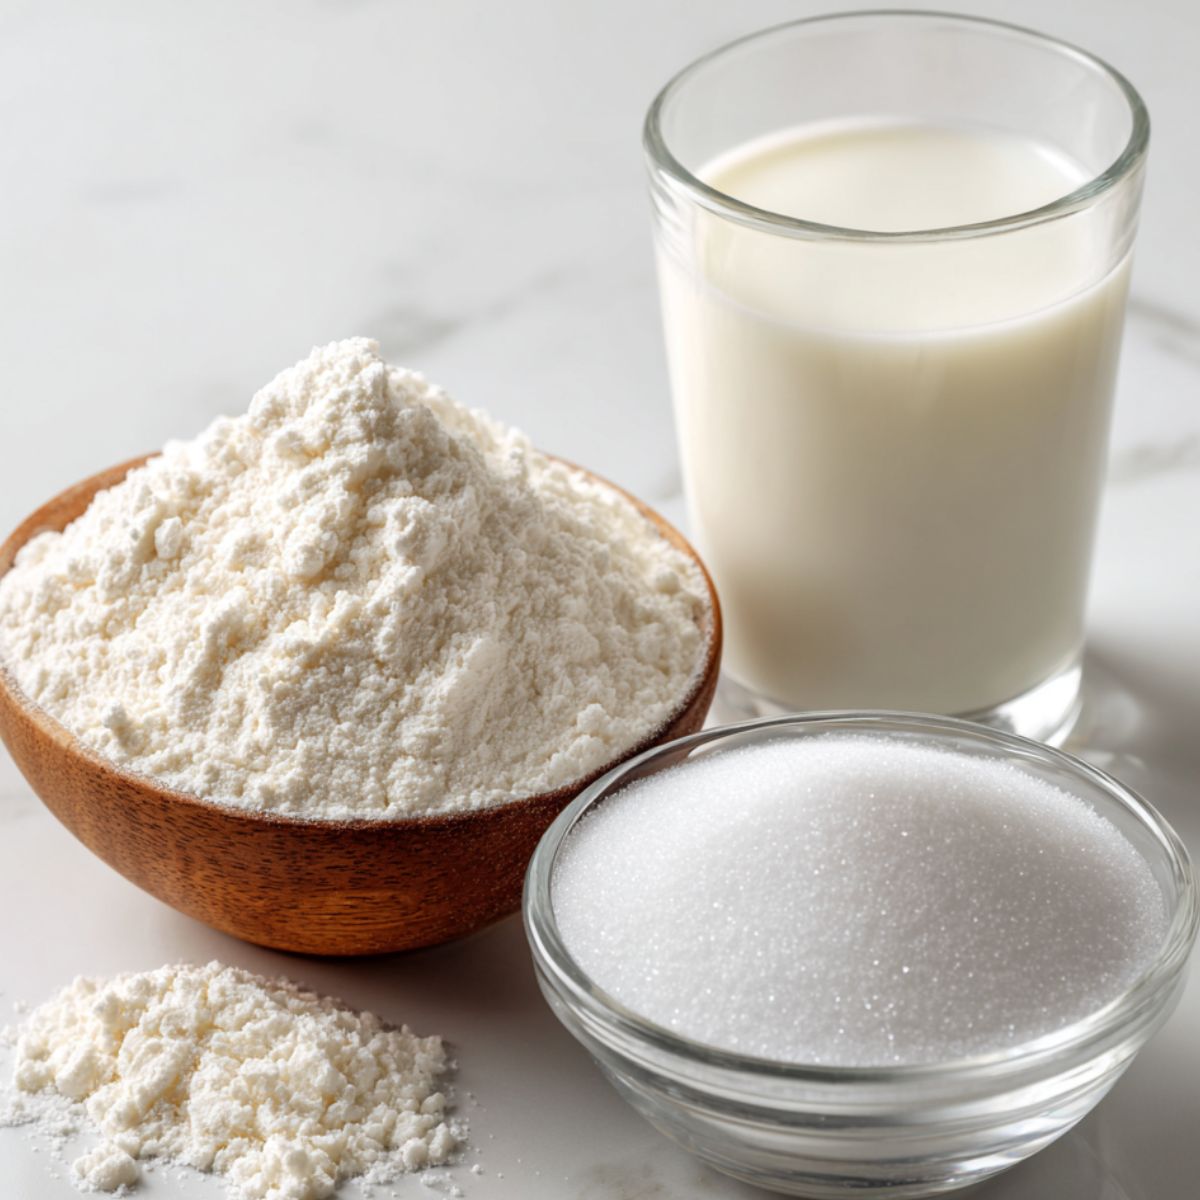
See recipe card for quantities.
Instructions
Mix All Ingredients
- In a microwave-safe bowl, whisk together the glutinous rice flour and sugar.
- Gradually pour in the milk while stirring constantly to prevent lumps. The mixture should look like thick cream with no dry flour pockets visible.
Pro tip: Strain the mixture through a fine mesh if you notice any lumps – this creates the silkiest final texture.
Microwave Until Cooked
- Microwave on high for 1 minute, then stir thoroughly.
- Continue microwaving in 30-second intervals, stirring between each interval, until the mixture becomes translucent and pulls away from the sides of the bowl (usually 2-3 minutes total).
Expert tip: The dough is ready when it becomes stretchy and slightly translucent. If it's still white and floury, continue microwaving in 15-second bursts.
Cool and Shape
- Let the hot mochi dough cool for 2-3 minutes until safe to handle.
- Dust your hands with cornstarch or potato starch to prevent sticking, then divide into 8-10 portions and roll into smooth balls.
- Place finished mochi balls on a plate dusted with cornstarch. They're ready to eat immediately while still warm and extra soft!
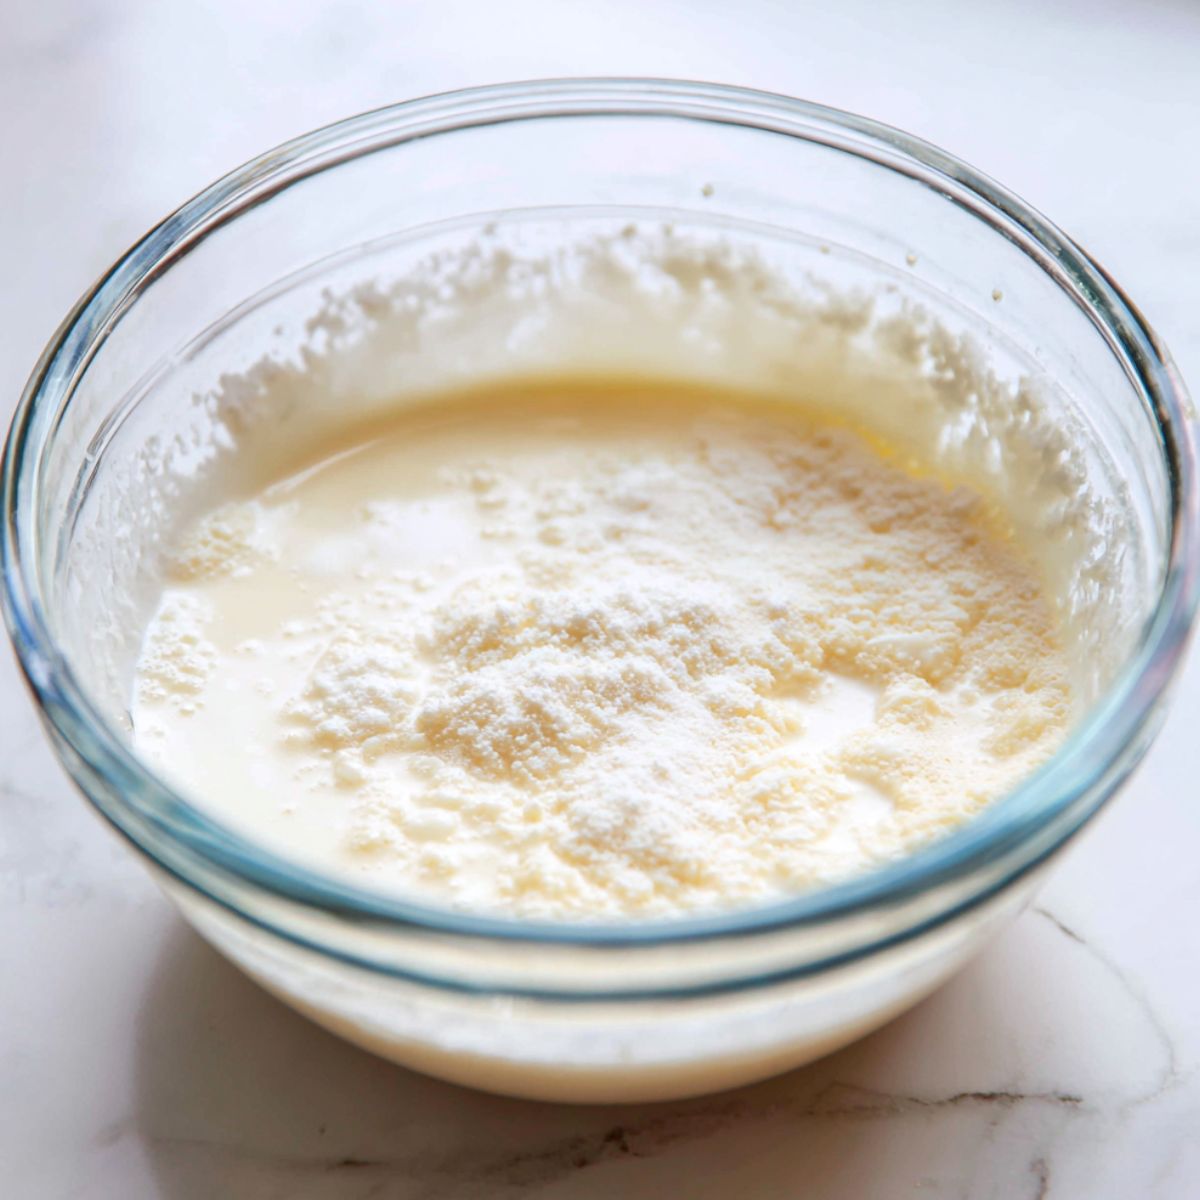
- Step 1: Mix All Ingredients
Mix glutinous rice flour, sugar, and milk until smooth
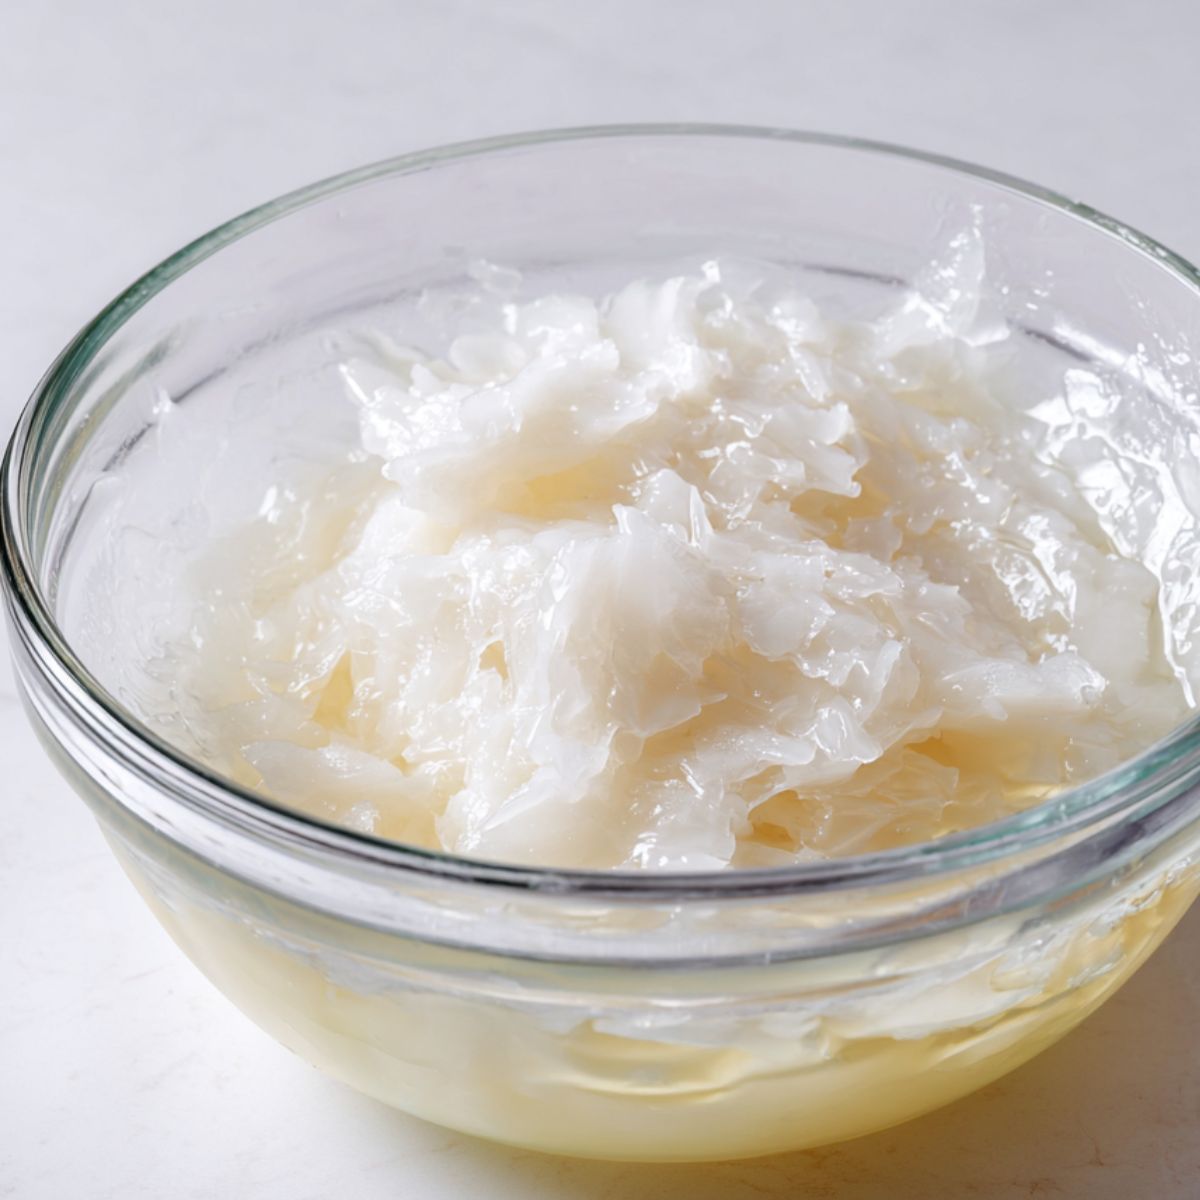
- Step 2: Microwave Until Cooked
Microwave until the dough is translucent and stretchy
- Step 3: Cool and Shape
Shape warm dough into small balls with dusted hands
Hints & Expert Cooking Tips
When it comes to making milk mochi, a few small tricks can make the difference between good and truly irresistible; here’s what you need to know:
- Consistency check; The ideal mochi dough should stretch nicely without snapping right away. If it tears too easily, it’s a sign that it needs a bit more cooking time.
- Timing is everything; Don’t overcook the mochi dough. You want it to be stretchy and soft, not tough. If your milk mochi dough feels a bit too firm, simply stir in a tablespoon of milk and microwave for another 15 seconds to bring it back to life.
- Prevent sticking; Always dust your hands and work surface with cornstarch or potato starch. This helps keep the sticky milk mochi dough easy to handle and shape.
- Temperature matters; You’ll get the best texture when the mochi is slightly warm — that’s when it’s at its softest and most melt-in-your-mouth. If it cools down too much, just microwave individual pieces for 5–10 seconds.
Optional Substitutions
One of the best parts about this milk mochi recipe is how easy it is to customize without sacrificing that soft, chewy texture or creamy flavor; here are some simple swaps you can try:
- Flavor variations; Mix in 1 teaspoon of vanilla extract or ½ teaspoon of matcha powder for a fun twist on the classic flavor.
- Gluten-free option; No changes needed ; this milk mochi is naturally gluten-free as long as you use pure glutinous rice flour.
- Dairy-free version; Swap out the whole milk for coconut milk or oat milk; you’ll still get that rich, creamy result that makes milk mochi so irresistible.
- Lower sugar; Prefer something less sweet? Just reduce the sugar to 2 tablespoons for a lighter touch.
Recipe Variations & Dietary Modifications
One of the things I love most about this milk mochi recipe is how easy it is to adapt; whether you’re after new flavors or trying to fit specific dietary needs, these simple tweaks will keep your milk mochi just as soft, chewy, and satisfying.
Flavor Variations;
- Matcha milk mochi; Add 1 teaspoon of matcha powder to the dry ingredients for a subtle, earthy twist.
- Chocolate version; Mix in 2 tablespoons of cocoa powder to turn your milk mochi into a chocolate lover’s dream.
- Coconut milk mochi; Replace regular milk with coconut milk for a tropical touch that pairs beautifully with fresh fruit.
- Brown sugar boba milk tea mochi; Use brown sugar instead of white and stir in a pinch of tea powder for a fun, boba-inspired flavor.
Dietary Modifications;
- Vegan milk mochi; Simply use oat milk, almond milk, or your favorite plant-based milk for the same creamy texture without the dairy.
- Reduced sugar; Halve the sugar and add a few drops of liquid stevia if you’re looking to cut back on sweetness.
- Protein-boosted; Stir in 1 scoop of unflavored protein powder and reduce the milk slightly for added nutrition.
These variations all follow the same basic method, so you can experiment confidently knowing your milk mochi will turn out just right.
Equipment
Essential Tools:
- Microwave-safe bowl: Glass or ceramic works best for even heating
- Whisk: Prevents lumps and ensures smooth mixing
- Fine mesh strainer: Optional but helpful for ultra-smooth texture
Budget-Friendly Alternatives:
- Use any microwave-safe container if you don't have a dedicated bowl
- A fork works in place of a whisk for small batches
- Clean kitchen towel can substitute for specialized dusting tools
The beauty of this recipe is that it requires minimal equipment, making it accessible for any kitchen setup.
Storage & Meal Prep Tips
When it comes to enjoying milk mochi at its best, a few simple storage tips can make all the difference; here’s how to keep that soft, chewy texture no matter when you plan to eat it.
- Immediate Storage; Fresh milk mochi is at its softest and most delicious within 2–3 hours of making. Keep it covered at room temperature to lock in that perfect texture.
- Refrigerator Storage; If you have leftovers, place your milk mochi in an airtight container and refrigerate for up to 3 days. The texture will firm up in the fridge, but no worries; a quick 5–10 seconds in the microwave will bring back that signature softness.
- Freezing Instructions; Freeze individual milk mochi balls on a tray first, then transfer them to freezer bags. They’ll keep well for up to a month. When you’re ready to enjoy them, thaw at room temperature for about 20 minutes, or microwave straight from frozen for 10–15 seconds.
- Meal Prep Tip; Make a double batch and stash half in the freezer. That way, you’ll always have a quick, satisfying dessert ready to go; they thaw fast and taste just as fresh as the day you made them.
The Secret Mochi Maker’s Trick You’ll Wish You Knew Sooner
When I first started making milk mochi at home, I couldn’t figure out how to get that ultra-smooth, almost magical texture that you find in fancy dessert shops. Then I stumbled on a tip from an old-school mochi maker; after mixing your batter, just let it rest for 5 minutes. It sounds simple, but this little pause gives the glutinous rice flour time to fully soak up the liquid, creating a batter that cooks up softer, stretchier, and smoother ; like professional milk mochi every time.
Here’s another trick I swear by; shape your milk mochi while it’s still warm. The dough is so much easier to handle when it’s hot, letting you form perfect little rounds without cracks or frustration. Once you try it, you’ll see how this simple timing makes your milk mochi look as good as it tastes.
FAQ
What is milk mochi?
Milk mochi is a soft, chewy rice cake made with glutinous rice flour, milk, and sugar; it’s a creamier twist on traditional mochi.
Should you use milk or water for mochi?
Milk makes milk mochi richer and creamier, while water gives a plainer taste; milk is the better choice for flavor.
Is mochi healthier than ice cream?
Milk mochi is lighter than ice cream; it has less fat and fewer calories per serving.
How is mochi so chewy?
The chewiness of milk mochi comes from glutinous rice flour, which turns sticky and stretchy when cooked.
Ready to Master Milk Mochi?
This easy 3-ingredient milk mochi recipe is proof that you don’t need complicated steps or fancy ingredients to make an incredible dessert; just that perfect chewy texture and creamy milk flavor that keeps you coming back for more. The best part? Once you’ve nailed this base recipe, you can branch out and try other fun creations like my Mochi Muffins Recipe or the super-refreshing Watermelon Mochi Recipe ; both are guaranteed crowd-pleasers.
So, what are you waiting for? Whip up a batch this weekend and see for yourself why homemade mochi always wins over store-bought. If you give it a try, I’d love to hear how it turned out; drop your rating, share your creative twists in the comments, and tag your photos so I can see your amazing mochi magic!
Related
Looking for other recipes like this? Try these:


Pairing
These are my favorite dishes to serve with this Milk Mochi Recipe:


Milk Mochi Recipe
Equipment
- 1 Microwave-safe bowl
- 1 Whisk
- 1 Fine-mesh strainer (optional)
Ingredients
- 1 cup glutinous rice flour
- 0.75 cup whole milk
- 3 tablespoons granulated sugar
- as needed cornstarch or potato starch for dusting
Instructions
- Mix flour, sugar, and milk.
- Microwave until translucent.
- Cool slightly and shape.


Martina says
I would line to try your recipe but I don’t have a microwave.
Viola says
No worries at all; you can make this on the stovetop too! Just cook the mixture over low heat, stirring constantly, until it thickens into a sticky dough. It turns out just as chewy and delicious! 😊