

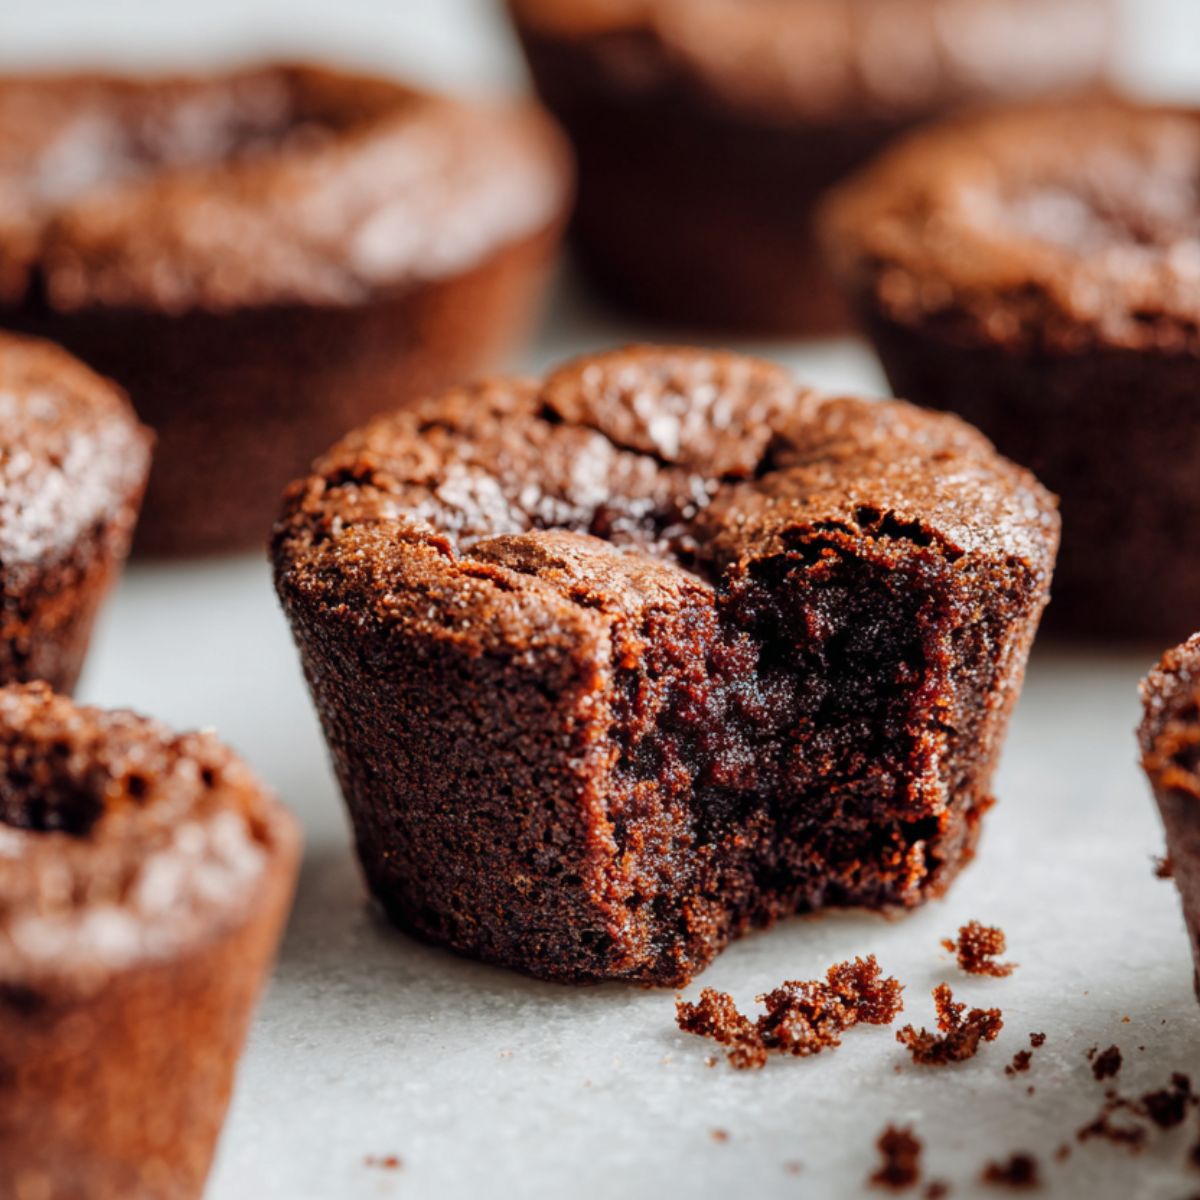
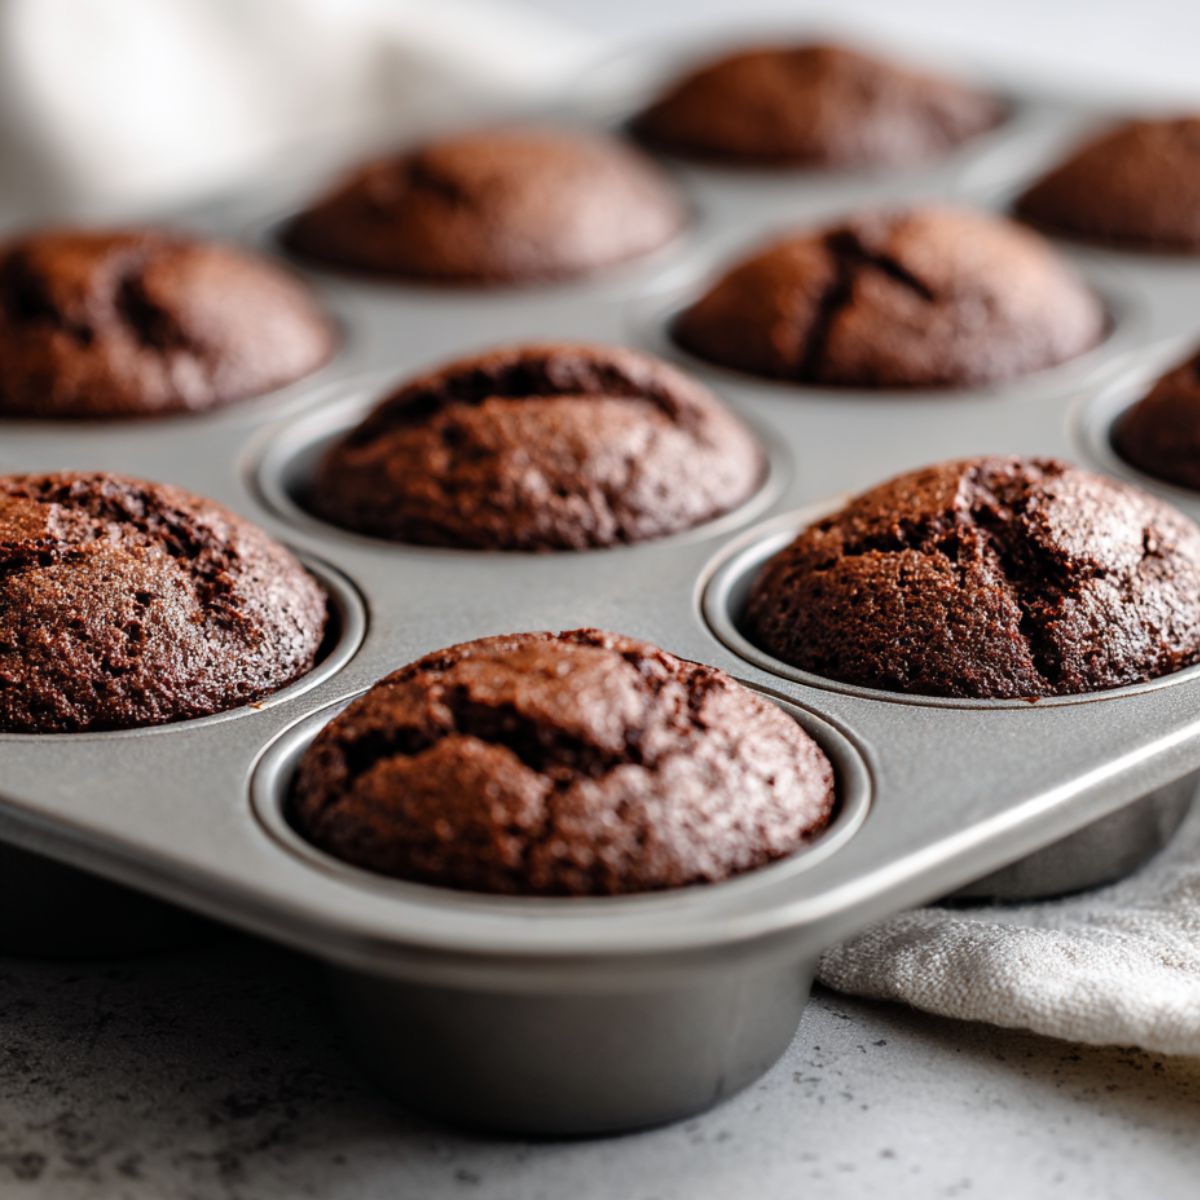
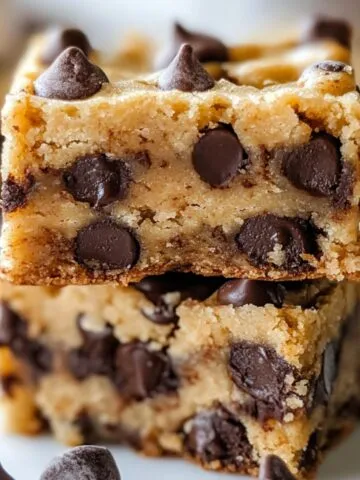
Craving something rich, chocolaty, and ready in a flash? Let me introduce you to the magic of Brownie Bites; your go-to treat when time is short but your sweet tooth won’t wait. With just three simple pantry ingredients, you can whip up these fudgy little delights in under 20 minutes.
These Brownie Bites are everything you want in a dessert, moist, chewy, and loaded with deep chocolate flavor. Whether you're hosting a party, packing school snacks, or just need a quick pick-me-up, they deliver big satisfaction in a small bite.
The best part? No fancy tools or complicated steps. Just pure, gooey goodness that’s as easy to make as it is to love. Trust me; once you try these Brownie Bites, they’ll become your new go-to chocolate fix.
Why These Brownie Bites Are a Game-Changer
Let’s be honest; not all Brownie Bites are created equal. While some recipes require a laundry list of ingredients and the patience of a pastry chef, this version proves that less really can be more. With just three key ingredients, these Brownie Bites come together effortlessly; and the result? A perfectly gooey center that’s rich, fudgy, and downright dreamy for any chocolate lover.
What truly sets these Brownie Bites apart is their amazing versatility. Want to impress guests? Serve them warm with a scoop of vanilla ice cream. Hosting a party? These are crowd-pleasing, bite-sized desserts that disappear fast. Need a quick treat after lunch? Grab one straight from the mini muffin tin and you’re good to go.
And because of their compact size, these Brownie Bites strike the perfect balance; satisfying your sweet tooth without going overboard. They deliver everything you crave in a classic brownie; just smaller, easier, and more irresistible.
Jump to:
Ingredients
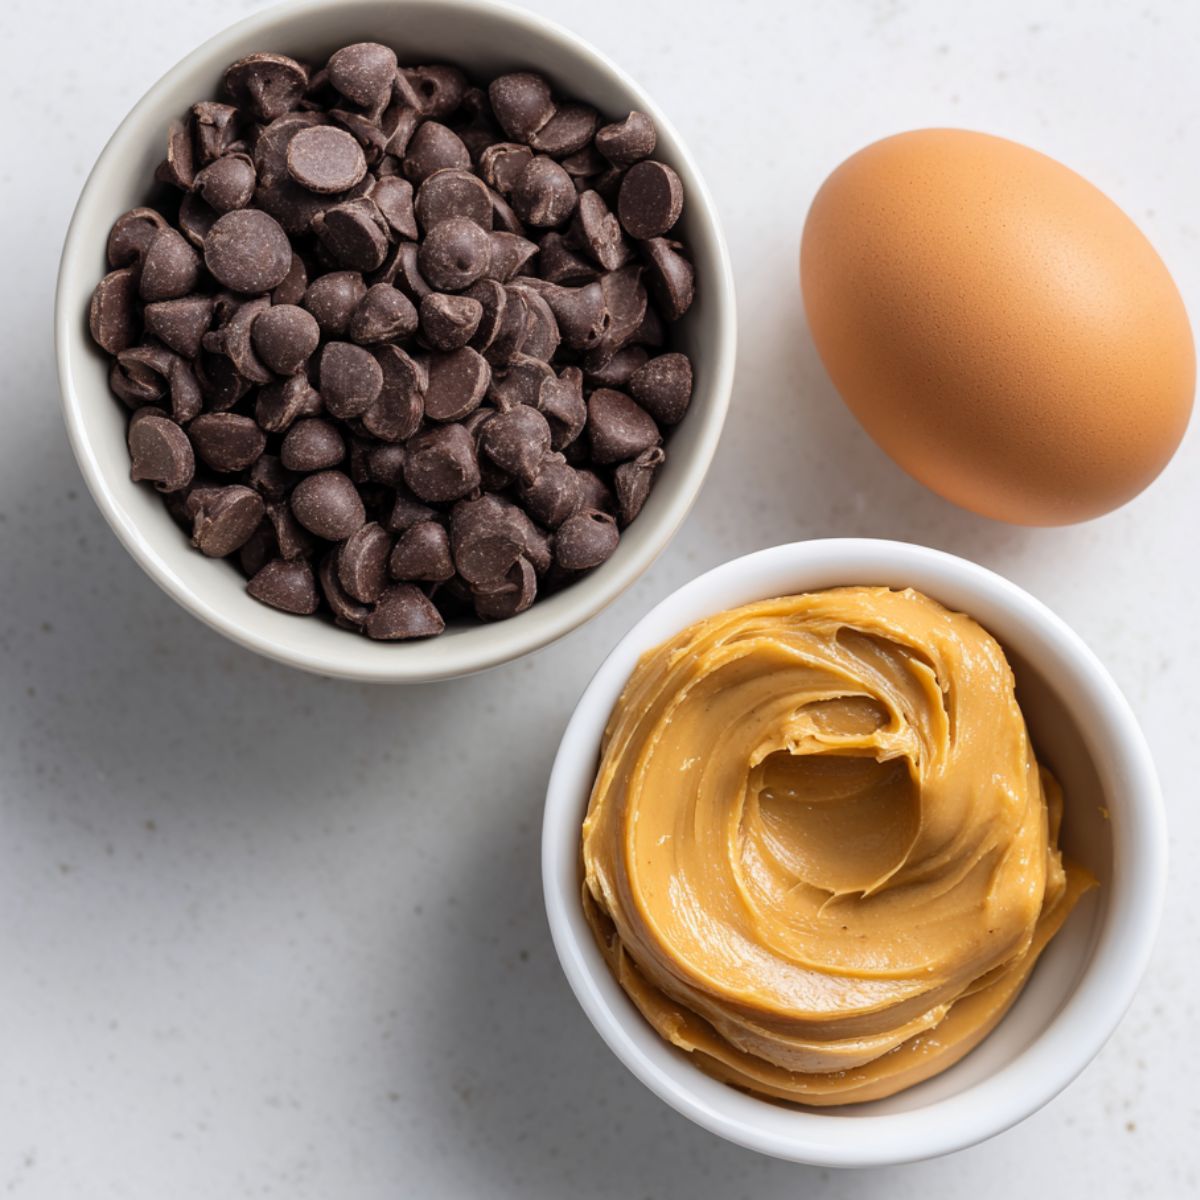
The magic of this recipe happens with just three simple ingredients:
- Large egg – Provides the necessary structure and helps bind everything together. This creates the chewy brownie bites texture that makes them so addictive.
- Chocolate chips – The star of the show that provides both structure and intense chocolate flavor. Semi-sweet works best, but dark chocolate chips create a more sophisticated taste profile.
- Creamy peanut butter – Acts as both the binding agent and adds richness. The natural oils in peanut butter create that perfect moist brownies texture. For nut-free versions, try sunflower seed butter or tahini.
See recipe card for quantities.
Instructions
Mix Everything Together
- Preheat your oven to 350°F (175°C) and grease a mini muffin tin.
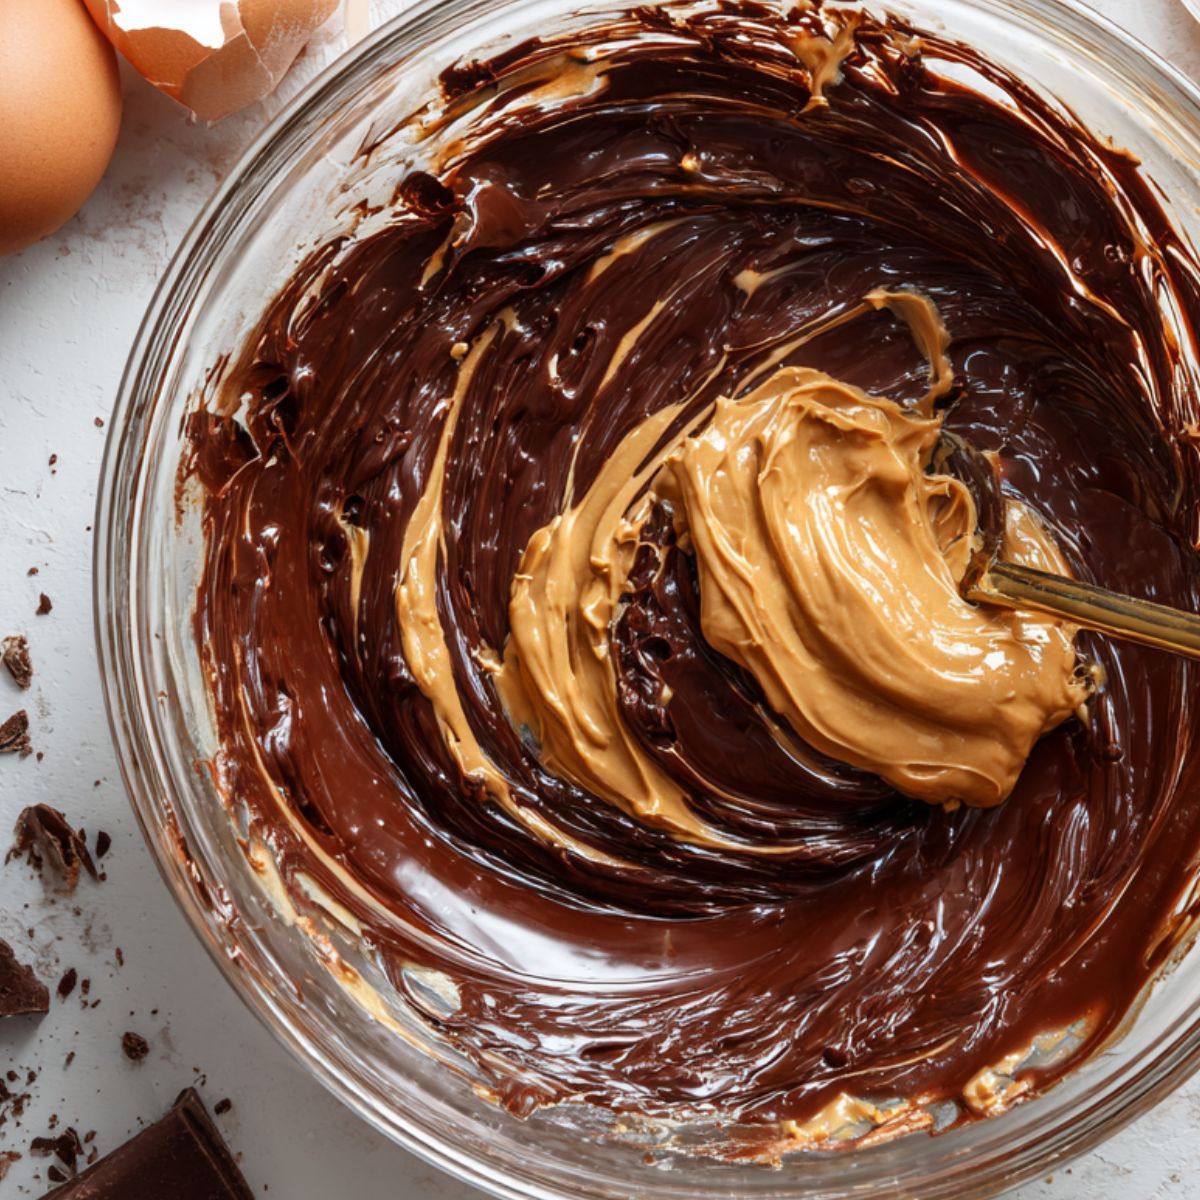
- Melt the chocolate chips in a microwave-safe bowl in 30-second intervals, stirring between each, until smooth (about 1-2 minutes total).
- Stir in the peanut butter until well combined, then beat in the egg until the batter is completely uniform and glossy.
Pro Tip: For extra smooth melting, add a teaspoon of coconut oil to the chocolate chips before microwaving.
Fill and Bake
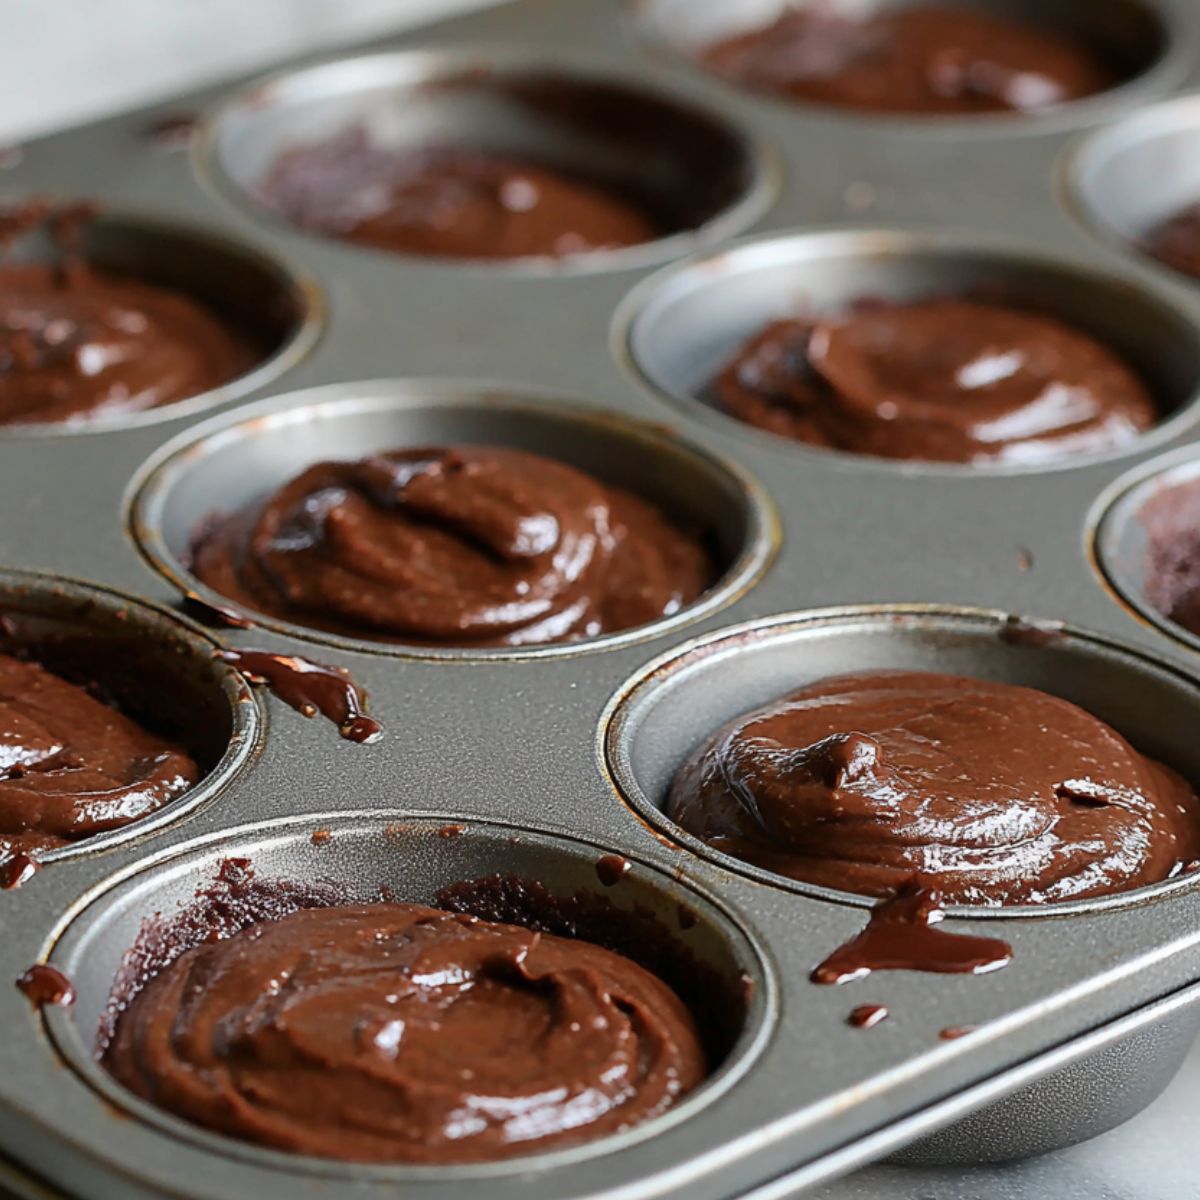
- Using a small cookie scoop or spoon, divide the batter evenly among the mini muffin cups, filling each about ⅔ full.
- Bake for 12-15 minutes, or until the tops are set but still slightly soft to the touch. The centers should still look slightly underdone – this creates that perfect gooey texture.
Expert Tip: Don't overbake! The brownie bites will continue cooking from residual heat even after removing from the oven.
Cool and Enjoy
- Let cool in the pan for 5 minutes before carefully removing.
- Use a thin knife to gently loosen the edges if needed.
- Serve warm for the ultimate chocolate experience, or let cool completely for a firmer texture.
- Step 1: Mix Everything Together
Combine the melted chocolate with peanut butter, then stir in the egg
- Step 2: Fill and Bake
Fill each muffin cup two-thirds full with batter before baking
- Step 3: Cool and Enjoy
Let brownie bites cool for a few minutes before removing and enjoying
Hints & Expert Cooking Tips
- Temperature Matters: Room temperature ingredients mix more easily and create a smoother batter. Take your egg out of the fridge 30 minutes before baking.
- Don't Overmix: Once you add the egg, mix just until combined. Overmixing can make your brownie bites tough instead of tender.
- Size Consistency: Use a small cookie scoop to ensure all your brownie bites are the same size for even baking.
- Storage Secret: Store in an airtight container with a piece of bread to maintain that perfect moist texture.
Master these small steps, and you’ll bake up Brownie Bites that wow every time; no fancy tricks required.
Substitution Options for Every Lifestyle
The beauty of these Brownie Bites? They’re incredibly adaptable. Whether you’re baking for dietary needs or just trying something new, here are some easy swaps that keep the flavor big and the prep simple:
- Gluten-Free Brownie Bites: No adjustments needed; this recipe is naturally gluten-free thanks to the minimal ingredient list. You get all the chewy, fudgy goodness without the flour.
- Keto Brownie Bites: Craving chocolate on a low-carb plan? Swap in sugar-free chocolate chips and opt for natural peanut butter with no added sugars. You'll still get that rich, indulgent bite; just keto-friendly.
- Vegan Brownie Bites: Skip the egg and mix 1 tablespoon of ground flaxseed with 3 tablespoons of water. Let it sit a few minutes to thicken; then use it as your plant-based binder. The result? Vegan brownie bites that don’t skimp on texture or taste.
No matter how you tweak them, these Brownie Bites stay true to what makes them special: easy, decadent, and made to share; or not.
Recipe Variations & Dietary Modifications
There’s more than one way to enjoy these Brownie Bites, and that’s the fun of it. Whether you’re customizing for flavor, nutrition, or the weather, these easy tweaks make the recipe work for you:
- Fudgy Brownie Bites Upgrade
Want an even richer, more indulgent version? Stir in 1 tablespoon of cocoa powder to deepen the chocolate flavor. This simple add-on makes your Brownie Bites ultra-fudgy and even harder to resist. - For Chocolate Chip Lovers
Double down on the chocolate by mixing in 2 tablespoons of mini chocolate chips. These melt into sweet little pockets, adding bursts of richness to every bite of your Brownie Bites. - Prime Bites Protein Brownie Version
Looking to sneak in some protein? Add 1 scoop of chocolate protein powder and reduce the chocolate chips to ¾ cup. You’ll keep that same chewy texture while turning your Brownie Bites into a delicious post-workout treat. - No-Bake Brownie Bites Alternative
Too hot to turn on the oven? Skip the baking step and roll the mixture into bite-sized balls instead. Chill for about 2 hours until firm. These no-bake Brownie Bites are perfect for summer snacking or on-the-go energy boosts.
Equipment
Essential Tools:
- Mini muffin tin – A 24-cup mini muffin pan works perfectly for this recipe
- Microwave-safe mixing bowl – Glass or ceramic work best for melting chocolate
- Small cookie scoop – Ensures consistent sizing and easy filling
- Wire cooling rack – Allows proper air circulation for cooling
Budget-Friendly Alternatives: If you don't have a mini muffin tin, regular muffin cups work too – just increase baking time to 18-20 minutes and expect 12 larger brownie bites instead of 24 mini ones.
Storage & Meal Prep Tips
Keeping a stash of these Brownie Bites on hand is a smart (and delicious) move. Here’s how to store, freeze, and meal prep like a pro:
- Meal Prep Magic
Got a serious sweet tooth or a house full of snackers? Double the recipe and freeze half for those future chocolate emergencies. These Brownie Bites thaw quickly and taste just as indulgent as the day you made them. - Fridge Storage
Place your Brownie Bites in an airtight container and refrigerate for up to one week. Bonus tip—they actually taste even better the next day as the chocolate flavors settle and deepen. It’s like they mature into their best selves overnight. - Freezing Instructions
Yes, Brownie Bites freeze beautifully. Wrap each one individually in plastic wrap, then tuck them into a freezer-safe bag. They’ll keep well for up to 3 months. When you’re ready for a treat, just thaw at room temperature for about 30 minutes—or microwave for 15–20 seconds for that cozy, fresh-from-the-oven feel.
The Brownie Bites Secret I Almost Didn’t Share
Okay, confession time; I wasn’t going to tell anyone this. But if you’ve made Brownie Bites before and felt like they were good but not quite unforgettable—this little trick changes everything. After years of tweaking and testing, I discovered that letting the batter rest for just 10 minutes before baking unlocks next-level magic.
Why? It gives the ingredients time to fully hydrate, which deepens the chocolate flavor and smooths out the texture. The result? Brownie Bites that are richer, fudgier, and melt-in-your-mouth delicious. Trust me, once you try it, you'll never skip the pause again.
FAQ
Can I bake brownies in mini muffin tins?
Yes, mini muffin tins are perfect for making Brownie Bites. They help create those irresistible crispy edges with soft, gooey centers. Just be sure to adjust your baking time; typically 10–14 minutes is all you need.
How do you keep brownie bites from sticking to the pan?
To prevent sticking, generously grease your mini muffin tin with non-stick spray or use mini paper liners. Let the Brownie Bites cool a few minutes before gently loosening them with a butter knife or offset spatula.
What to make in a brownie bite pan?
Aside from classic Brownie Bites, you can get creative; mini cheesecakes, cookie cups, frittatas, or even no-bake treats pressed into the pan and chilled. It’s a versatile little tool for both sweet and savory bites.
Are Costco brownie bites good?
Costco’s brownie bites are popular for a reason; they’re soft, chocolatey, and convenient. But homemade Brownie Bites? They’re fresher, customizable, and honestly hard to beat when made with love (and fewer preservatives).
One Bite and You're Hooked
These 3-ingredient Brownie Bites are proof that dessert magic doesn’t need a long ingredient list or hours of baking. With their rich chocolate flavor and perfectly chewy texture, they’re an instant favorite; and simple enough that even the kids can jump in and help. It’s one of those recipes you'll find yourself making on repeat.
Ready to whip up your own batch of these chocolatey gems? Give the recipe a try, then drop a comment below and tell us how yours turned out. And if you’re into quick, no-fuss treats like this, don’t miss our Tiramisu Truffles Recipe and No-Bake Lemon Truffles Recipe; they’re just as easy and totally irresistible. Don’t forget to rate the recipe and share your own twist; we love hearing from fellow dessert lovers like you!
Related
Looking for other recipes like this? Try these:


Pairing
These are my favorite dishes to serve with [this 3 Ingredient Brownie Bites Recipe:


3-Ingredient Brownie Bites
Equipment
- 1 Mini muffin tin
- 1 Microwave-safe mixing bowl
- 1 Small cookie scoop or spoon
- 1 Wire cooling rack
Ingredients
- 1 cup Chocolate chips Semi-sweet or dark chocolate
- ½ cup Peanut butter Creamy; natural recommended
- 1 Large egg Room temperature if possible
Instructions
- Preheat oven to 350°F and grease mini tin.
- Melt chocolate chips in microwave.
- Stir in peanut butter until smooth.
- Add egg and mix until glossy.
- Let batter rest for 10 minutes.
- Scoop batter into mini muffin cups.
- Bake for 12–15 minutes.
- Cool in pan for 5 minutes, then remove.
- Serve warm or let cool completely.
Leave a Reply