

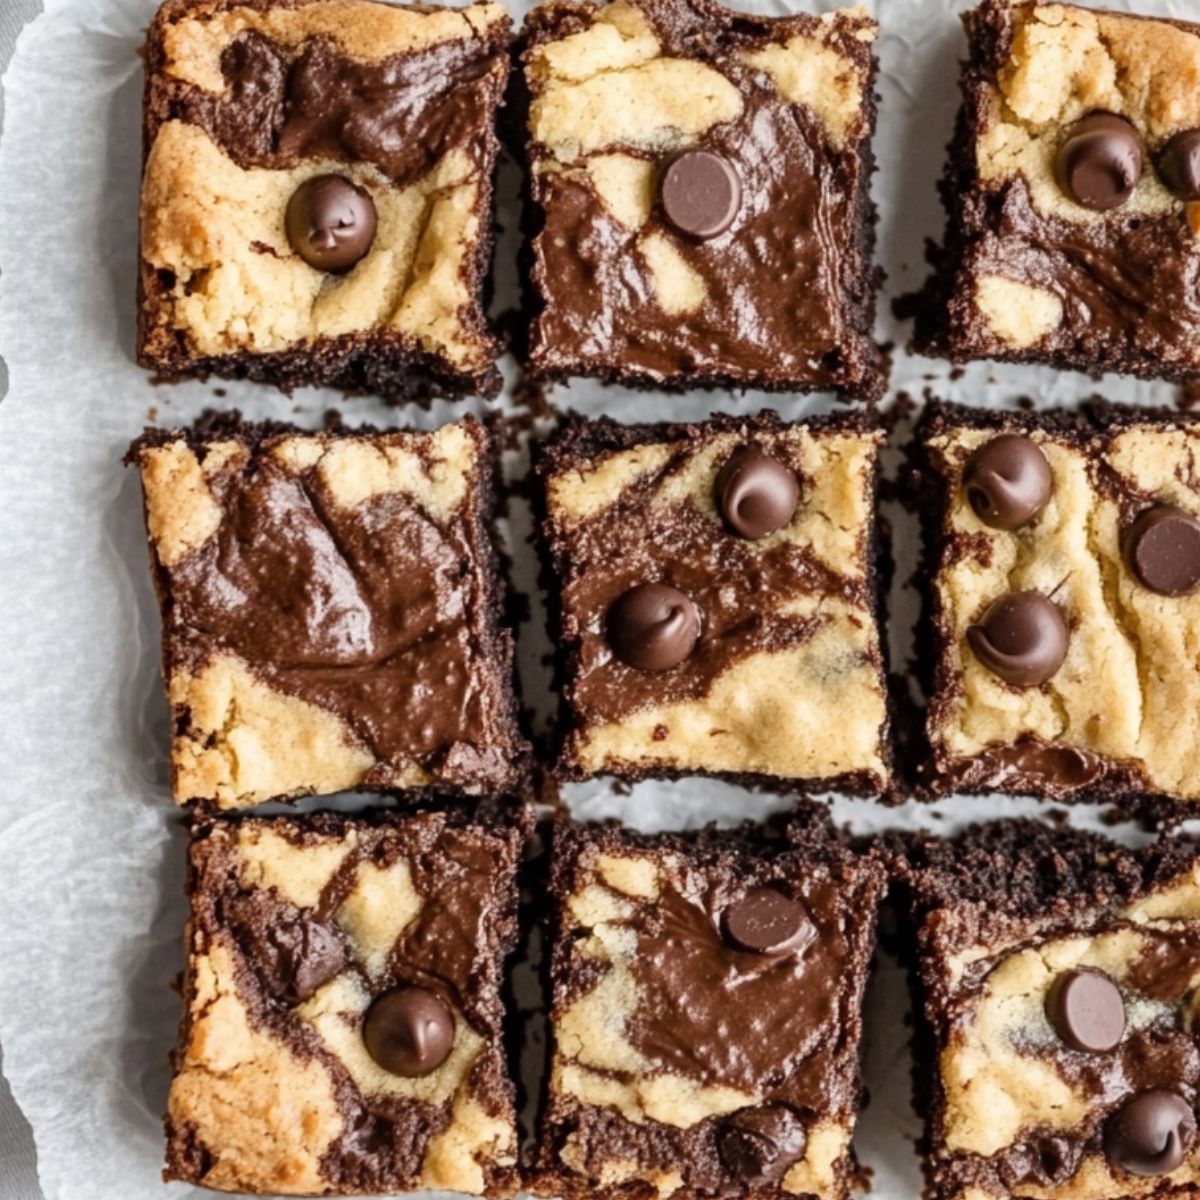
Let me tell you a secret... once you try Brown Butter Brookies, there's no going back.
Picture this: golden brown butter bubbling away on the stove, its nutty aroma filling your kitchen with the promise of something truly special. That’s the heart of these Brown Butter Brookies—a dessert that’s not just delicious, but legendary. We’re talking about the ultimate combo: rich, fudgy brownie on one side, and soft, chewy chocolate chip cookie on the other. Why choose when you can have both?
This recipe was born from countless hours of baking, tweaking, and—let’s be honest—taste-testing (someone had to do it!). The magic lies in the brown butter, which gives these brookies a warm, caramelized depth that makes the chocolate sing and the cookie layer downright addictive.
Whether you’re baking for a party, a bake sale, or just because Tuesday needed a little extra joy, these Brown Butter Brookies are the kind of treat that gets talked about long after the plate is empty. Trust me, once you share them, folks will be begging for the recipe.
So, go ahead—grab your whisk and let’s make something unforgettable. Because life’s too short to settle for either cookies or brownies… when Brown Butter Brookies let you have it all.
What Makes These Brown Butter Brookies Truly Stand Out
Let’s get one thing straight, Brown Butter Brookies aren’t just your typical cookie-brownie mashup. Sure, brookies have been popping up in kitchens and bake sales for years, but these? These are on a whole other level.
The secret lies in that golden elixir: brown butter. While most recipes stick to plain butter, this one goes the extra, flavor-packed mile by browning it first. That toasty, nutty aroma isn’t just a bonus—it’s a game-changer. It infuses both the cookie dough and the brownie batter with a deep, caramelized richness that regular brookies can’t even begin to touch. One bite, and you’ll understand why Brown Butter Brookies deserve their own category of delicious.
And let’s talk versatility. These Brown Butter Brookies are a hit at everything from birthday parties to bake sales, and yes, even as an “accidentally-on-purpose” breakfast treat (we’re not judging). Top them with a scoop of vanilla ice cream for a show-stopping dessert, or sneak one alongside your morning coffee for a cozy, indulgent start to your day.
One batch of these Brown Butter Brookies and you’ll see, they don’t just satisfy your sweet tooth, they elevate it.
Jump to:
Ingredients
For the Brown Butter Cookie Layer:
- Unsalted butter, for browning
- Light brown sugar, packed
- Granulated sugar
- Large eggs, room temperature
- Vanilla extract
- All-purpose flour
- Baking soda
- Salt
- Semi-sweet chocolate chips
For the Brownie Layer:
- Chocolate chips
- Unsalted butter, for browning
- Granulated sugar
- Light brown sugar
- Large eggs plus egg yolk
- Vanilla extract
- Unsweetened cocoa powder
- All-purpose flour
- Salt
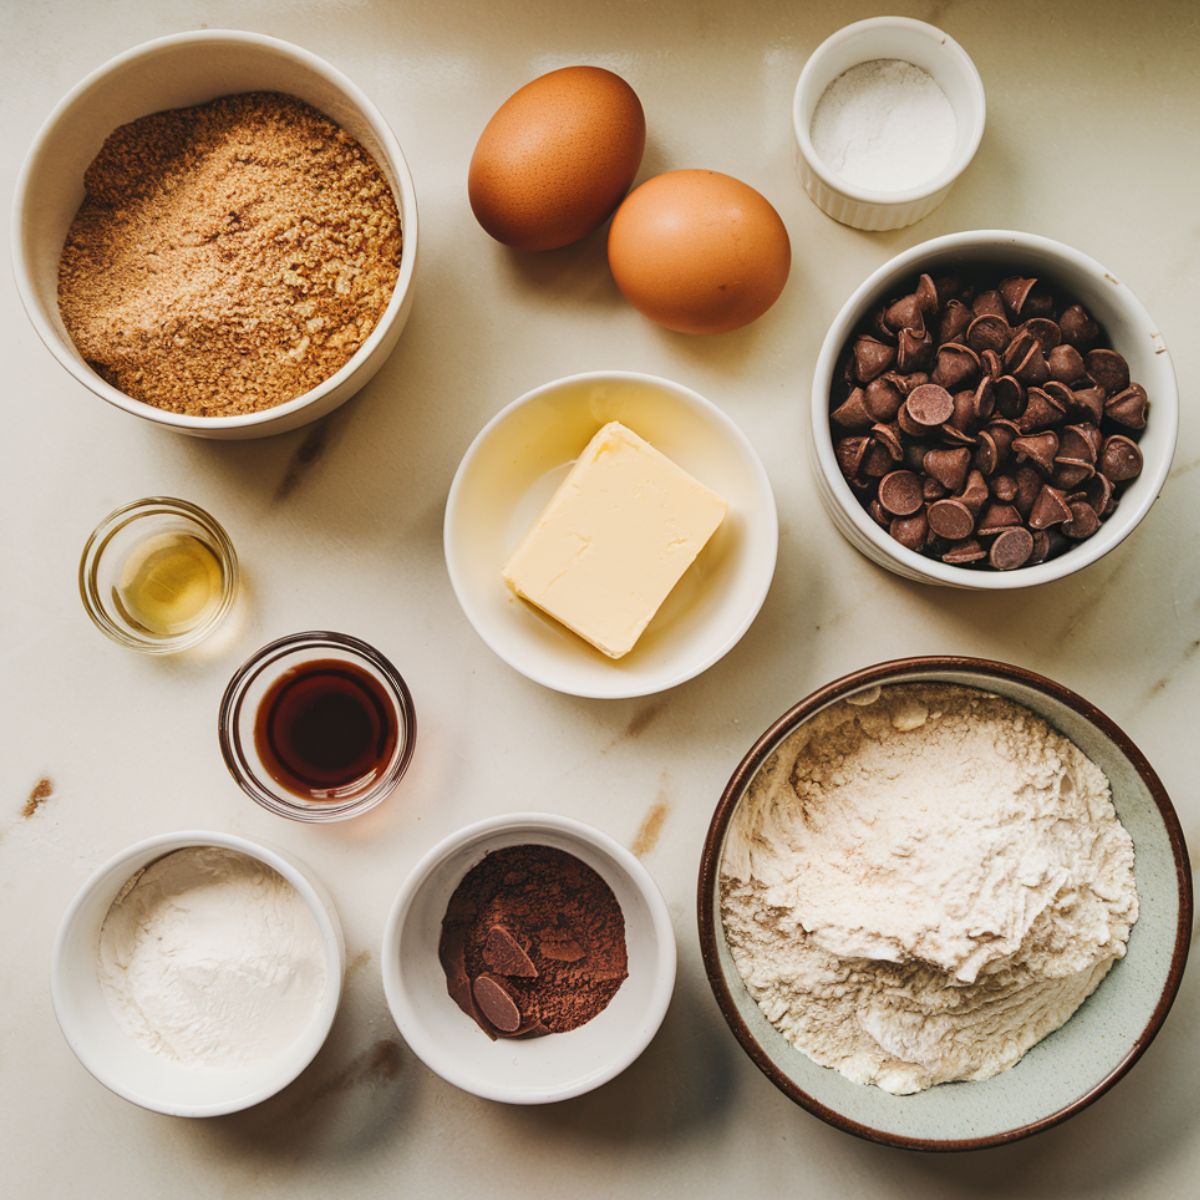
See recipe card for quantities.
Why These Ingredients Matter (Yes, Every One!)
Let’s break it down, these aren’t just random pantry grabs. Each ingredient in these Brown Butter Brookies plays a key role in creating that irresistible, bakery-worthy texture and flavor:
- Brown butter: This isn’t just butter—it’s transformed butter. Browning it deepens the flavor, bringing out rich, nutty, almost toffee-like notes that make these Brown Butter Brookies unforgettable. It’s a tiny extra step that packs a massive flavor punch. Totally worth it.
- A mix of sugars: There’s science behind this sweet duo! Brown sugar lends moisture and chewiness (that perfect cookie texture), while granulated sugar adds just the right structure and slight crisp. Together, they strike a beautiful balance in both the cookie and brownie layers.
- Extra egg yolk in the brownie layer: Think of this as your fudginess insurance. That extra yolk gives the brownies a richer, silkier texture—super moist without being overly dense.
- Chocolate chips in both layers: Because there’s no such thing as too much chocolate. Having chips in both the brownie and cookie portions ensures every bite is studded with melty, gooey goodness. No dry bits allowed here.
Easy Substitutions & Tasty Tweaks
Because life doesn’t always follow the recipe, and sometimes we love a remix:
- Going gluten-free? Swap the all-purpose flour with a 1:1 gluten-free baking blend. Look for one with xanthan gum for the best texture.
- Need a dairy-free option? Use plant-based butter sticks that are specifically labeled as browning-friendly (not all vegan butters can brown—double-check the packaging!).
- Feeling adventurous? Stir in about ½ cup of your favorite mix-ins. Try chopped pecans, toffee bits, or white chocolate chips to add even more fun (and flavor) to your brookie masterpiece.
Instructions
Brown the Butter (Both Layers)
- Place butter for each layer in separate light-colored saucepans over medium heat.
- As the butter melts, it will begin to foam. Stir occasionally.
- Watch carefully as the color changes from yellow to golden to a rich amber brown (about 5-8 minutes).
- Look for small brown bits forming at the bottom and a nutty aroma.
- Remove from heat immediately once browned to prevent burning.
- Pour each batch of browned butter into separate heatproof bowls, making sure to scrape all the browned bits (that's where the flavor is!).
- Allow to cool for about 10 minutes before using in the batters.
Pro tip: Use a light-colored pan when browning butter so you can easily see the color change. Dark pans make it harder to tell when the butter has properly browned.
Prepare the Cookie Dough
- Preheat oven to 350°F (175°C). Line a 9×13-inch baking pan with parchment paper, leaving overhang on all sides for easy removal.
- In a large bowl, combine cooled brown butter for the cookie layer with both sugars. Mix until well combined.
- Add eggs and vanilla extract. Beat until mixture becomes lighter in color and slightly fluffy.
- In a separate bowl, whisk together flour, baking soda, and salt.
- Gradually add dry ingredients to wet ingredients, mixing just until combined.
- Fold in chocolate chips.
- Set cookie dough aside while preparing the brownie batter.
Time-saving tip: The cookie dough can be made up to 24 hours in advance and refrigerated. Just bring it back to room temperature before assembling.
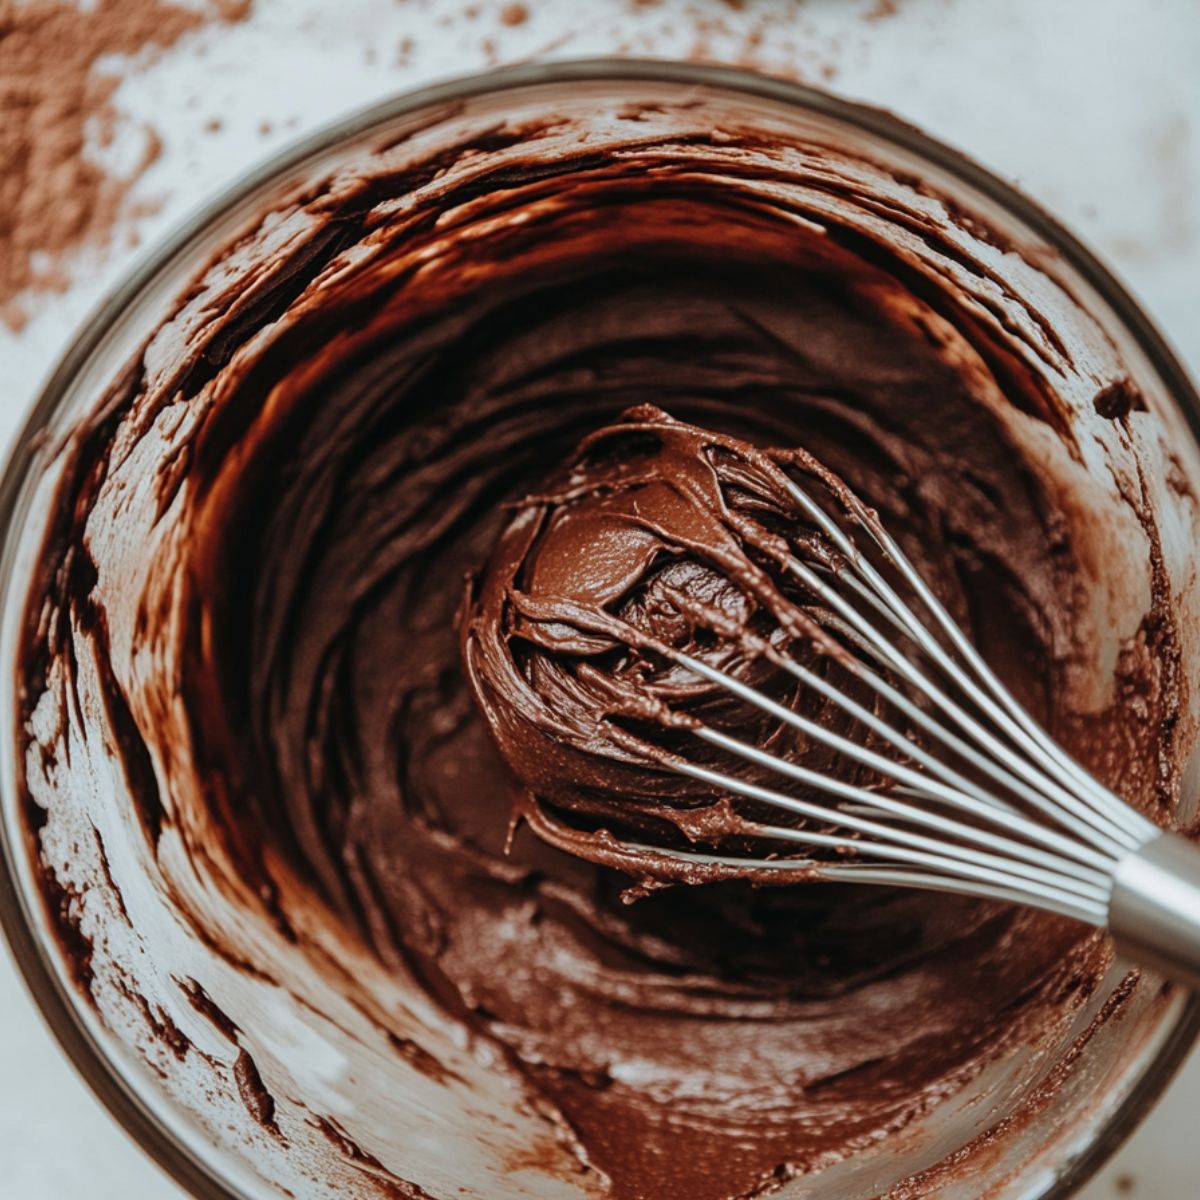
Make the Brownie Batter
- In a large bowl, whisk together cooled brown butter for the brownie layer with both sugars until well combined.
- Add eggs, egg yolk, and vanilla extract. Beat until mixture is smooth and well incorporated.
- Sift in cocoa powder to avoid lumps.
- Add flour and salt, mixing until just combined. Don't overmix.
- Fold in chocolate chips.
Expert tip: For an extra fudgy brownie layer, mix the batter just until the ingredients are incorporated. Overmixing can lead to a cakey texture.
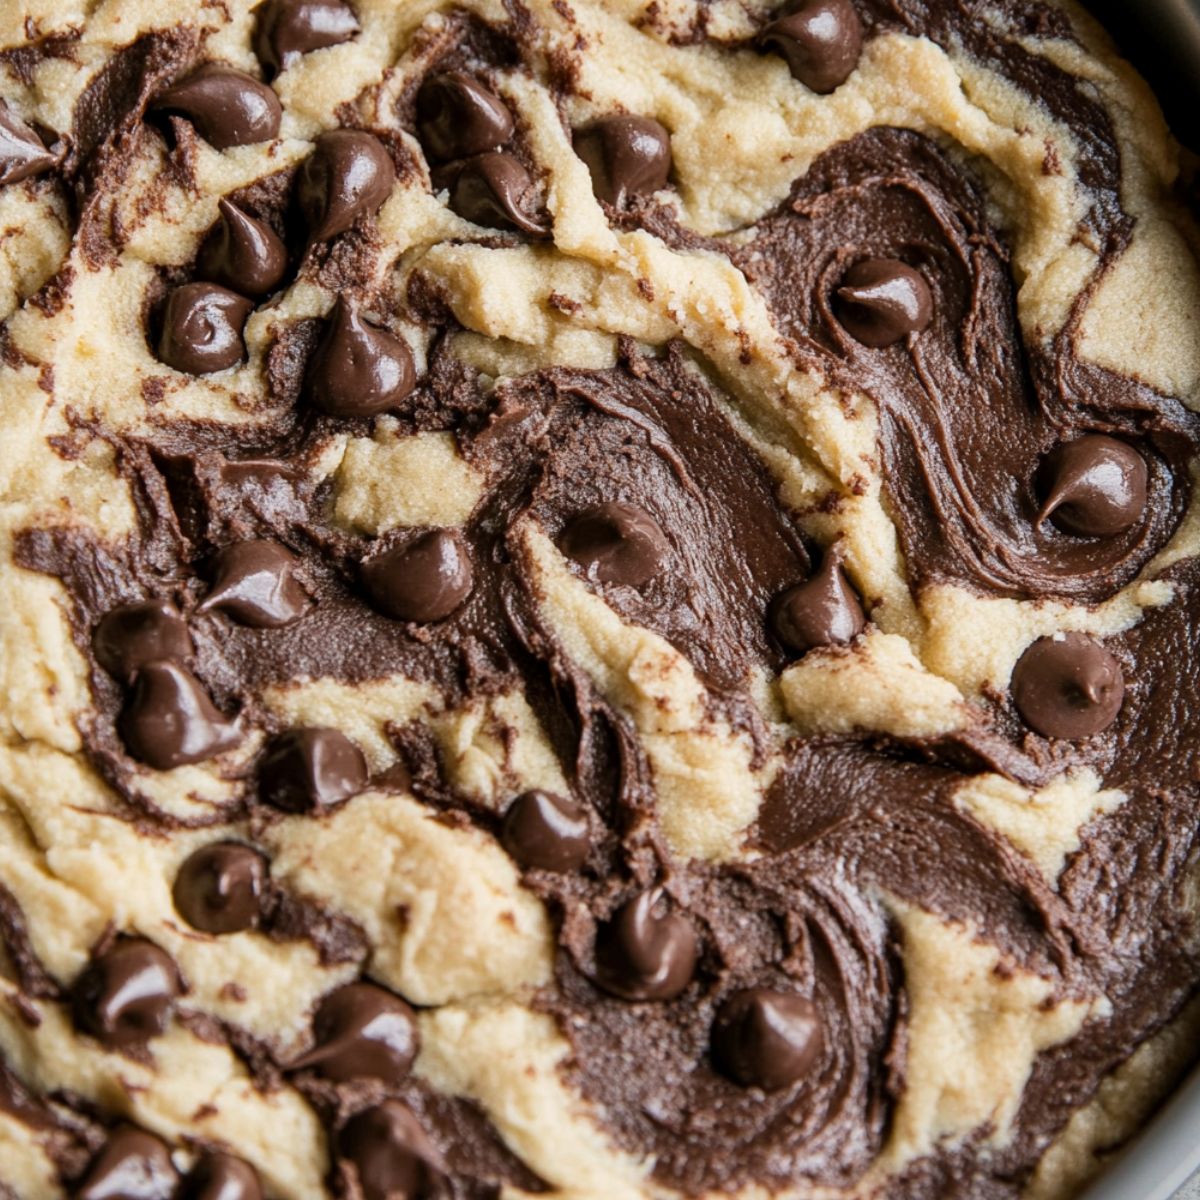
Assemble and Bake
- Spread about two-thirds of the cookie dough evenly in the bottom of the prepared pan.
- Pour the brownie batter over the cookie dough layer and spread it evenly.
- Drop spoonfuls of the remaining cookie dough on top of the brownie layer.
- Use a knife or skewer to gently swirl the top layers together for a marbled effect.
Baking instructions:
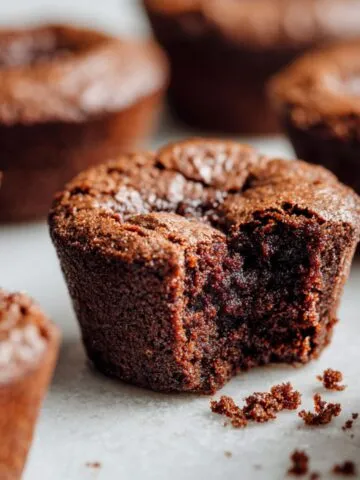
- Bake in preheated oven for 25-30 minutes. The brookies are done when the edges are set and the center is no longer jiggly.
- For gooier brookies, aim for the shorter baking time. For more set brookies, bake the full 30 minutes.
- Allow to cool completely in the pan on a wire rack before cutting.
The perfect test: A toothpick inserted in the center should come out with a few moist crumbs, but not wet batter.
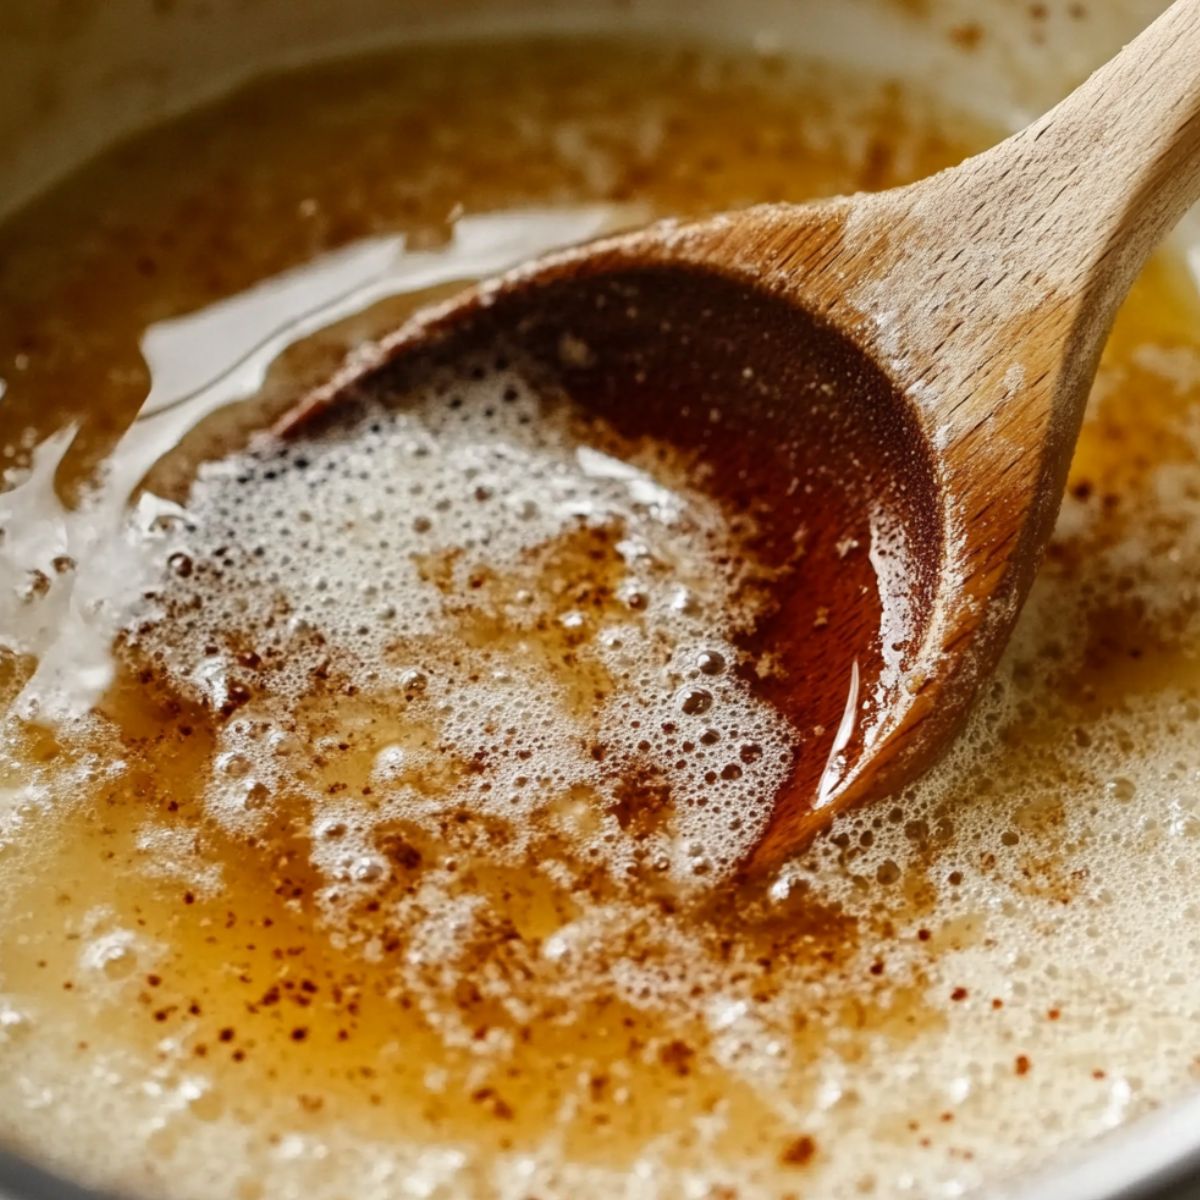
- Step 1: Brown the Butter (Both Layers)
Browning butter until it’s golden and aromatic is the flavor foundation of this recipe.
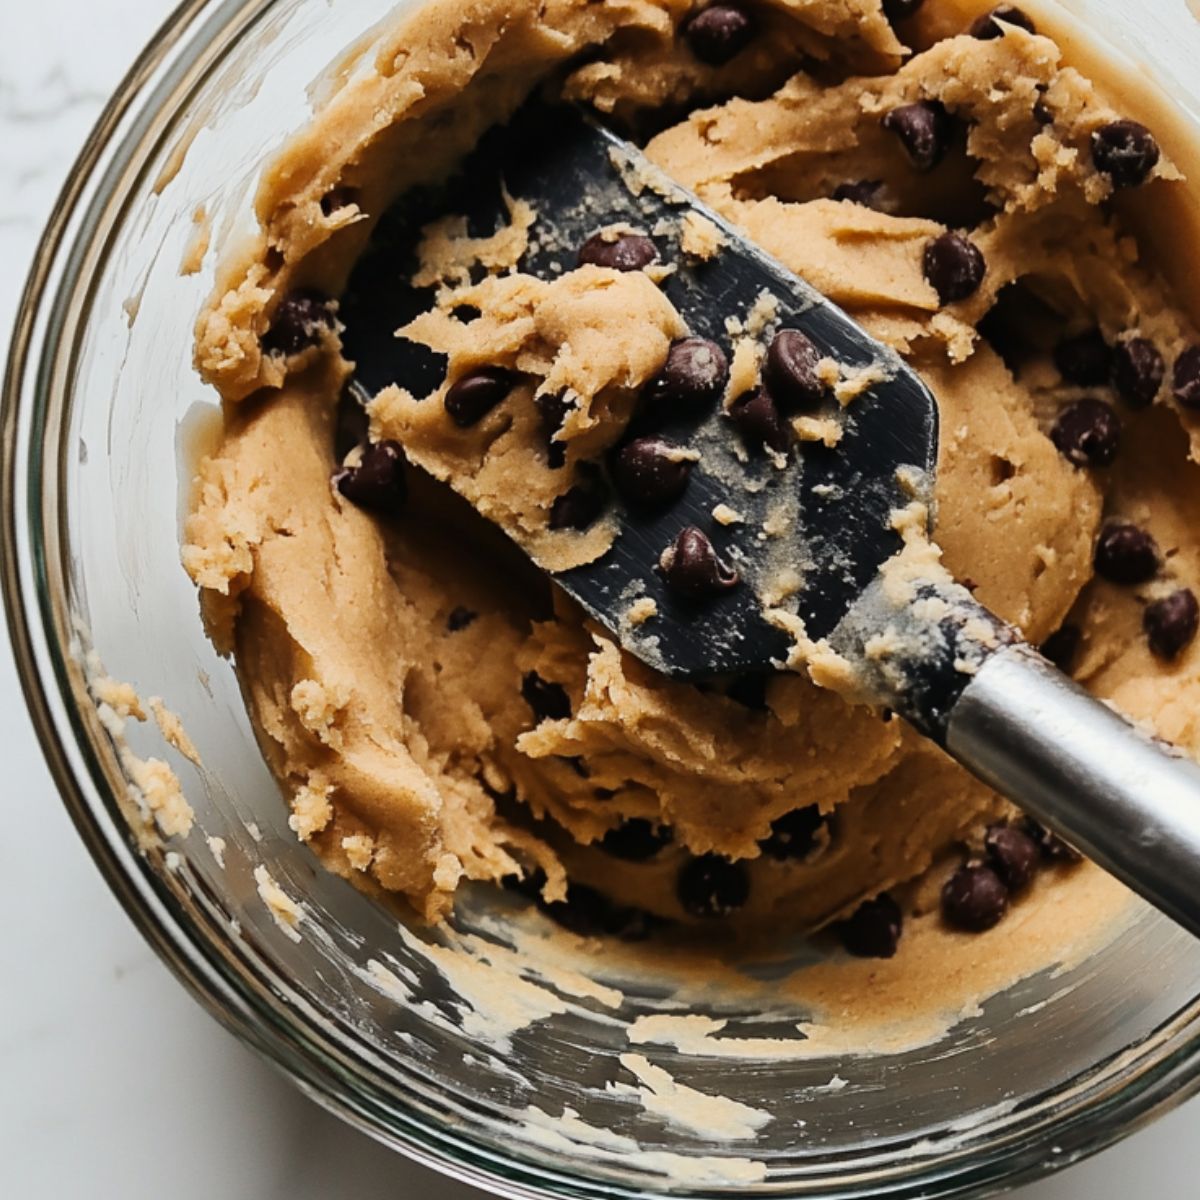
- Step 2: Prepare the Cookie Dough
Combine the brown butter with sugars, eggs, and flour to create a soft, chewy cookie dough layer.
- Step 3: Make the Brownie Batter
Rich cocoa brownie batter brings fudgy depth to every bite.
- Step 4: Assemble and Bake
Spread and swirl both layers together before baking for that signature brookie look.
Hints & Expert Cooking Tips for Brown Butter Brookies
Baking up the perfect Brown Butter Brookies isn’t just about the ingredients—it’s also about the technique. Here are some pro-level pointers to help you nail it every single time (and look like a dessert genius while doing it):
- Avoid the #1 rookie mistake—overbaking: If your brookies look just a little gooey in the center when you pull them out, you’re doing it right. They’ll continue to set as they cool. Overbaking leads to dry, sad bars—and no one wants that.
- Mastering brown butter like a boss: This is the flavor foundation of your brookies, so don’t rush it. Keep a close eye—brown butter can go from beautifully golden to burnt toast real quick. Once you see those amber bits at the bottom and smell a nutty aroma, remove it from the heat. When in doubt, pull it early. You can’t un-burn butter.
- Room temperature eggs = smoother batter: Cold eggs straight from the fridge can make your batter lumpy and uneven. Forgot to take them out? No problem. Pop them in a bowl of warm water for 5–10 minutes while you prep the other ingredients. Boom—ready to roll.
- Use the right pan for golden perfection: A metal baking pan gives you those crisp edges and evenly baked layers that make Brown Butter Brookies shine. Glass pans are okay in a pinch, but they retain heat longer, so your brookies may need a few extra minutes (and a watchful eye).
- Cut like a pro: Want those clean, bakery-style squares? Cool your brookies completely, then refrigerate for 1–2 hours before cutting. Use a sharp knife and wipe it clean between cuts—yes, every single time. It’s the difference between “homey” and “hello, Pinterest-worthy!”
Recipe Variations & Dietary Modifications
One of the most delightful things about Brown Butter Brookies is just how versatile they are. Whether you’re looking to experiment with flavor or need to accommodate dietary preferences, this recipe offers plenty of delicious wiggle room.
Flavor Twists
- Salted Brown Butter Brookies
Add a pinch of flaky sea salt over the top before baking for that perfect sweet-and-salty contrast. It brings out the brown butter's depth beautifully. - Nutty Brown Butter Brookies
Mix in about ½ cup of chopped walnuts or pecans into either layer. They add a subtle crunch and pair naturally with the nutty richness of brown butter. - Peanut Butter Brookies
Swirl ⅓ cup of warmed peanut butter into the brownie layer before baking. It creates a decadent ripple and a satisfying nutty twist. - Espresso Brown Butter Brookies
Incorporate 1 tablespoon of espresso powder into the brownie batter. It won’t taste like coffee but will deepen the chocolate flavor, making it more intense and luxurious.
Dietary Adaptations
- Gluten-Free Brown Butter Brookies
Substitute the all-purpose flour with a 1:1 gluten-free flour blend in both layers. For best results, choose one that includes xanthan gum to preserve the brookies’ chewy texture. - Dairy-Free Option
Opt for plant-based butter that is suitable for browning—some vegan butters won’t brown properly, so check the label. Use dairy-free chocolate chips to keep it fully dairy-free and still delicious. - Lower Sugar Version
You can reduce the sugar in both layers by up to 25%. Expect a slight change in texture (a bit less chew, a little more cake-like), but the flavor will still shine thanks to the brown butter and chocolate.
Equipment
- Light-colored saucepan: Essential for browning butter properly so you can see the color change.
- 9×13-inch baking pan: For the perfect thickness of brookies. Metal pans provide more even baking than glass.
- Parchment paper: Makes removal and slicing much easier.
- Stand mixer or hand mixer: While you can mix by hand, a mixer makes the process much faster.
- Rubber spatula: For folding in chocolate chips and scraping every bit of brown butter from the pan.
- Whisk: For properly combining dry ingredients.
Budget alternative: If you don't have a stand mixer, a hand mixer works just as well. And if you don't have parchment paper, you can simply grease the pan well.
Storage & Meal Prep Tips
Brown Butter Brookies aren’t just amazing fresh from the oven—they also store and freeze beautifully. Whether you're planning ahead or saving leftovers (if there are any), these tips will help you keep them tasting bakery-fresh.
Counter Storage
- Store cut Brown Butter Brookies in an airtight container at room temperature for up to 3 days.
- If stacking, place a sheet of parchment paper between layers to prevent sticking.
Refrigerator Storage
- Keep in an airtight container in the fridge for up to 1 week.
- For the best texture, let the brookies sit at room temperature for about 30 minutes before serving.
Freezing Instructions
- Wrap individual brookies or the entire uncut slab tightly in plastic wrap, followed by a layer of aluminum foil.
- Store in the freezer for up to 3 months.
- To thaw, transfer to the refrigerator overnight or let sit at room temperature for about 2 hours.
Make-Ahead Option
- Let both come to room temperature before assembling and baking for even results.
- Both the cookie dough and brownie batter can be prepared up to 24 hours in advance.
- Store each component separately in airtight containers in the refrigerator.
The Secret Flavor Bomb Behind Next-Level Brown Butter Brookies
Let me let you in on a little trick that most bakers won’t share—one that transforms already-delicious Brown Butter Brookies into unforgettable, bakery-level magic.
Here’s the move: brown your butter for both the cookie and brownie layers a day before you bake. Then tuck it into the fridge overnight. Why? Because as that browned butter rests, something quietly wonderful happens—those toasted milk solids (yep, the little brown bits) settle in and deepen the flavor. The result? Butter that doesn’t just taste rich and nutty—it takes on a caramelized complexity that sets these Brown Butter Brookies apart from anything else.
So when you’re ready to bake, bring that pre-browned butter back to room temperature and use it in your batters. You’ll notice the difference immediately—not just in taste, but in aroma, texture, and that oh-so-satisfying “wow” factor that makes Brown Butter Brookies a true showstopper.
It’s one of those little secrets you usually pass down in hushed kitchen conversations—but lucky for you, I’m spilling it here. Because these Brown Butter Brookies deserve nothing less than their full flavor potential.
FAQ
How do you know when brookies are done?
Brookies are done when the edges look set and lightly golden, and the center no longer appears wet—just slightly underdone. This is key. They’ll continue to firm up as they cool. A toothpick inserted into the center should come out with a few moist crumbs, not raw batter. Overbaking can dry them out, so trust the visual cues more than the clock.
Does brown butter change cookie texture?
Yes—and in the best way. Brown butter reduces the water content slightly, which can lead to a slightly denser, chewier texture. At the same time, its rich, nutty flavor makes every bite more complex. In Brown Butter Brookies, it enhances both layers with a toasty depth that regular butter just can’t deliver.
Why are my brown butter cookies spreading too much?
If your Brown Butter Brookies or cookies are spreading more than you'd like, the most common culprit is overly warm butter. After browning, butter needs time to cool before mixing—otherwise, it can make your dough too soft, causing it to spread in the oven. Another reason could be inaccurate flour measurement; too little flour leads to thinner, flatter results. Be sure to spoon and level your flour (or better yet, use a kitchen scale for accuracy). Lastly, consider chilling the dough for 20–30 minutes before baking. This helps solidify the fats and gives your brookies better structure, especially if your kitchen runs warm.
How long do brookie cookies last?
Brown Butter Brookies keep well for several days. Store them in an airtight container at room temperature for up to 3 days, or in the refrigerator for up to a week. For longer storage, freeze them for up to 3 months. Bring to room temperature (or warm slightly) before serving for the best flavor and texture.
Can’t Choose Between Cookies and Brownies? Now You Don’t Have To.
If you’ve ever stood in the kitchen, torn between baking cookies or brownies, friend, let me introduce you to your new favorite sweet fix: Brown Butter Brookies. They’re rich, chewy, chocolatey, and kissed with that irresistible, nutty brown butter magic that takes them from good to legendary. Yes, the browning step adds a couple of minutes, but trust me—it’s the flavor upgrade you didn’t know you needed. You get the best of both worlds in every single bite: a fudgy brownie base, a golden cookie top, and melty chocolate nestled throughout.
These beauties are perfect for bake sales, potlucks, birthdays, or hey, even a random Tuesday when your sweet tooth won’t quit. And if you’re already daydreaming about your next bake, might I suggest my Cheesecake Red Velvet Brownie for a truly indulgent swirl situation, or the German Chocolate Poke Cake Recipe, which is basically a hug in cake form (just wait till you taste that coconut-pecan topping).
So go ahead, whip up a batch, snap a pic before they disappear (they will disappear), and drop a comment below to tell me how it went. I love seeing your kitchen wins. Happy baking, and welcome to Team Brookie.
Related
Looking for other recipes like this? Try these:


Pairing
These are my favorite dishes to serve with this Brown Butter Brookies recipe:


Homemade Brown Butter Brookies
Equipment
- 1 Light-colored saucepan
- 1 9x13 inch baking pan
- 1 Parchment paper
- 1 Mixing bowls
- 1 Whisk
- 1 Rubber spatula
- 1 Hand or stand mixer
- 1 Cooling rack
Ingredients
Cookie Dough Layer
- 1 cup unsalted butter browned
- 1 cup light brown sugar packed
- ½ cup granulated sugar
- 2 large eggs room temperature
- 2 teaspoon vanilla extract
- 2 ¼ cups all-purpose flour
- 1 teaspoon baking soda
- ½ teaspoon salt
- 1 ½ cups semi-sweet chocolate chips
Brownie Layer
- ½ cup unsalted butter browned
- 1 cup granulated sugar
- ½ cup light brown sugar packed
- 2 large eggs
- 1 egg yolk
- 1 teaspoon vanilla extract
- ¾ cup unsweetened cocoa powder sifted
- ¾ cup all-purpose flour
- ½ teaspoon salt
- ½ cup chocolate chips
Instructions
- Brown butter for both layers until golden and aromatic; let cool.
- Prepare cookie dough by mixing browned butter, sugars, eggs, and flour.
- Whisk brownie layer ingredients to form rich batter.
- Layer cookie dough, then brownie batter, then swirl with more cookie dough.
- Bake at 350°F for 25–30 mins until set at edges and slightly soft center.
- Cool completely before slicing for clean brookie squares.
Leave a Reply